Get 30+ FREE Crochet Patterns — Join Our Newsletter
Crochet Snowflake Flurry Pattern
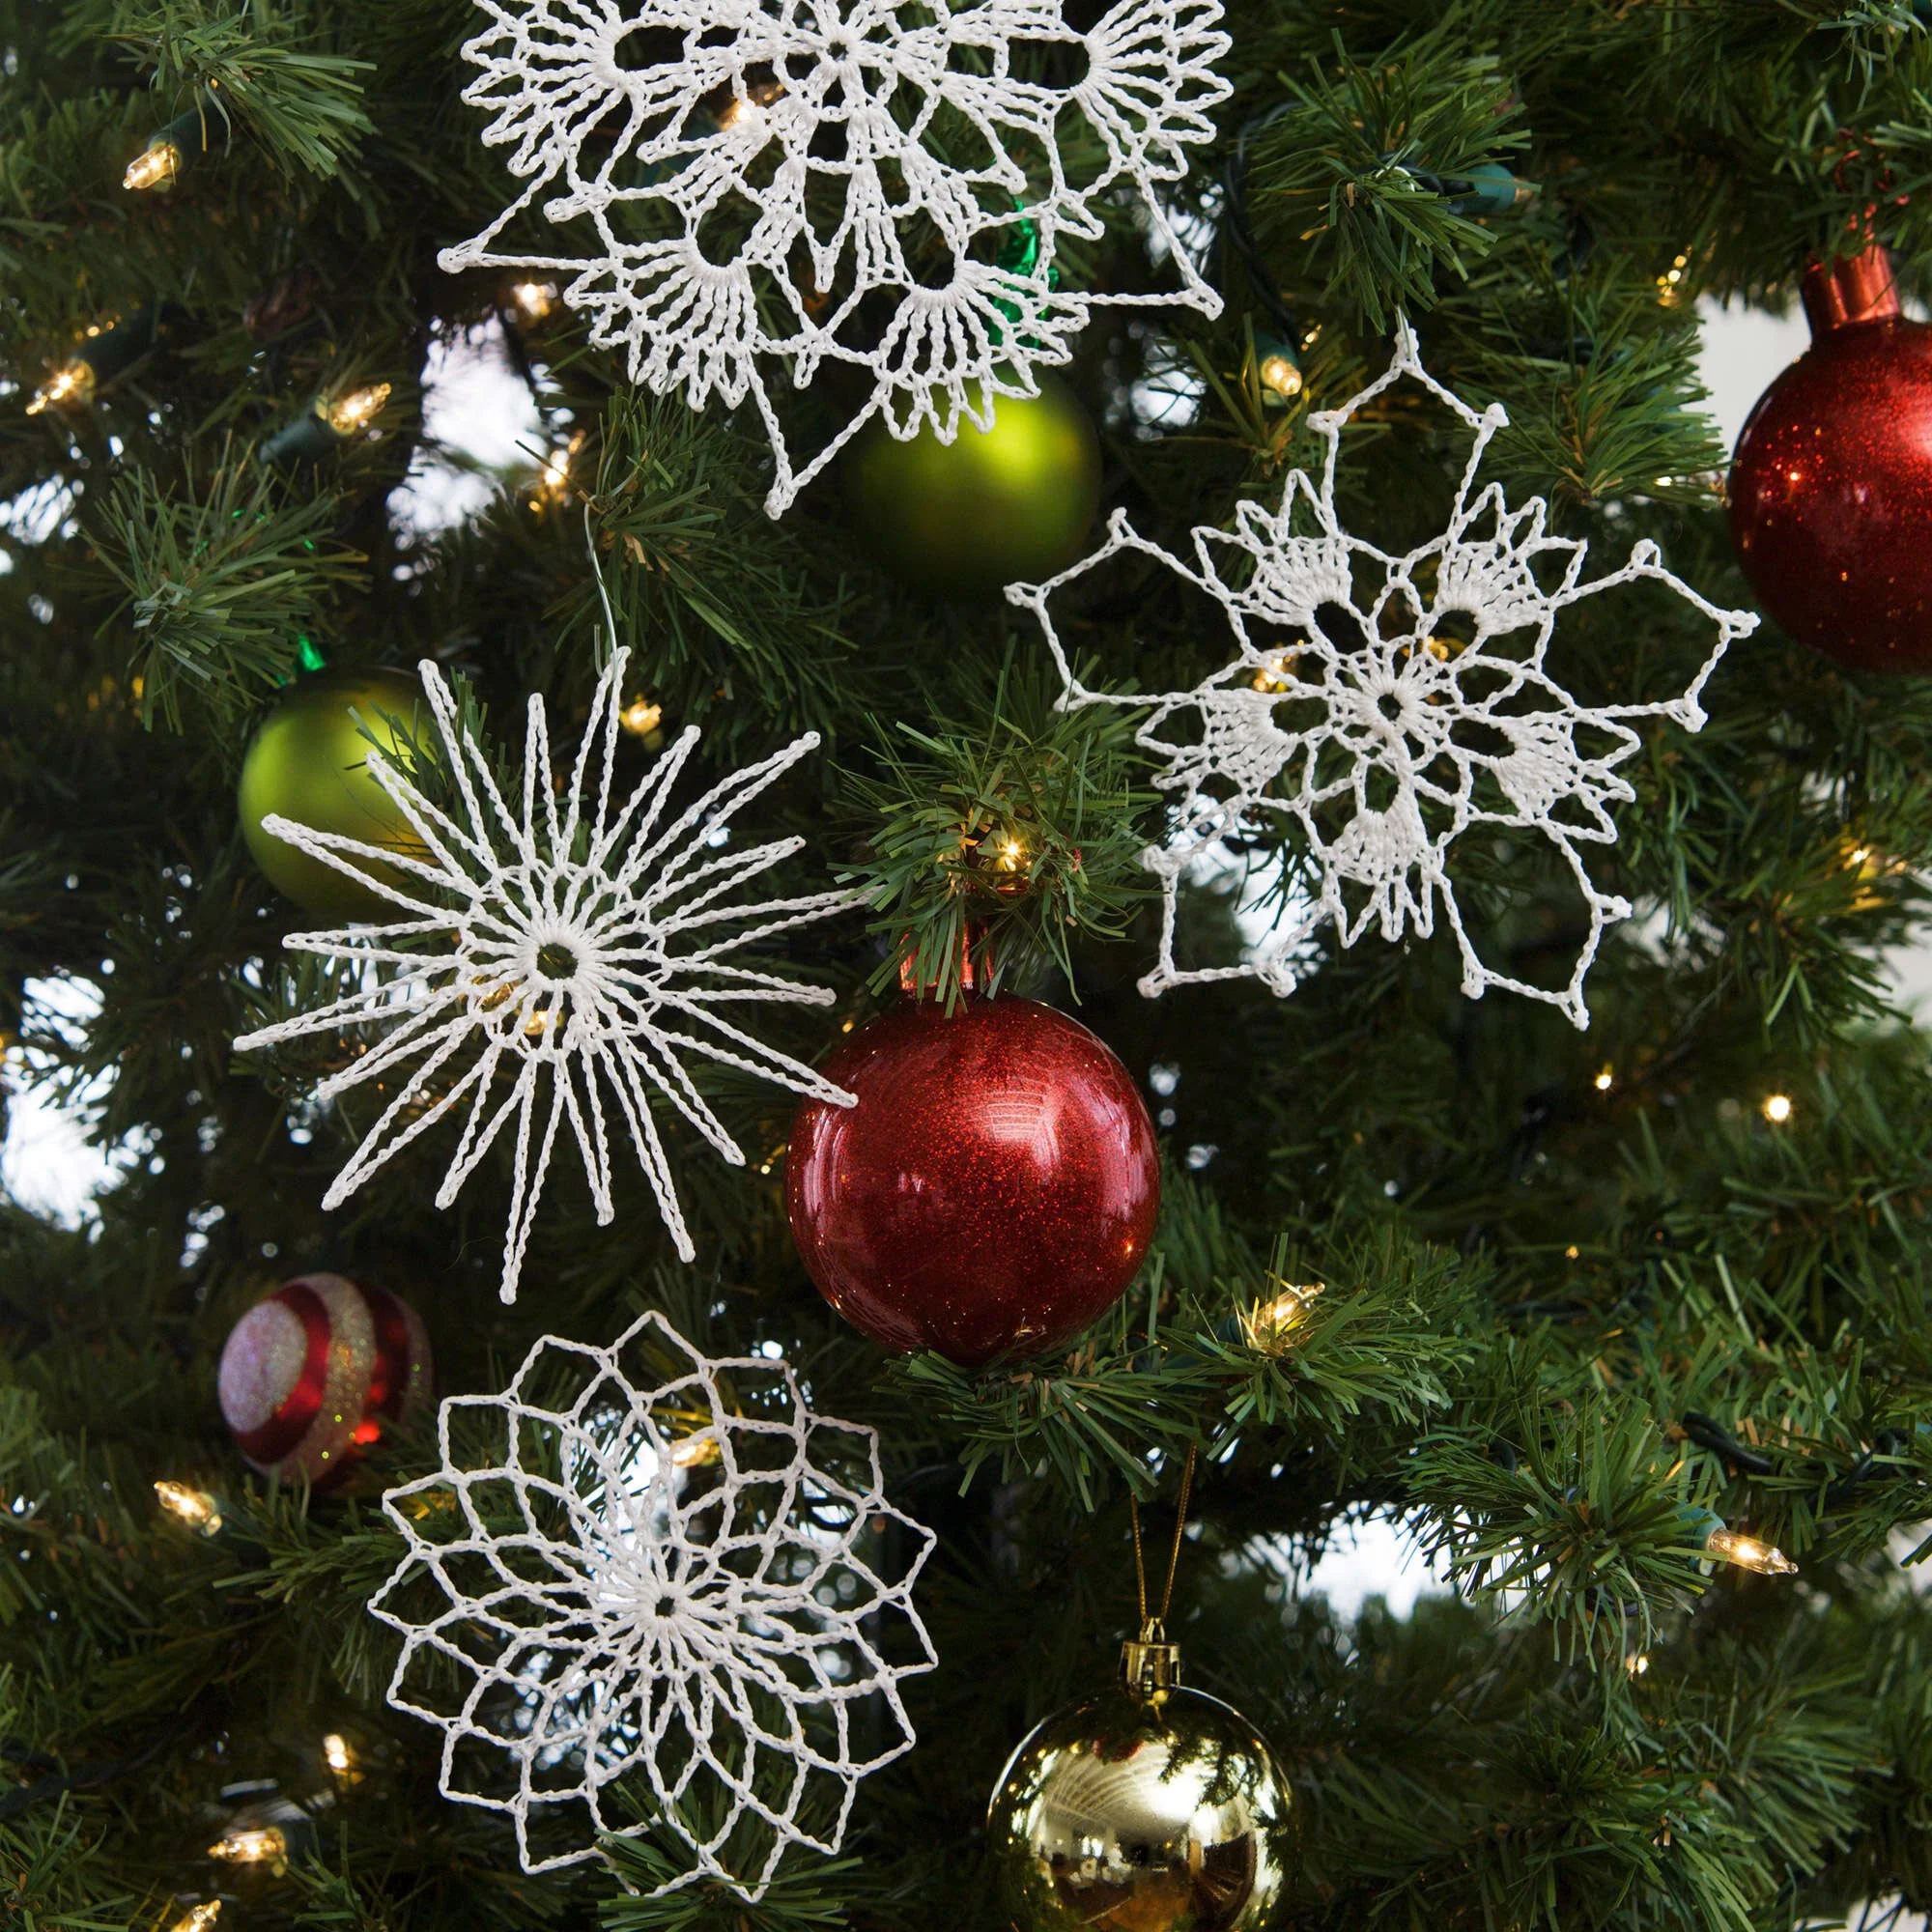
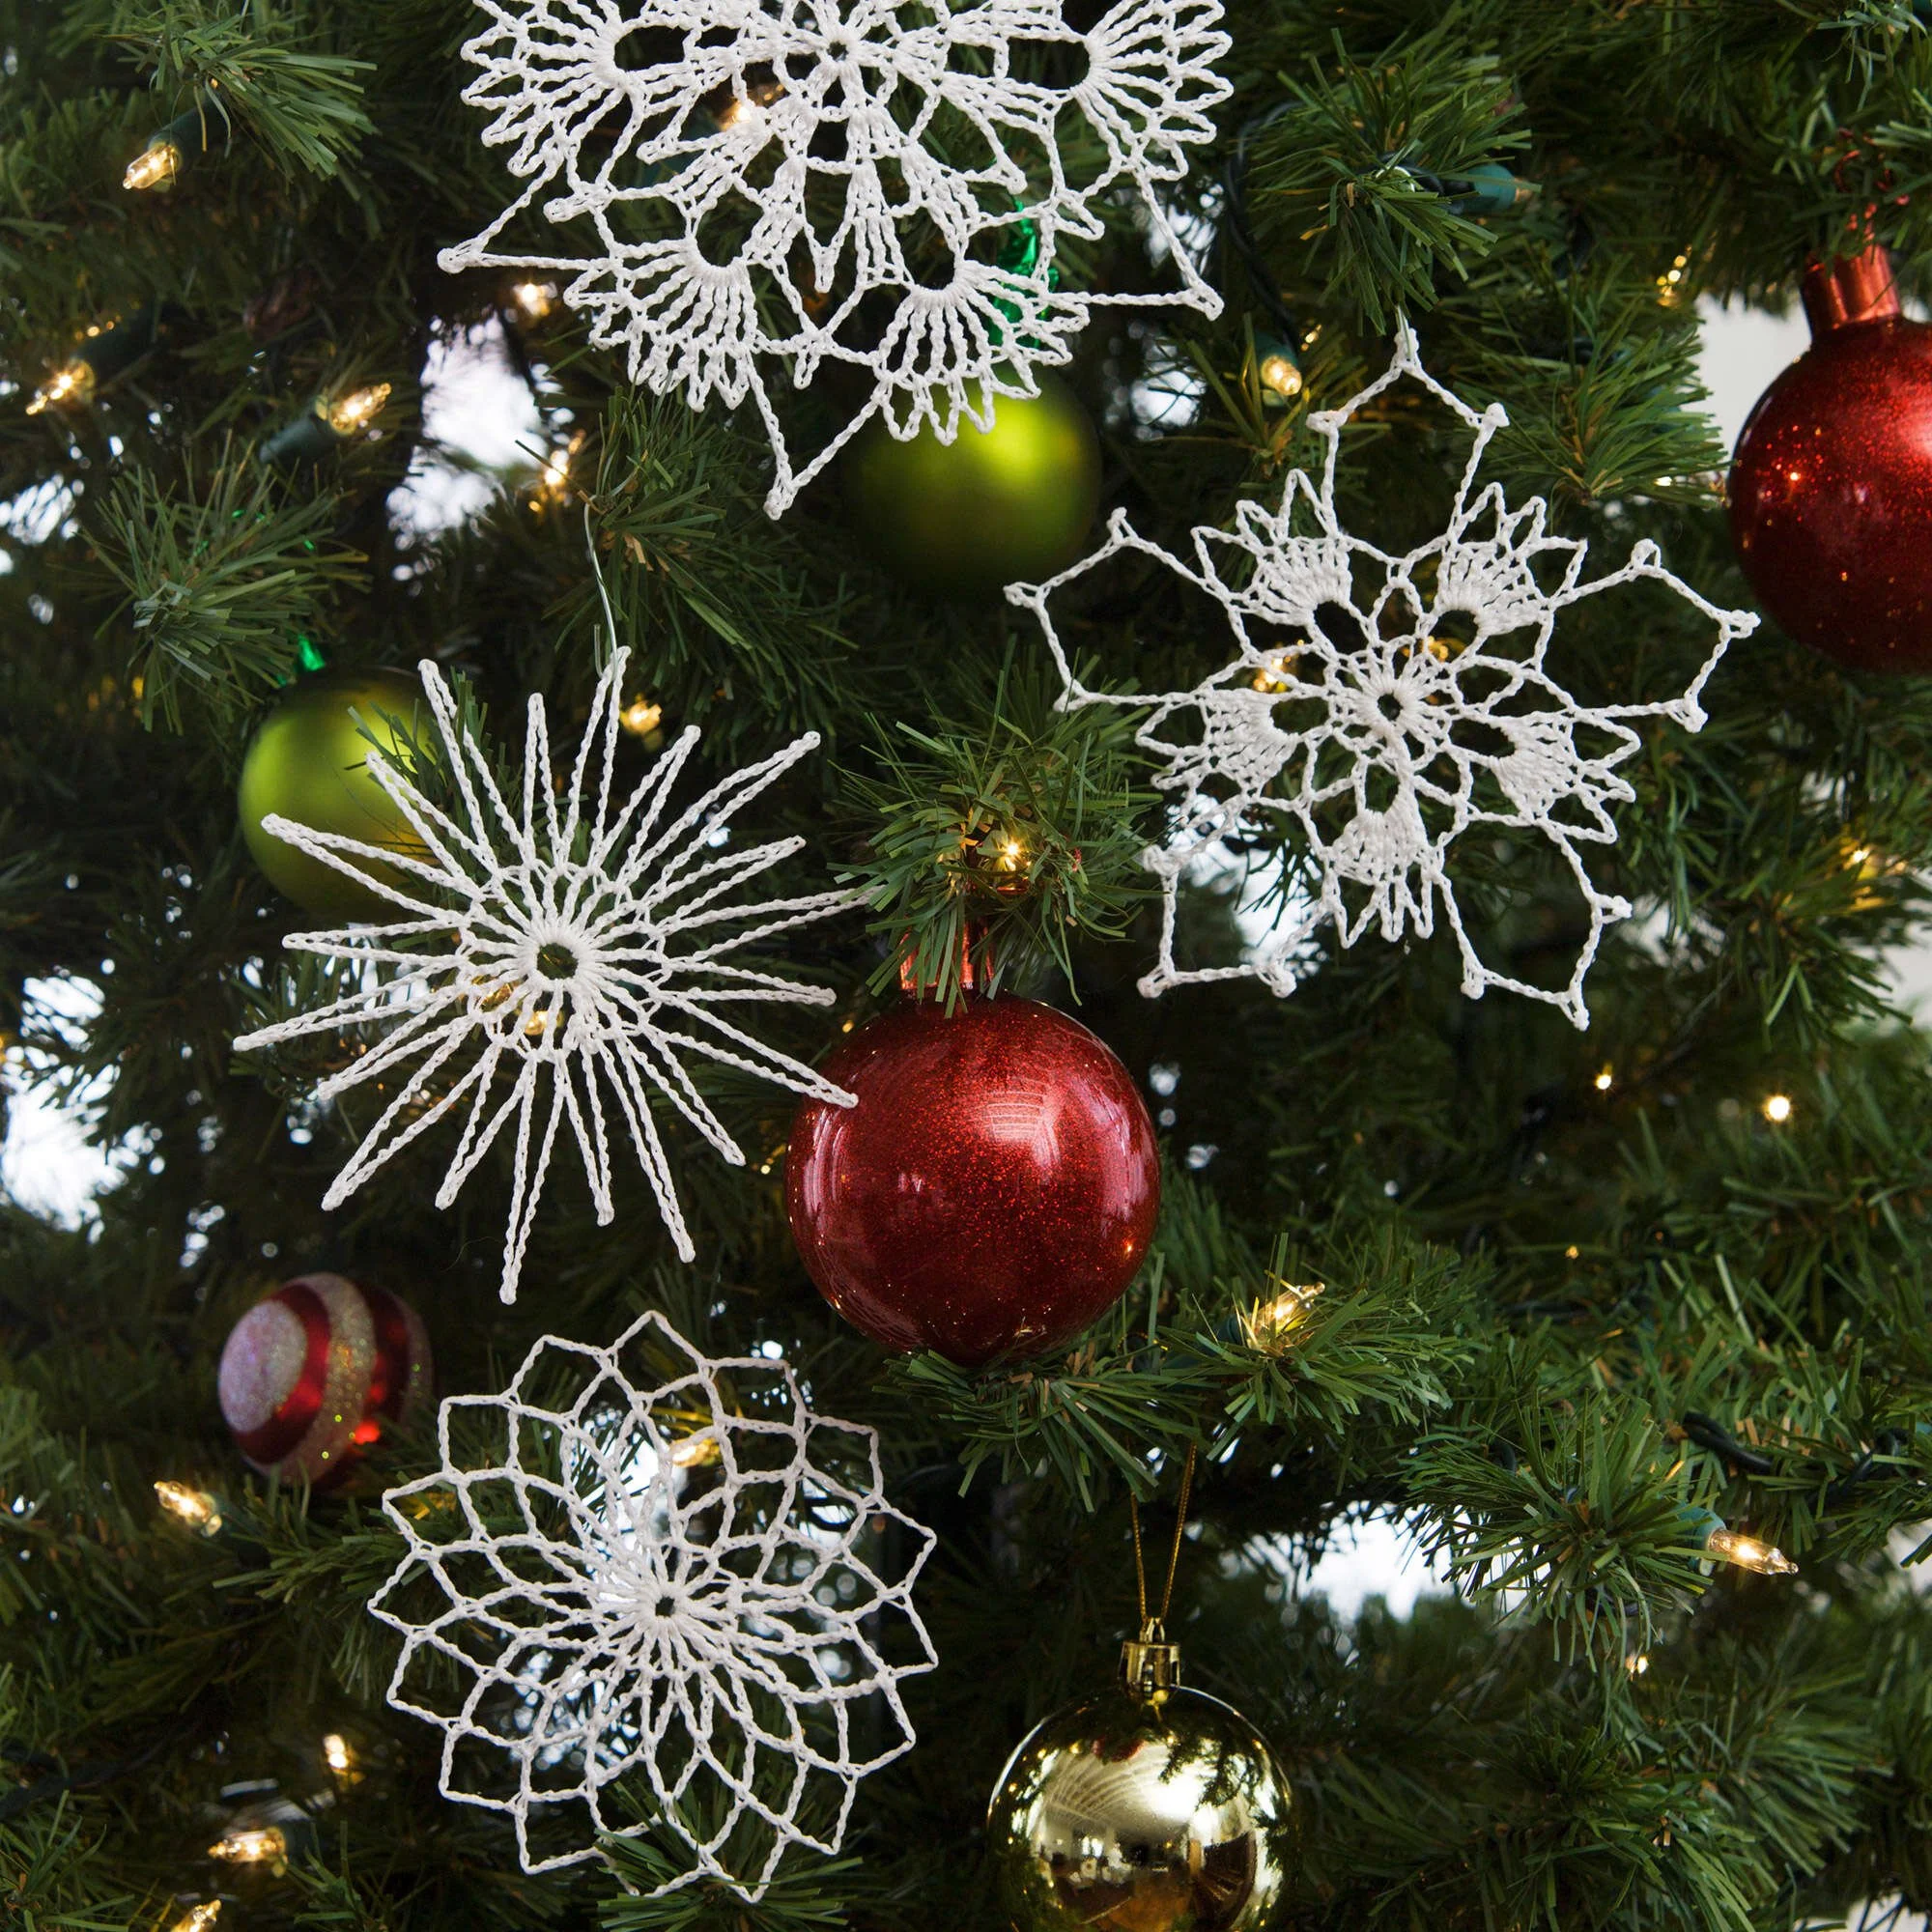
The Crochet Flurry of Snowflakes Pattern features four distinct snowflake designs, each showcasing a delicate and intricate texture perfect for your winter decorations. This project uses basic crochet techniques and is suitable for intermediate to easy skill levels, making it accessible to a variety of crochet enthusiasts. Follow the supplied photographs alongside the written directions for best results.
Project Details
- Crochet terminology: US Terms
- Skill level: Intermediate & Easy
- Finished size: Varies by style
- Construction method: Motif
Materials and Tools
| Yarn option | Yarn and specifications | Amount |
|---|---|---|
| AUNT LYDIA’S® Classic Crochet Thread, Size 10 | Art. 154, Color: 001 White | 1 ball |
- Susan Bates® Steel Crochet Hook: 1.5mm [US 7]
- Thread needle
- Rustproof pins
- Fabric stiffener
- Ornament hangers
AUNT LYDIA’S® Classic Crochet Thread, Size 10 is available in white (400 yds) and ecru (400 yds) balls; solid colors (250 yds) and shaded colors (300 yds).
Abbreviations
| Abbreviation | Meaning |
|---|---|
| ch | Chain |
| sc | Single Crochet |
| dc | Double Crochet |
| tr | Treble Crochet |
| dtr | Double Treble Crochet |
| sl st | Slip Stitch |
Preparation and Techniques
Joining Rounds
The pattern involves joining rounds using slip stitches, ensuring that the motif retains an even shape. Slip stitch into the first stitch of each round to properly join.
Complete Pattern Instructions
Snowflake Style #1 (Intermediate)
Setup / Gauge:
Ch 8, join with slip st in first ch to form ring.
| Round | Instructions | Stitches |
|---|---|---|
| 1 | Ch 5 (counts as first tr and ch-1), [tr into ring, ch 1] 19 times; slip st in 4th ch of ch-5 to join. | 20 tr and 20 ch-1 spaces |
| 2 | Ch 1, sc into next ch-1 space, *ch 18, sc into next ch-1 space, ch 25, sc into next ch-1 space; repeat from * around; slip st in beginning sc to join. | 10 ch-18 loops and 10 ch-25 loops |
Fasten off and weave in ends. Stiffen Snowflake following stiffener directions, referring to photograph for finished shape.
Snowflake Style #2 (Easy)
Setup / Gauge:
Ch 6, join with slip st in first ch to form ring.
| Round | Instructions | Stitches |
|---|---|---|
| 1 | Ch 3 (counts as first dc), 2 dc into ring, ch 2, *3 dc into ring, ch 2; repeat from * 4 times; slip st in top of ch-3 to join. | 5 3-dc clusters and 5 ch-2 spaces |
| 2 | Ch 1, sc in top of ch-3, *ch 7, skip 1 dc, sc in next dc, **ch 7, skip next ch-2 space, sc in next dc; repeat from * 3 times, then from * to ** once, ch 7, skip last ch-2 space; slip st in beginning sc to join. | 10 ch-7 loops |
| 3 | Slip st into first ch-7 loop, ch 4 (counts as first tr), 7 tr into same loop, ch 3, sc into next ch-7 loop, ch 3, *8 tr into next ch-7 loop, ch 3, sc into next ch-7 loop, ch 3; repeat from * 3 times; slip st in top of ch-4 to join. | 5 8-tr clusters and 10 ch-3 spaces |
| 4 | Ch 1, sc in top of ch-4, *ch 6, skip 2 tr, sc in next tr, ch 5, sc in next tr, ch 6, skip 2 tr, sc in last tr in cluster, [ch 8, sc in 4th ch from hook (picot made)] 3 times, ch 4, skip ch-3 space and sc and ch-3 space, **sc in next tr; repeat from * 3 times, then from * to ** once; slip st in beginning sc to join. | 5 3-picot loops, 10 ch-6 loops, and 5 ch-5 loops |
Fasten off and weave in ends. Stiffen Snowflake following stiffener directions, referring to photograph for finished shape.
Snowflake Style #3 (Intermediate)
Setup / Gauge:
Ch 6, join with slip st in first ch to form ring.
| Round | Instructions | Stitches |
|---|---|---|
| 1 | Ch 3 (counts as first dc), dc into ring, ch 3, *2 dc into ring, ch 3; repeat from * 4 times; slip st in top of ch-3 to join. | 6 2-dc clusters and 6 ch-3 spaces |
| 2 | Ch 3 (counts as first dc), dc in top of same st, 2 dc in next dc, ch 4, skip next ch-3 space, *2 dc in each of the next 2 dc, ch 4; repeat from * 4 times; slip st in top of ch-3 to join. | 6 4-dc clusters and 6 ch-4 spaces |
| 3 | Ch 3 (counts as first dc), 2 dc in top of same st, *ch 3, skip 2 dc, 3 dc in next dc, ch 6, sc in 4th chain from hook (picot made), ch 2, skip next ch-4, **3 dc in next dc; repeat from * 4 times, then from * to ** once; slip st in top of ch-3 to join. | 12 3-dc clusters, 6 ch-3 spaces, and 6 picot loops |
| 4 | Ch 4 (counts as first tr), tr in each of next 2 dc, *ch 5, skip next ch-3 space, tr in each of next 3 dc, ch 8, skip next picot loop, **tr in each of next 3 dc; repeat from * 4 times, then from * to ** once; slip st in top of ch-4 to join. | 12 3-tr clusters, 6 ch-5 spaces, and 6 ch-8 spaces |
Fasten off and weave in ends. Stiffen Snowflake following stiffener directions, referring to photograph for finished shape.
Snowflake Style #4 (Easy)
Setup / Gauge:
Ch 6, join with slip st in first ch to form ring.
| Round | Instructions | Stitches |
|---|---|---|
| 1 | Ch 3 (counts as first dc), ch 1, *dc into ring, ch 1; repeat from * around; slip st in top of ch-3 to join. | 16 dc and 16 ch-1 spaces |
| 2 | Slip st in first ch-1 space, sc in same space, *ch 6, skip next dc, sc in next ch-1 space; repeat from * 14 times, ch 3, skip ch-3; dc in beginning sc to join (counts as last ch-6 loop). | 16 sc and 16 ch-6 loops |
| 3–4 | Ch 1, sc into top of loop just made, *ch 6, skip next sc, sc in next ch-6 loop; repeat from * 14 times, ch 3, skip last sc; dc in beginning sc to join (counts as last ch-6 loop). | 16 sc and 16 ch-6 loops |
| 5 | Ch 1, sc into top of loop just made, *ch 7, skip next sc, sc in next ch-6 loop; repeat from * 14 times, ch 7, skip last sc; slip st in beginning sc to join. | 16 sc and 16 ch-7 loops |
Fasten off and weave in ends. Stiffen Snowflake following stiffener directions, referring to photograph for finished shape.
Assembly and Finishing
Stiffen the Snowflakes
Follow the instructions provided with your stiffener to ensure that each snowflake retains its shape. This crucial step is essential to achieving the delicate, crisp look characteristic of crocheted snowflakes. Once stiffened, attach ornament hangers if desired.
Frequently Asked Questions
What size will my snowflakes be?
The finished size may vary based on tension and the style chosen. Generally, they will be small decorative motifs, perfect for ornaments or embellishments.
What level of crochet skills do I need?
The pattern includes options for both easy and intermediate skill levels. However, familiarity with basic stitches and joining rounds is recommended.
Can I substitute different yarns?
Yes, you can substitute yarns, but ensure they are of similar weight. Yarn weight affects the dimensions and drape, so test a swatch first if in doubt.
How do I attach my stiffened snowflakes to branches or garlands?
You can use ornament hangers or simply thread a piece of thin ribbon through the top of each snowflake to hang them. Make sure it is secured well for stability.
Can I sell the finished snowflakes?
Check the designer’s terms regarding selling finished items. Generally, personal use is preferred; always credit the designer if selling is allowed.