Get 30+ FREE Crochet Patterns — Join Our Newsletter
Christmas Crochet Applique Pattern
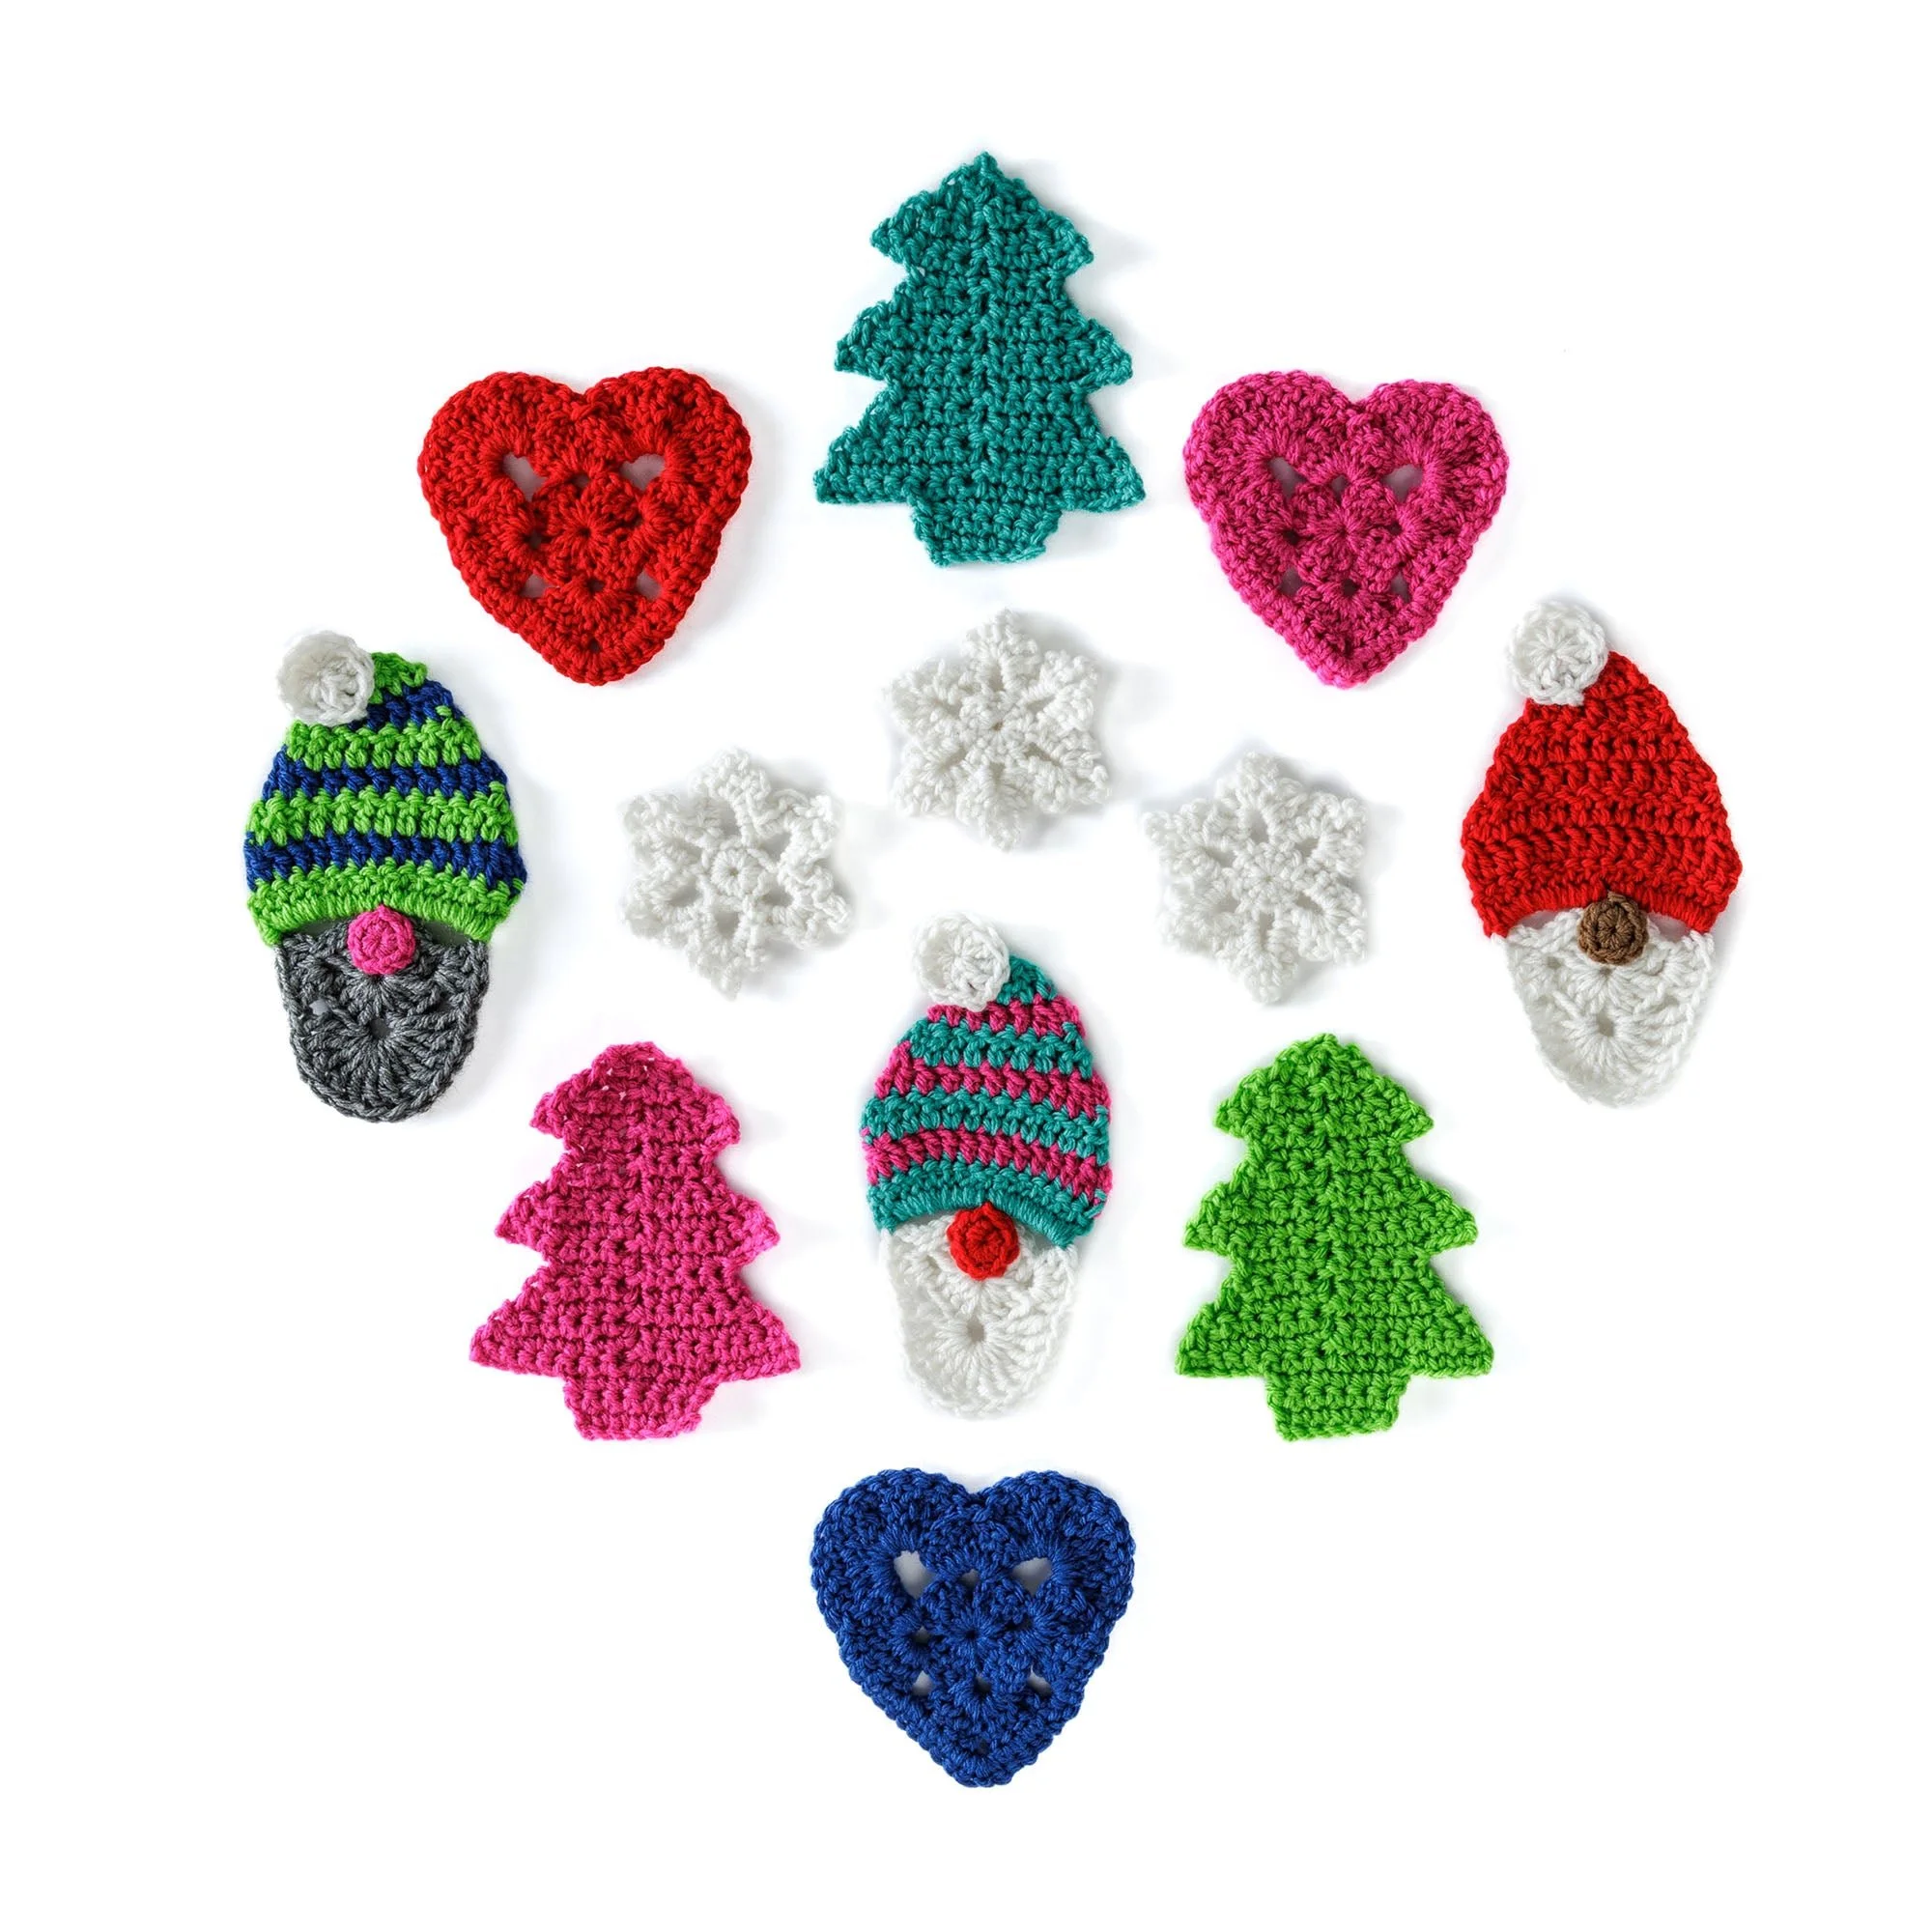
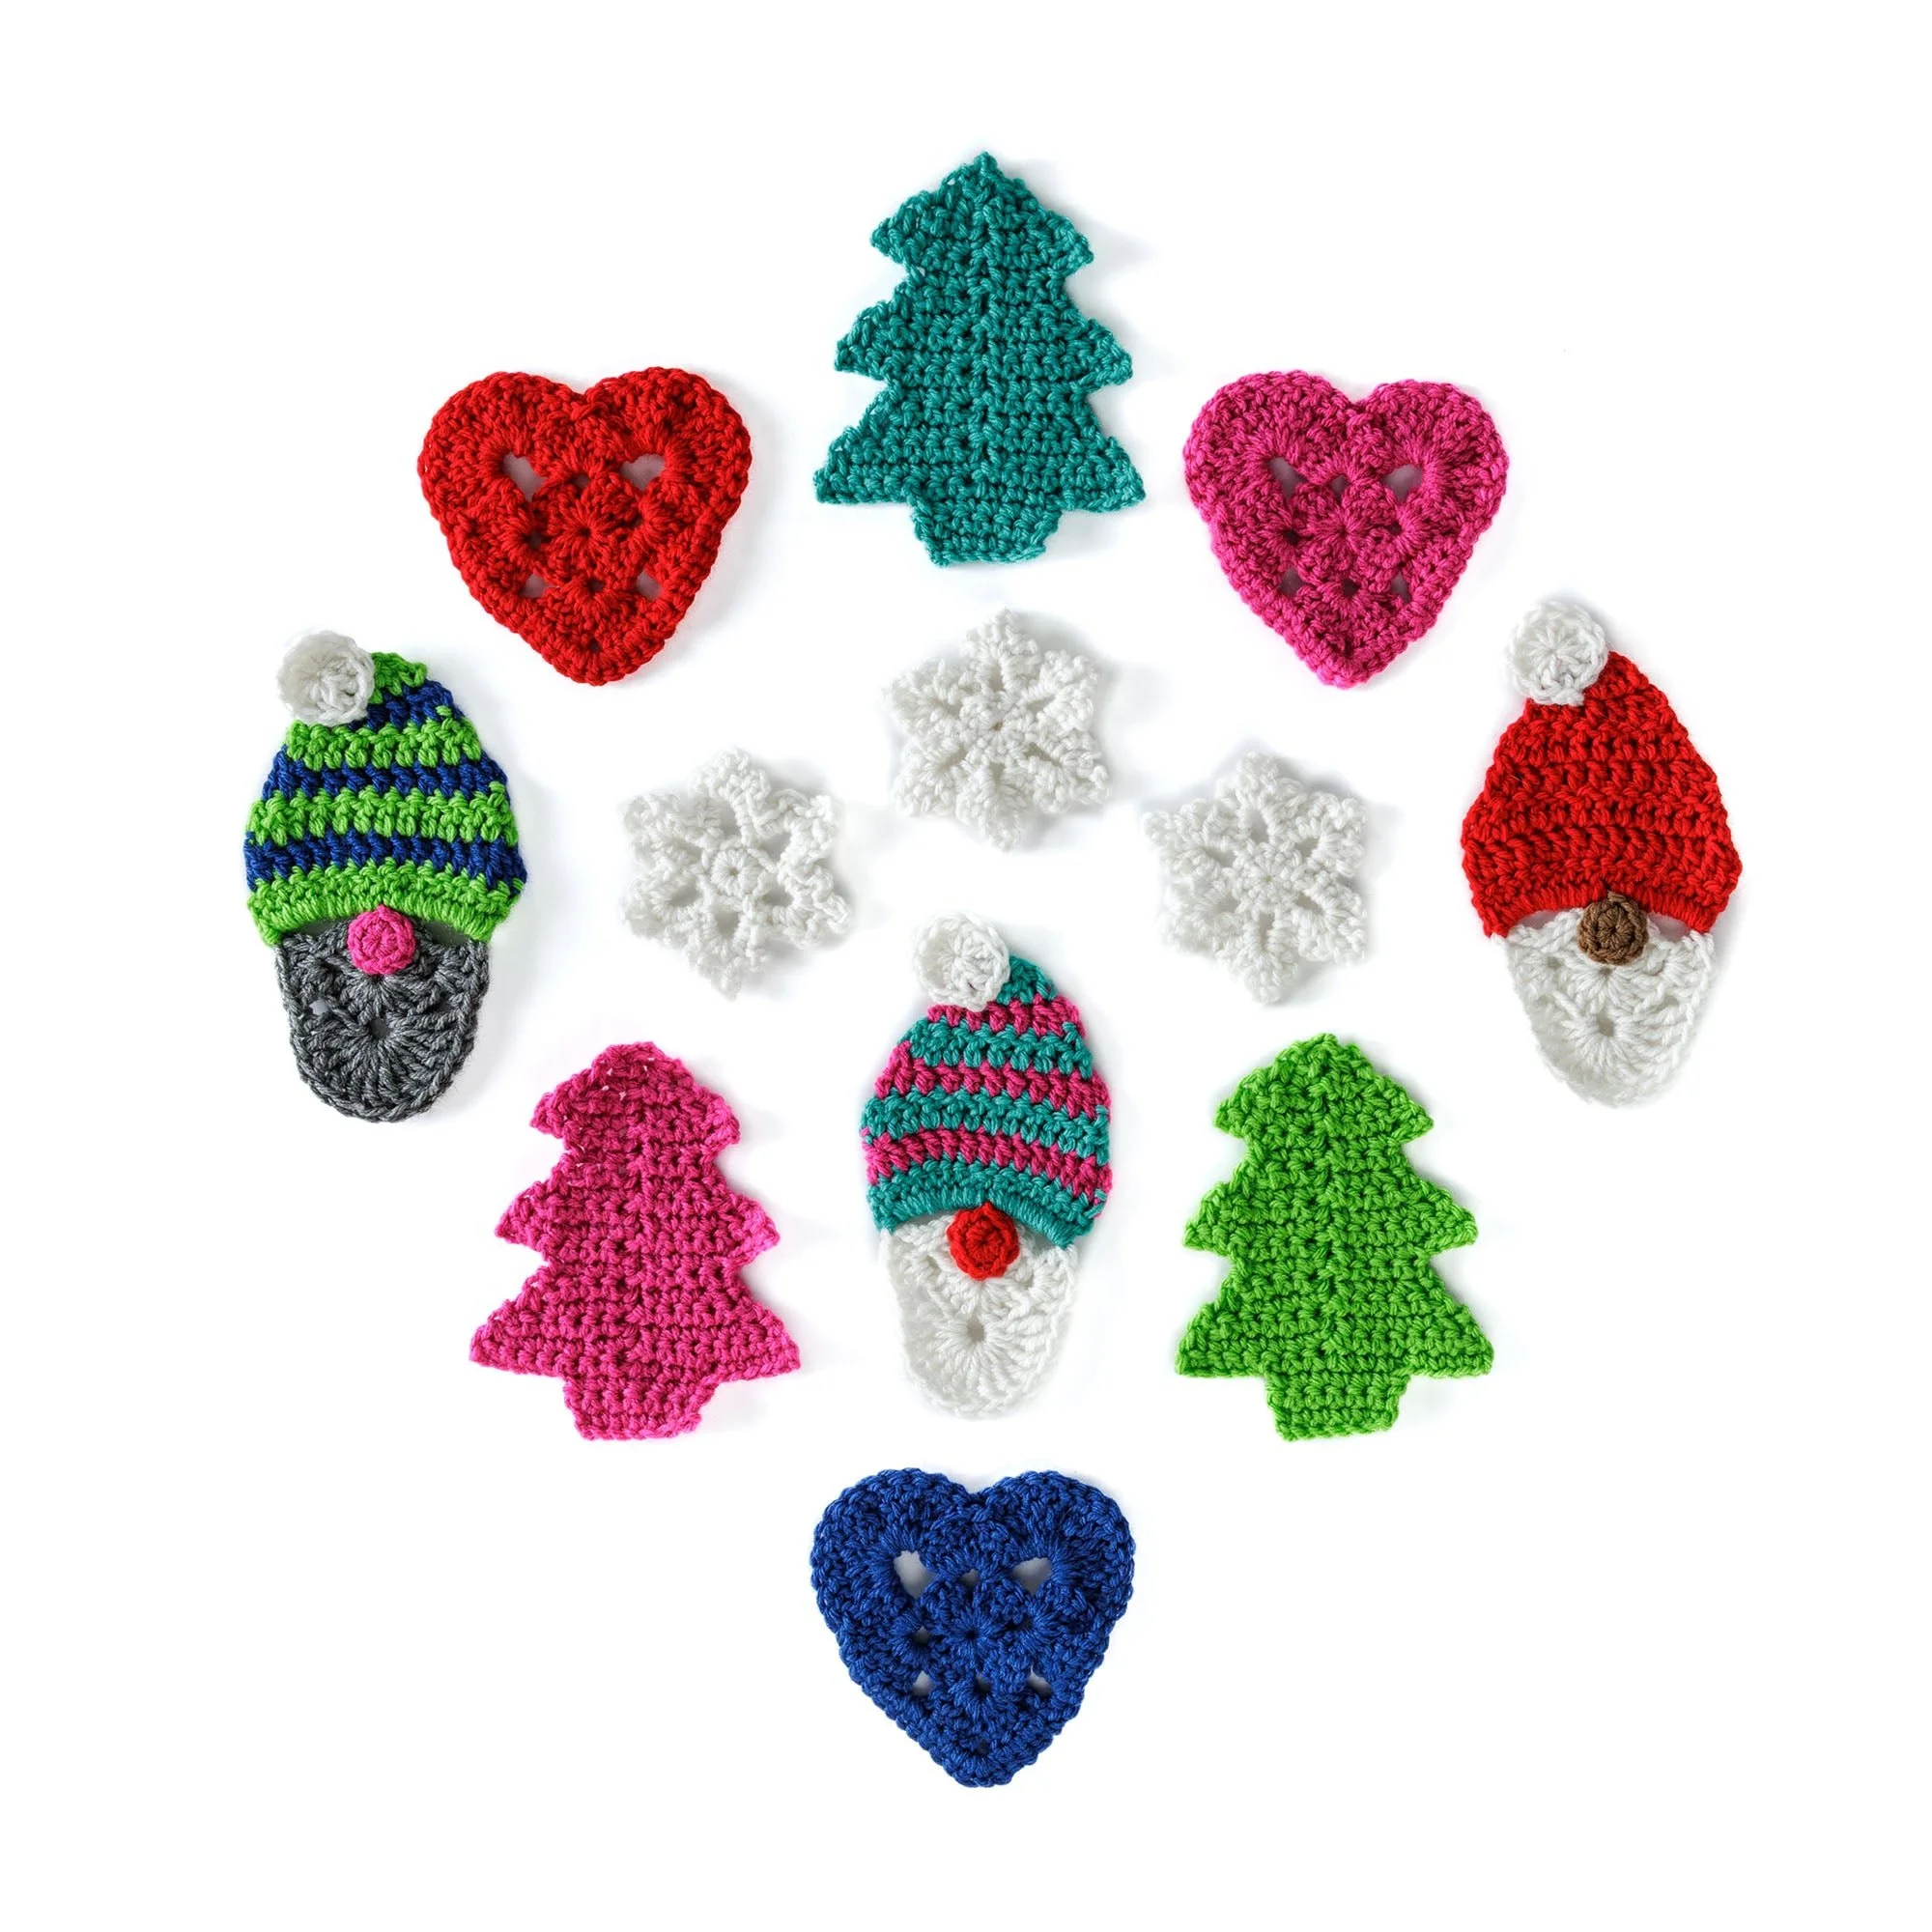
Get into the holiday spirit with these charming Ho Ho Holiday Christmas Crochet Appliques! This collection includes a festive tree, heart, snowflake, and gnome, each bringing warmth and joy to your seasonal decor. The pattern utilizes basic crochet stitches, and with clear instructions, it’s perfect for crocheters of various skill levels. Follow along with the written directions and included diagrams for a delightful crafting experience!
Project Details
- Crochet terminology: U.S.
- Skill level: Intermediate; skills required include chain, slip stitch, single crochet, double crochet, and treble crochet.
- Finished size: Approx. 5″ x 6″ (tree), 5″ x 5″ (heart), 4″ x 4″ (snowflake), 4″ x 8″ (gnome).
- Construction method: Appliqué.
Materials and Tools
| Yarn option | Yarn and specifications | Amount |
|---|---|---|
| Tree | Jade or Shocking Pink or Spring Green | 1 ball (17 yds/15.5 m) |
| Heart | Cherry Red or Royal or Shocking Pink | 1 ball (15 yds/4.5 m) |
| Snowflake | Soft White | 1 ball (10 yds/9 m) |
| Gnome Beard | Soft White or Gray Heather | 1 ball (8 yds/7.5 m) |
| Gnome Hat (Contrast A) | Jade or Spring Green | 1 ball (6 yds/5.5 m) |
| Gnome Hat (Contrast B) | Shocking Pink or Royal | 1 ball (6 yds/5.5 m) |
| Gnome Hat (Solid) | Cherry Red | 1 ball (6 yds/5.5 m) |
| Gnome Nose | Cherry Red or Shocking Pink or Caffé Late | 1 ball (6 yds/5.5 m) |
- Tools/Notions: Size U.S. H/8 (5 mm) Susan Bates® Silvalume® crochet hook or size needed to obtain gauge
- Susan Bates® yarn needle
Abbreviations
| Abbreviation | Meaning |
|---|---|
| ch | chain |
| sl st | slip stitch |
| sc | single crochet |
| dc | double crochet |
| tr | treble crochet |
Preparation and Techniques
Working in a Spiral
This pattern utilizes the magic loop method and a combination of rows and rounds; follow the instructions carefully for the desired shapes.
TREE
Right Side of Tree
- With Jade or Shocking Pink or Spring Green, ch 7.
-
Row Instructions Stitches 1 Ch 1. 1 sc in 2nd ch from hook and each ch to end of chain. Turn. 6 sc 2 Ch 1. 1 sc in each sc to end of row. Turn. 6 sc 3 Ch 1. 1 sc in each sc to end of row. Turn. 6 sc 4 Ch 6. Working in back of chain, 1 sc in 2nd ch from hook and each of next 4 ch. 1 sc in each of next 3 sc. Turn. Leave rem 3 sts unworked. 6 sc 5 Ch 1. 1 sc in each of next 6 sc. Sc2tog. Turn. 7 sts 6 Ch 1. Sc2tog. 1 sc in each of next 5 sc. Turn. 6 sts 7 Ch 1. 1 sc in each of next 4 sc. Sc2tog. Turn. 5 sts 8 Ch 1. Sc2tog. 1 sc in each of next 3 sc. Turn. 4 sts 9 Ch 1. 1 sc in each of next 4 sts. Turn. 4 sc 10 Ch 4. 1 sc in 2nd ch from hook and each of next 2 ch. 1 sc in each of next 4 sc. Turn. 7 sc 11 Ch 1. 1 sc in each of next 5 sc. Sc2tog. Turn. 6 sts 12 Ch 1. Sc2tog. 1 sc in each of next 4 sc. Turn. 5 sts 13 Ch 1. 1 sc in each of next 3 sc. Sc2tog. Turn. 4 sts 14 Ch 1. Sc2tog. 1 sc in each of next 2 sc. Turn. 3 sts 15 Ch 1. 1 sc in each of next 3 sc. Turn. 3 sts 16 Ch 3. 1 sc in 2nd ch from hook and next ch. 1 sc in each of next 3 sc. Turn. 5 sc 17 Ch 1. 1 sc in each of next 3 sc. Sc2tog. Turn. 4 sts 18 Ch 1. Sc2tog. 1 sc in each of next 2 sc. Turn. 3 sts 19 Ch 1. 1 sc in next sc. Sc2tog. Turn. 2 sts 20 Ch 1. Sc2tog. 1 st - Fasten off, leaving a 16″ [40.6 cm] tail.
Left Side of Tree
- With RS facing, join yarn with sl st at last unworked sc of 3rd row.
-
Row Instructions Stitches 1 Ch 6. Working in back of chain, 1 sc in 2nd ch from hook and each of next 4 ch. 1 sc in each of next 3 sc. Sl st to corresponding sc of 4th row of Right Side of Tree. Turn. 6 sc 2 Ch 1. 1 sc in each of next 6 sc. Sc2tog. Turn. 7 sts 3 Ch 1. Sc2tog. 1 sc in each of next 5 sc. Sl st to corresponding sc of 6th row of Right Side of Tree. Turn. 6 sts 4 Ch 1. 1 sc in each of next 4 sc. Sc2tog. Turn. 5 sts 5 Ch 1. Sc2tog. 1 sc in each of next 3 sc. Sl st to corresponding sc of 8th row of Right Side of Tree. Turn. 4 sts 6 Ch 1. 1 sc in each of next 4 sts. Turn. 4 sts 7 Ch 4. 1 sc in 2nd ch from hook and each of next 2 ch. 1 sc in each of next 4 sc. Sl st to corresponding sc of 10th row of Right Side of Tree. Turn. 7 sc 8 Ch 1. 1 sc in each of next 5 sc. Sc2tog. Turn. 6 sts 9 Ch 1. Sc2tog. 1 sc in each of next 4 sc. Sl st to corresponding sc of 12th row of Right Side of Tree. Turn. 5 sts 10 Ch 1. 1 sc in each of next 3 sc. Sc2tog. Turn. 4 sts 11 Ch 1. Sc2tog. 1 sc in each of next 2 sc. Sl st to corresponding sc of 14th row of Right Side of Tree. Turn. 3 sts 12 Ch 1. 1 sc in each of next 3 sc. Turn. 3 sts 13 Ch 3. 1 sc in 2nd ch from hook and next ch. 1 sc in each of next 3 sc. Sl st to corresponding sc of 16th row of Right Side of Tree. Turn. 5 sc 14 Ch 1. 1 sc in each of next 3 sc. Sc2tog. Turn. 4 sts 15 Ch 1. Sc2tog. 1 sc in each of next 2 sc. Sl st to corresponding sc of 18th row of Right Side of Tree. Turn. 3 sts 16 Ch 1. 1 sc in next sc. Sc2tog. Turn. 2 sts 17 Ch 1. Sc2tog. Sl st to top of Right Side of Tree. Fasten off.
GRANNY SQUARE HEART
Magic Loop Setup / Rounds
- 1st rnd: Ch 3. 3 dc in magic loop. (Ch 2. 4 dc) 3 times in magic loop. Ch 2. Join. Pull tail to tighten, closing center hole.
- 2nd rnd: Sl st through back loop only in each dc to corner ch-2 sp. Ch 3. (3 dc. Ch 2. 4 dc) in same sp as last sl st. [(Ch 2. 4 dc) twice in next ch-2 sp] 3 times. Ch 2. Join.
- 3rd rnd: Ch 1. 1 sc in same sp as sl st. 1 sc in each of next 3 dc. 3 sc in next ch-2 sp. 1 sc in each of next 4 dc. 2 sc in next ch-2 sp. 1 sc in each of next 4 dc. Sl st in next ch-2 sp. (Skip next 4 dc. 12 tr in next ch-2 sp. Skip next 4 dc. Sl st in next ch-2 sp) twice. 1 sc in each of next 4 dc. 2 sc in next ch-2 sp. Join with sl st to first sc. Fasten off.
GNOME
Beard
- With MC, make Magic Loop.
- 1st rnd: Ch 3. 3 dc in magic loop. (Ch 2. 4 dc) 3 times in magic loop. Ch 2. Join. Pull tail to tighten, closing center hole.
- 2nd rnd: Sl st through back loop only in each dc to corner ch-2 sp. Ch 3. 3 dc in same sp as last sl st. Skip next 4 dc. 12 tr in next ch-2 sp. Skip next 4 dc. 4 dc in next ch-2 sp. Join A.
- Do not fasten off.
Hat (Worked in rows)
- 1st row: With A, ch 10. Skip next (4 dc, ch-2, 4 dc). Join with sl st to first dc of 2nd rnd. Turn. Cont working in rows.
- 2nd row: Ch 2. 15 dc in ch-10 sp. Join B. Break A. Turn.
- 3rd row: With B, ch 2. Dc2tog. 1 dc in each of next 11 dc. Dc2tog. Join A. Break B. Turn.
- 4th row: With A, ch 2. Dc2tog. 1 dc in each of next 9 dc. Dc2tog. Join B. Break A. Turn.
- 5th row: With B, ch 2. Dc2tog. 1 dc in each of next 7 dc. Dc2tog. Join A. Break B. Turn.
- 6th row: With A, ch 2. Dc2tog. 1 dc in each of next 5 dc. Dc2tog. Join B. Break A. Turn.
- 7th row: With B, ch 2. Dc2tog. 1 dc in each of next 3 dc. Dc2tog. Join A. Break B. Turn.
- 8th row: With A, ch 2. Skip first st. Dc3tog. Ch 2. Sl st to top of last st. Fasten off.
Nose
- With C, make Magic Loop.
- 1st rnd: Ch 1. 10 sc in magic loop. Join with sl st to first sc. Fasten off, leaving a generous tail to sew nose on and pull through loop. Center nose below hat on top of the two 4-dc in 1st rnd of Granny Square. Stitch into place. Weave in ends.
Pom-Pom
- With Soft White, make Magic Loop.
- 1st rnd: Ch 3. 11 dc in magic loop. Join with sl st to top of ch-3. Fasten off, leaving a generous tail to sew pom-pom on and pull through loop. Stitch to tip of hat, weave in ends.
SNOWFLAKE
Setup / Rnd 1
- With Soft White, make Magic Loop.
- 1st rnd: Ch 1. 12 sc in magic loop. Join with sl st to first sc. 12 sc.
Rnd 2
- 2nd rnd: Ch 5. Skip first 2 sc. Sl st in next sc.
- *(Ch 5. Skip next sc. Sl st in next sc) 5 times. Ch 5. Skip last sc. Join with sl st to first st of 1st rnd.
Rnd 3
- 3rd rnd: (Sl st. Ch 1. 2 sc. Ch 3. 1 sc. Ch 5. 1 sc. Ch 3. 2 sc) all in first ch-5 sp.
- *(2 sc. Ch 3. 1 sc. Ch 5. 1 sc. Ch 3. 2 sc) all in next ch-5 sp. Rep from * around. Join with sl st to first sc. Fasten off. Weave in ends.
Frequently Asked Questions
What size are the finished appliqués?
The finished sizes are approximately 5″ x 6″ for the tree, 5″ x 5″ for the heart, 4″ x 4″ for the snowflake, and 4″ x 8″ for the gnome.
What skill level is needed for this pattern?
This pattern is rated as intermediate, requiring basic crochet skills such as chaining, slip stitches, and various crochet stitches including single, double, and treble crochet.
Can I use a different yarn for the appliqués?
Yes, you can use different yarns as long as you match the weight and gauge. Keep in mind that this might alter the finished size of your appliqués.
How long does it take to make these appliqués?
The time varies based on your crochet speed, but each appliqué can be completed in a few hours.
How do I attach the appliqués to my projects?
You can sew the appliqués to your projects using a yarn needle and matching yarn. Alternatively, you can use fabric glue for a quicker attachment.
What is the best way to care for finished appliqués?
Care instructions depend on the yarn used. Check the yarn label for washing and care recommendations to maintain the quality of your appliqués.