
Get 30+ FREE Crochet Patterns — Join Our Newsletter
Crochet Christmas Stocking Pattern Tutorial
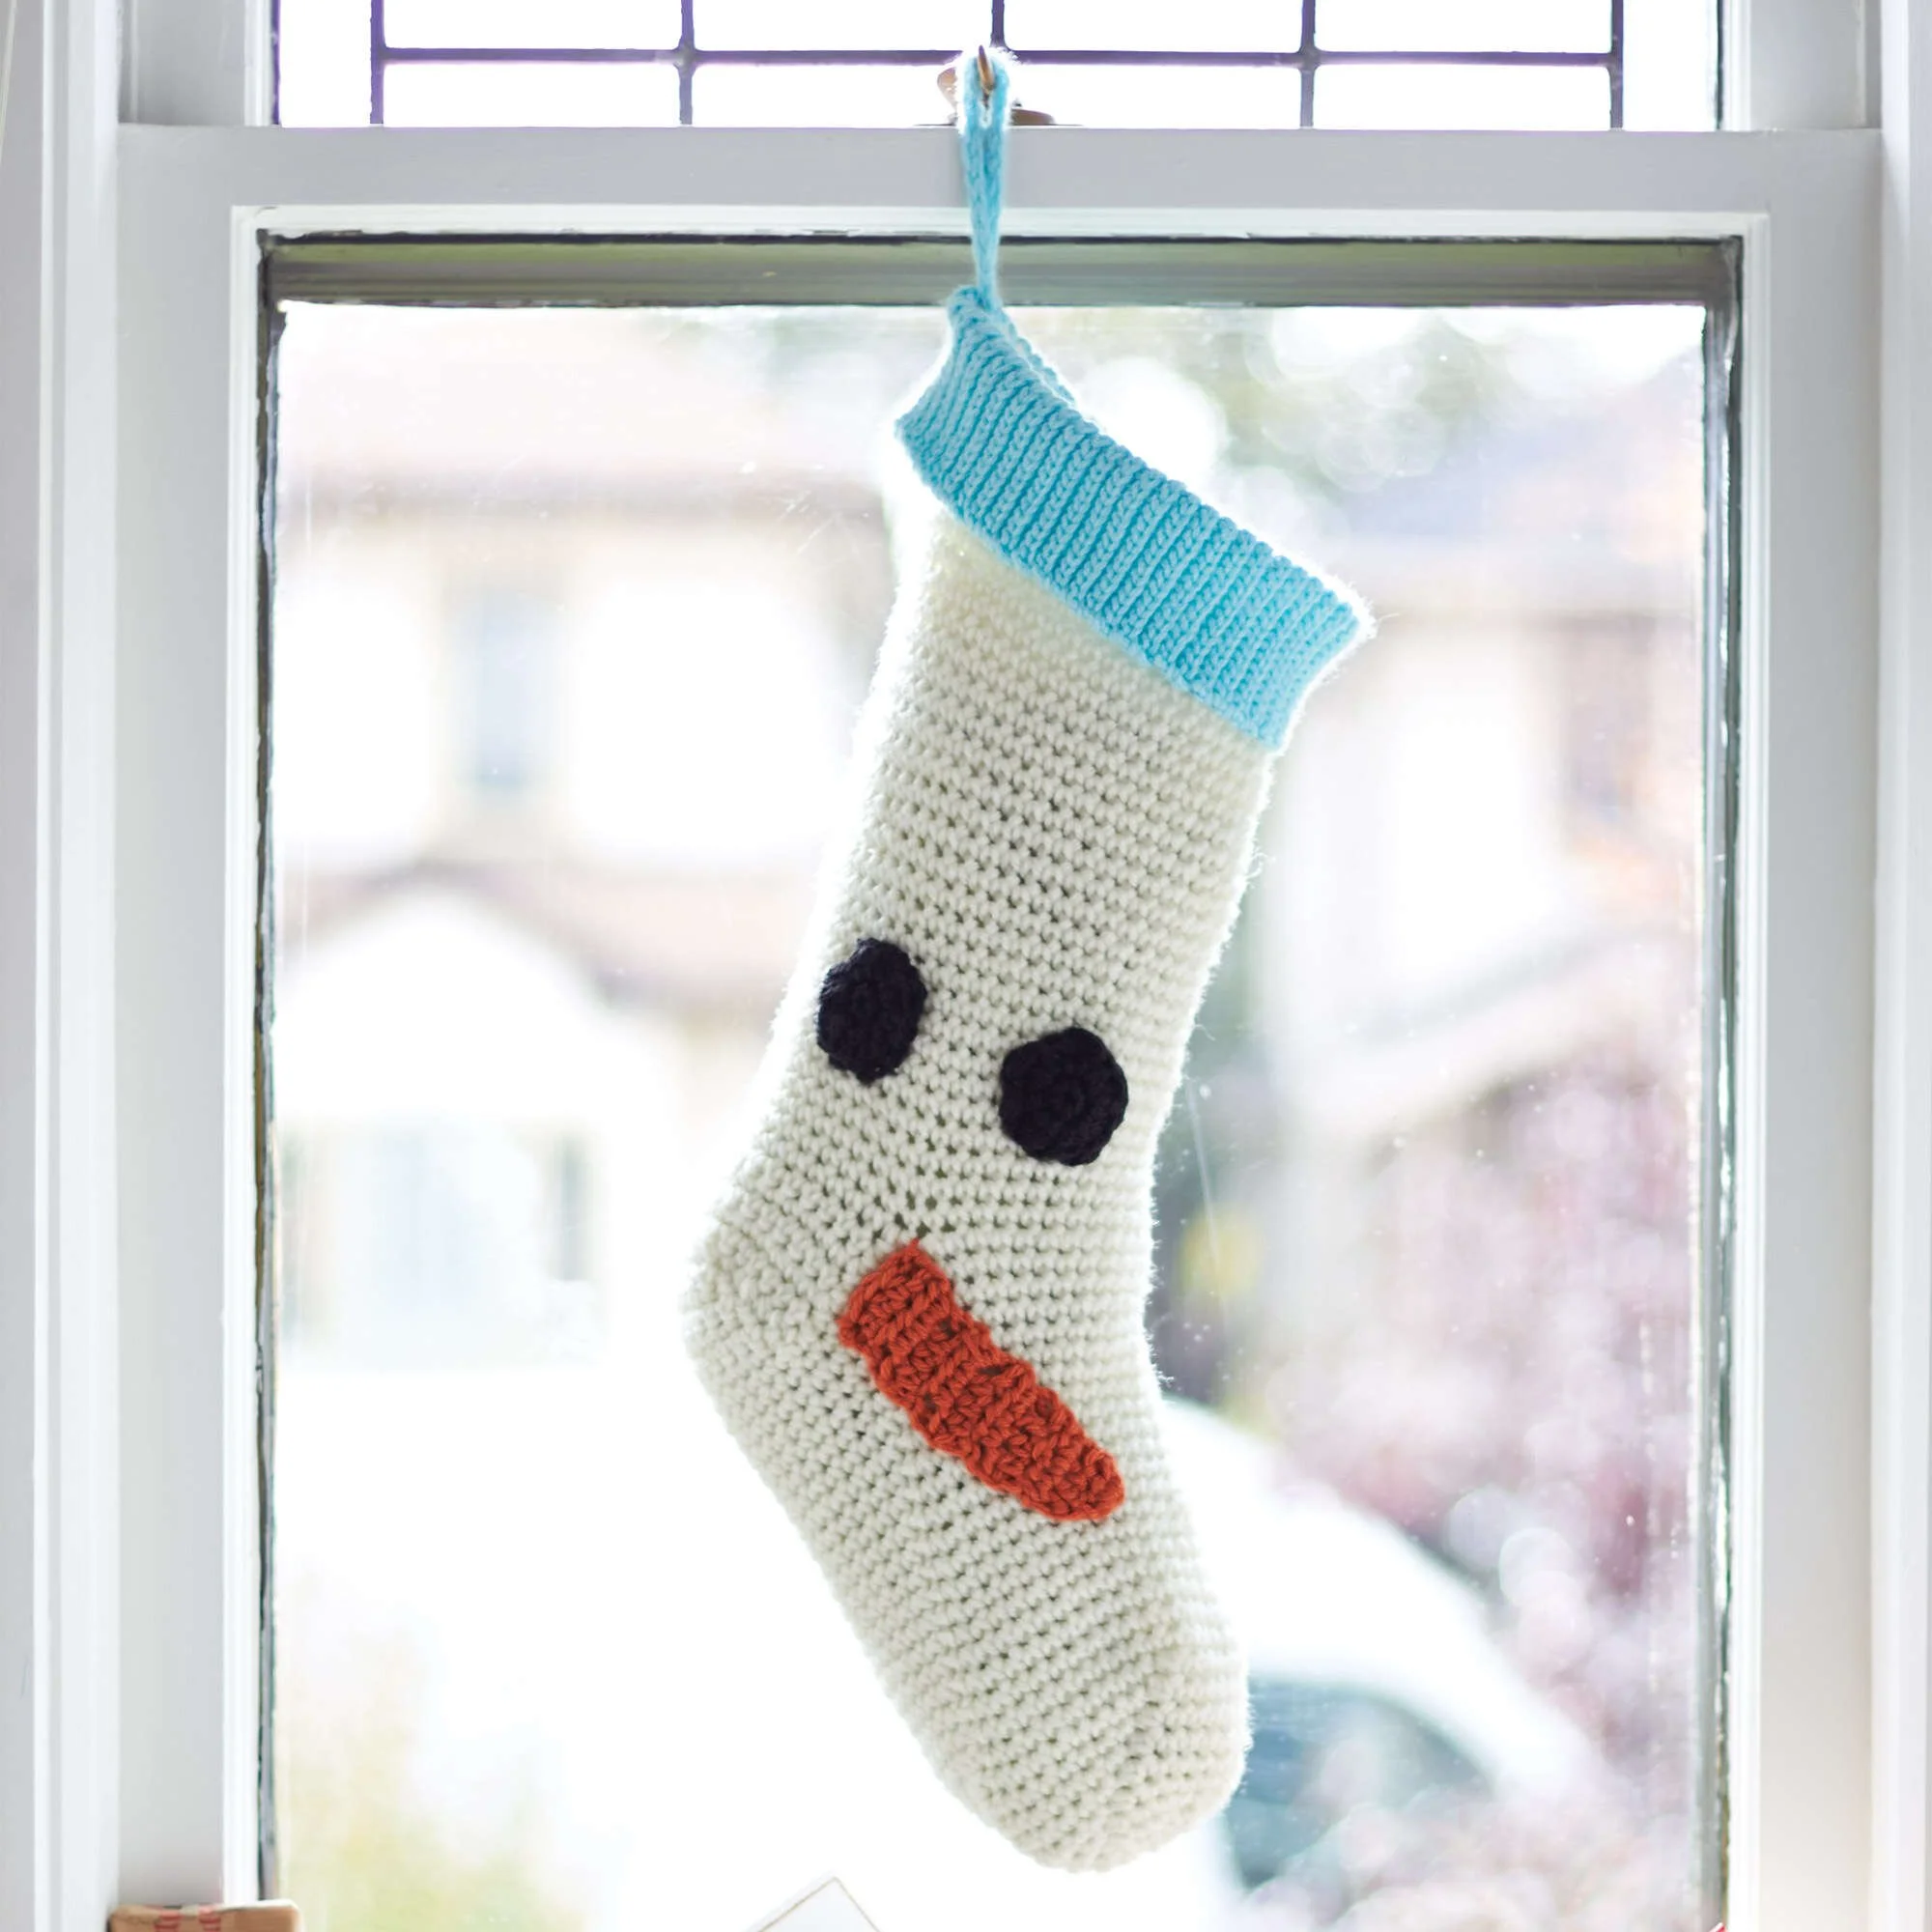
Celebrate the holiday season with a charming crochet Christmas stocking pattern! This festive project features adorable snowman and reindeer designs, perfect for hanging by the fireplace. The stockings are crafted using soft and cozy Bernat® Super Value™ yarn, promising warmth and durability. With straightforward construction involving basic stitches and color changes, both novice and experienced crocheters will find joy in creating these delightful decorations.
In this tutorial, you will follow clear instructions to create two types of character stockings. Each stocking is made up of a cuff, leg, heel, toe shaping, and embellishments for the snowman and reindeer. Keep your yarn and hook handy, and let’s bring some holiday spirit to your home!
Project Details
- Crochet terminology: U.S. terminology
- Skill level: Intermediate
- Finished size: Approximately 14 inches [35.5 cm] tall
- Construction method: Worked in rounds and rows
- Gauge: Not specified
Materials and Tools
| Yarn Option | Yarn and Specifications | Amount |
|---|---|---|
| Snowman | Bernat® Super Value™ (7 oz / 197 g; 426 yds / 389 m) | 1 ball each of Winter White (07407), Cool Blue (53730), Pumpkin (53630), Black (07421) |
| Reindeer | Bernat® Super Value™ (7 oz / 197 g; 426 yds / 389 m) | 1 ball each of Taupe (53012), Winter White (07407), Cherry Red (53436), Black (07421) |
- Size U.S. H/8 (5 mm) crochet hook (or size needed to obtain gauge)
- Stitch marker
Abbreviations
| Abbreviation | Meaning |
|---|---|
| ch | chain |
| sl st | slip stitch |
| sc | single crochet |
| dc | double crochet |
| hdc | half double crochet |
| st(s) | stitch(es) |
| rem | remaining |
| RS | right side |
| WS | wrong side |
Preparation and Techniques
Working in a Spiral
This pattern involves working in joined rounds for the body of the stockings. It is essential to keep track of where each round begins, using a stitch marker to indicate the start.
Changing Yarn Colors
When changing colors in your work, finish the last stitch in the previous color, then complete the stitch using the new color. Make sure to carry the old color up the side or fasten it off as needed.
Complete Pattern Instructions
Cuff
- With Contrast A (Cool Blue for Snowman or Winter White for Reindeer), ch 17.
- 1st row: (RS) 1 sl st in 2nd ch from hook, 1 sl st in each ch to end of chain. Turn. (16 sl st)
- 2nd row: Working in back loops only, 1 sl st in each sl st across. Turn.
- Repeat 2nd row until work from beg measures 14″ [35.5 cm], ending on a WS row.
- Join Cuff: Working in back loops only, sl st last row and remaining loops of foundation ch together. Fasten off.
Leg
- Join Main Color (MC) with a sl st to the side edge of Cuff.
- 1st rnd: Ch 1. Work 46 sc evenly around side edge of Cuff. Join with sl st to first sc.
- 2nd rnd: Ch 1. 1 sc in each sc around. Join with sl st to first sc.
- Repeat 2nd rnd until the work from the bottom of the Cuff measures 9″ [23 cm].
Heel
- With RS facing, join MC with sl st to the first sc.
- 1st row: Ch 1. 1 sc in same sp as last sl st. 1 sc in each of next 22 sc. Turn. Leave remaining sts unworked.
- 2nd row: Ch 1. 1 sc in each sc to end of row. Turn.
- Repeat 2nd row for 2″ [5 cm], ending on a WS row.
- Shape heel:
- 1st row (RS): Ch 1. 1 sc in each of next 15 sc. Sc2tog. 1 sc in next sc. Turn. Leave remaining sts unworked.
- 2nd row: Ch 1. 1 sc in each of the first 9 sts. Sc2tog. 1 sc in next sc. Turn.
- 3rd row: Ch 1. 1 sc in each of the first 10 sts. Sc2tog. 1 sc in next sc. Turn.
- 4th row: Ch 1. 1 sc in each of the first 11 sts. Sc2tog. 1 sc in next sc. Turn.
- 5th row: Ch 1. 1 sc in each of the first 12 sts. Sc2tog. 1 sc in next sc. Turn.
- 6th row: Ch 1. 1 sc in each of the first 13 sts. Sc2tog. 1 sc in next sc. Turn.
- 7th and 8th rows: Ch 1. 1 sc in each of the first 14 sts. Sc2tog. Turn. (15 sts)
- Fasten off at the end of the 8th row.
Joining Round
- With RS facing, join MC with sl st at left side of Heel Base.
- Ch 1. 1 sc in each of the next 23 sc of instep. Place marker.
- Work 7 sc up right side of Heel.
- 1 sc in each of next 15 sc across the end of Heel and 7 sc down left side of Heel.
- Join with sl st to first sc. (52 sc)
Christmas Character Stockings (Toe Shaping)
- Next rnd (after 52 sc):
- 2nd rnd: Ch 1. 1 sc in each sc to the marker. Sc2tog. 1 sc in each sc to last 2 sc. Sc2tog. Join with sl st to first sc.
- Repeat 2nd rnd until 44 sts remain.
- Next rnd:
- Ch 1. 1 sc in each sc around. Join with sl st to first sc.
- Repeat last rnd until work from joining rnd measures 5½” [14 cm].
- Shape toe:
- 1st rnd: Ch 1. (1 sc in each of the next 9 sc. Sc2tog) 4 times. Join with sl st to first sc.
- 2nd rnd: Ch 1. (1 sc in each of the next 8 sc. Sc2tog) 4 times. Join with sl st to first sc.
- Continue in the same manner, decreasing 4 sts on every rnd until 12 sts remain.
- Break yarn, leaving a long end. Draw the end tightly through the remaining sts and fasten securely.
Hanging Loop
- With Contrast A, ch 25.
- Sl st in 2nd ch from hook and each ch to end of chain. Fasten off.
- Fold in half and sew in position.
Snowman (Make)
Eyes (Make 2)
- With Contrast C (Black), ch 2.
- 1st rnd: 5 sc in 2nd ch from hook. Join with sl st to first sc.
- 2nd rnd: Ch 2. (1 dc, 1 hdc) in same sp as last sl st. (1 hdc, 1 dc, 1 hdc) in each of the next 4 sc. Join with sl st to the top of ch 2. Fasten off.
Nose (Make 1)
- With Contrast B (Pumpkin), ch 3.
- 1st row: 3 hdc in 3rd ch from hook (counts as 4 hdc). Turn.
- 2nd row: Ch 2. 1 hdc in each of next 3 hdc. Turn. (4 hdc)
- 3rd row: Ch 2. 1 hdc in the first hdc. 1 hdc in each of next 3 hdc. Turn. (5 hdc)
- 4th to 7th rows: Ch 2. 1 hdc in each of next 4 hdc. Turn. Fasten off after the 7th row.
Sewing
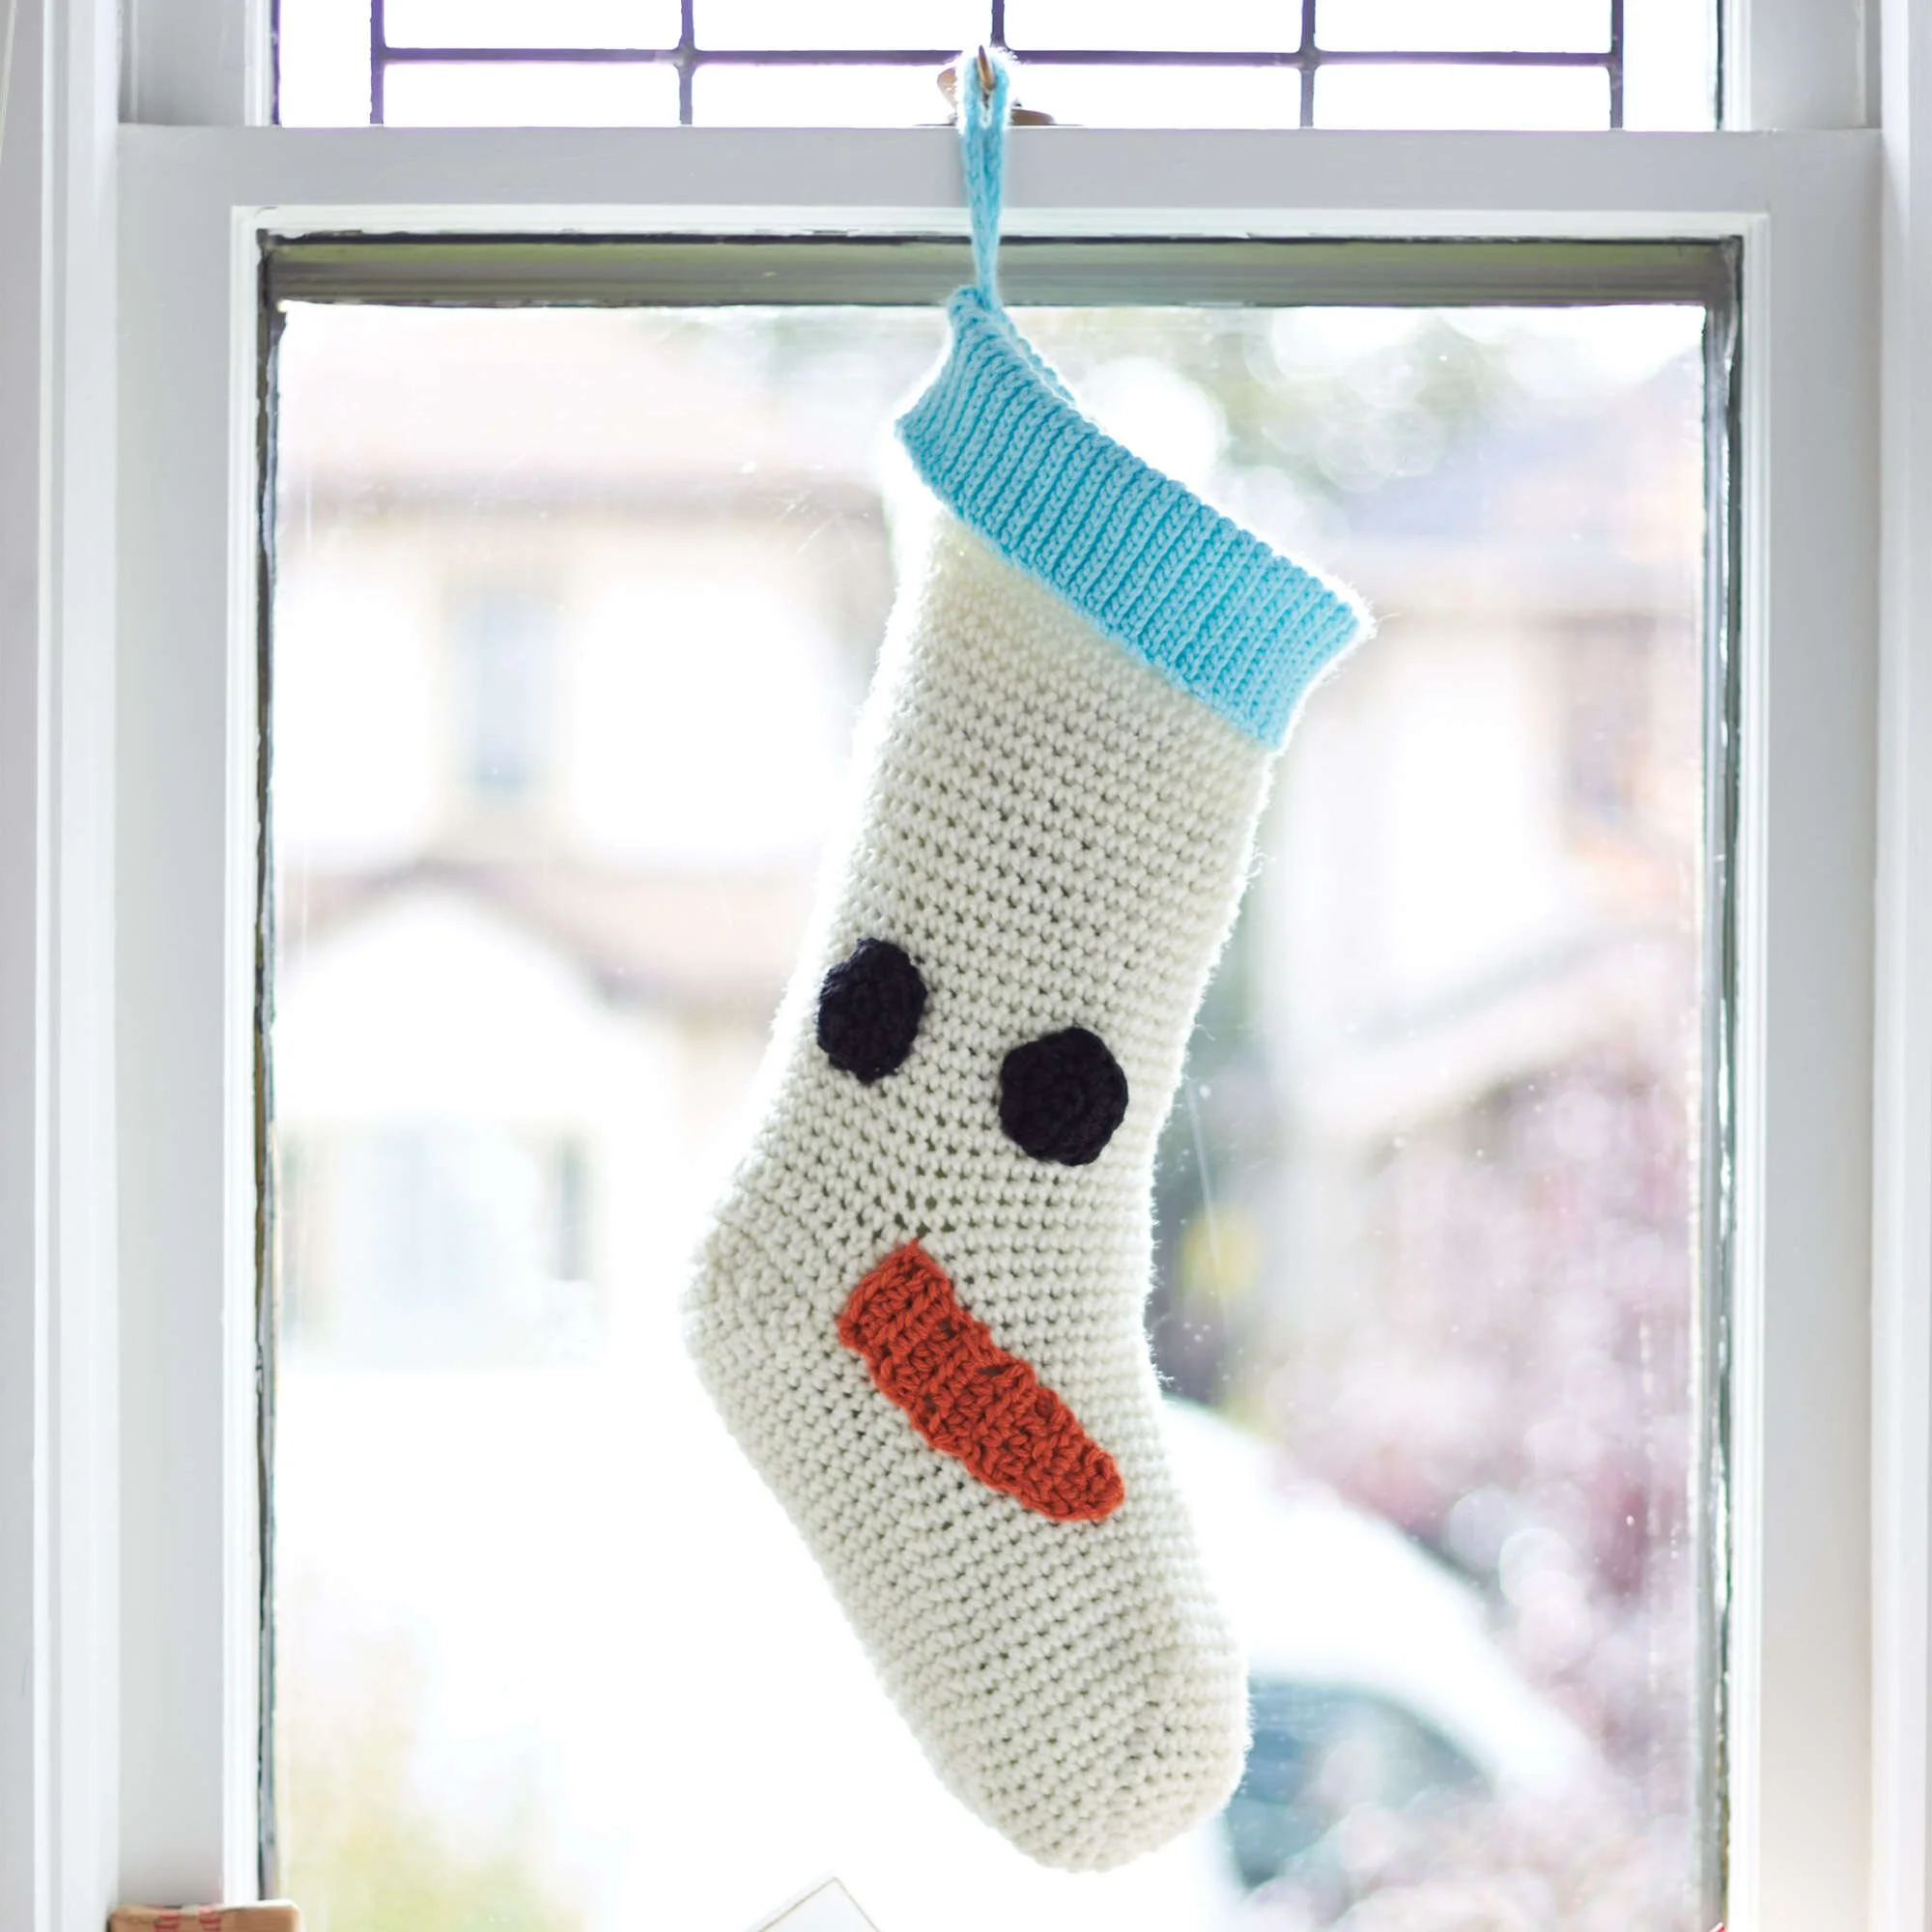
Sew eyes and nose to stocking as shown in the picture.
Reindeer (Make)
Eyes (Make 2)
- With Contrast C (Black), ch 2.
- 1st row: 2 sc in 2nd ch from hook. Turn. (2 sc)
- 2nd row: Ch 1. 2 sc in each of the next 2 sc. Turn. (4 sc)
- 3rd row: Ch 1. 2 sc in first sc. 1 sc in each of next 2 sc. 2 sc in last sc. Turn. (6 sc)
- 4th row: Ch 1. 2 sc in first sc. 1 hdc in each of next 4 sc. 2 sc in last sc. Join Contrast A (Winter White). Turn. (8 sts)
- 5th row: With A, ch 1. Sc2tog. 1 sc in each of next 4 hdc. Sc2tog. Turn. (6 sts)
- 6th row: Ch 1. Sc2tog. 1 sc in each of next 2 sc. Sc2tog. Turn. (4 sts)
- 7th row: Ch 1. (Sc2tog) twice. Fasten off.
Nose (Make 1)
- With Contrast B (Cherry Red), ch 2.
- 1st rnd: 6 sc in 2nd ch from hook. Join with sl st to first sc.
- 2nd rnd: Ch 1. 2 sc in each sc around. Join with sl st to first sc. (12 sc)
- Fasten off.
Ears (Make 2)
- With MC (Taupe), ch 2.
- 1st row: (RS) 2 sc in 2nd ch from hook. Turn. (2 sc)
- 2nd row: Ch 1. 2 sc in each of next 2 sc. Turn. (4 sc)
- 3rd row: Ch 1. 2 sc in first sc. 1 sc in each of next 2 sc. 2 sc in last sc. Turn. (6 sc)
- 4th row: Ch 1. 2 sc in first sc. 1 sc in each of next 4 sc. 2 sc in last sc. Turn. (8 sc)
- 5th to 10th rows: Ch 1. 1 sc in each sc to end of row. Turn.
- 11th row: Ch 1. Sc2tog. 1 sc in each of next 4 sc. Sc2tog. Turn.
- 12th row: Ch 1. Sc2tog. 1 sc in each of next 2 sc. Sc2tog. Fasten off.
Antlers (Make 2)
- With Contrast C (Black), ch 2.
- 1st row: (RS) 3 sc in 2nd ch from hook. Turn. (3 sc)
- 2nd to 7th rows: Ch 1. 1 sc in each sc to end of row. Turn.
- Fasten off after the last row.
Sewing
Sew eyes, nose, ears, and antlers to the stocking as shown in the picture.
Assembly and Finishing
- Sew the eyes, nose, ears, and antlers to the stocking as shown in the picture.
- Ensure all parts are securely attached.
- Weave in any loose ends to finish the stockings neatly.
Practical Tips
- Keep a consistent tension: Maintaining even tension throughout your stitches will give you a polished finish.
- Use a stitch marker: Mark your rounds to avoid losing your place, especially in spiral stitches.
- Try blocking: After finishing, lightly block the stockings to shape them nicely.
- Choose your colors: Be creative with color combinations to give your stockings a unique character.
Troubleshooting
- I lost my stitch count: Recount your stitches, and if you find fewer than required, check your last several rounds for missed stitches.
- The stocking is curling: This may occur with tight tension or incorrect stitch types. Adjust your tension or review your stitches for correctness.
- Parts aren’t securing together: Make sure you’re sewing tightly and securely to prevent any loose sections.
Care
To keep your crocheted stockings looking their best:
- Hand wash with mild detergent in cold water.
- Lay flat to dry to maintain shape.
- Avoid bleach and harsh chemicals that may damage the yarn.
Frequently Asked Questions
What materials are required for this crochet pattern?
You will need Bernat® Super Value™ yarn in specific colors, a U.S. size H/8 (5 mm) crochet hook, and a stitch marker.
How can I adjust the size of my stockings?
To adjust the size, you can use a thicker or thinner yarn and corresponding hook size. However, this can affect the overall look and character of the stockings.
Can I use different yarn colors?
Absolutely! Feel free to explore with various color combinations to create your unique festive designs.
How long does it take to complete one stocking?
The time varies based on skill level, but expect approximately a few hours to a day to complete one stocking, depending on your pace.
What if I am having trouble with the heel shaping?
If you’re struggling with the heel, check your stitch tension and ensure you are following the row instructions closely. It may help to mark the stitches for better visibility.
Can I sell the finished stockings?
Always check the original pattern’s usage terms. Generally, you may sell handmade items if they are made from purchased patterns.
Choose Your Next Crochet Project
Looking for more exciting crochet patterns? Explore our collection now!



