Get 30+ FREE Crochet Patterns — Join Our Newsletter
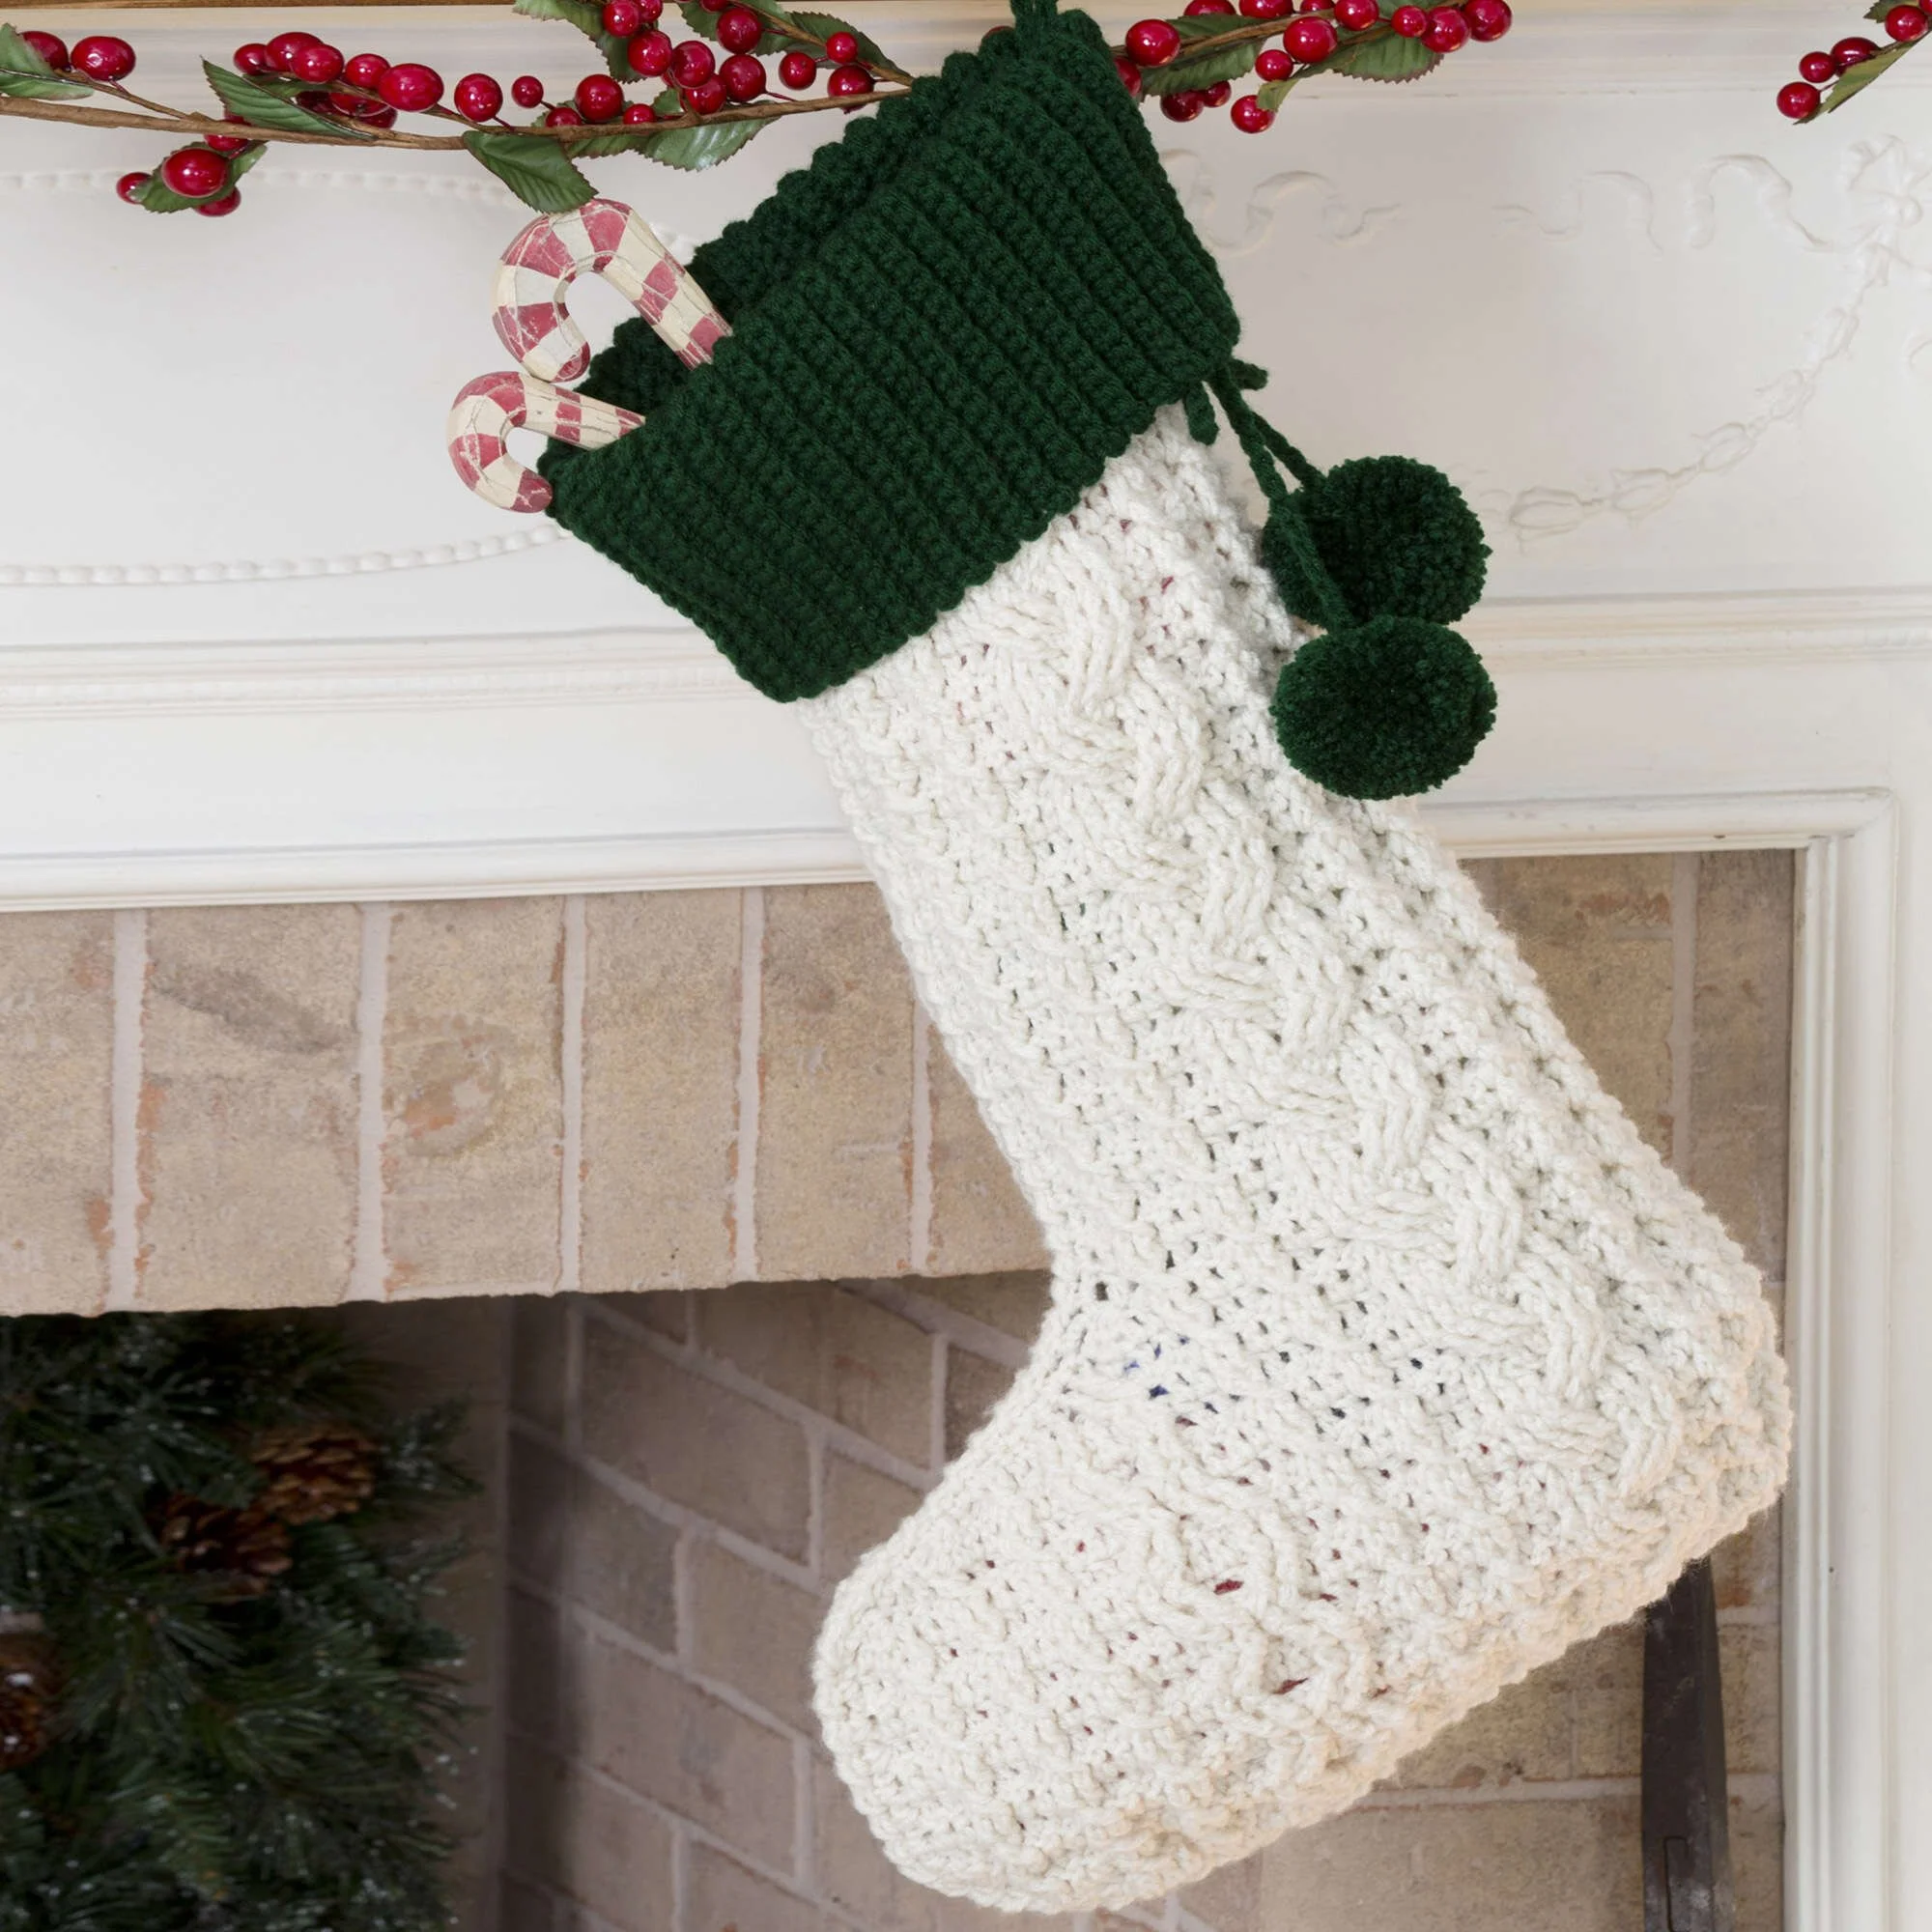
Crochet Cable Stocking Pattern Tutorial
Craft a delightful and intricate Crochet Cable Stocking with this comprehensive pattern. The stocking features textured cable stitches that add visual interest, making it a perfect decoration for the holiday season or a cozy addition to any home. This pattern guides you through creating both the front and back of the stocking, and finishing it with a decorative cuff and pompoms.
This project is suited for crocheters with intermediate skills, as it involves various techniques such as front post double crochet and back post double crochet. The result is a stylish stocking measuring approximately 20 inches tall, showcasing beautiful cable designs that will impress everyone!
Project Details
- Crochet terminology: US terminology
- Skill level: Intermediate
- Finished size: 20 inches (51 cm) tall
- Construction method: Worked in rows, with separate components assembled at the end
Materials and Tools
| Yarn option | Yarn and specifications | Amount |
|---|---|---|
| Color A | RED HEART® Super Saver® – 0313 Aran | 2 skeins |
| Color B | RED HEART® Super Saver® – 0389 Hunter Green | 1 skein |
- Susan Bates® Crochet Hook: 5.5mm [US I-9]
- Pompom maker for 2¼” (57mm) pompom
- Yarn needle
Please note that yarn weight and hook size can affect dimensions and structure. Ensure you have the right tools for the best results.
Abbreviations
| Abbreviation | Meaning |
|---|---|
| ch | Chain |
| dc | Double crochet |
| sc | Single crochet |
| Fpdc | Front post double crochet |
| Bpdc | Back post double crochet |
| lc | Left cable stitch |
| rc | Right cable stitch |
| dc3tog | Double crochet three together |
Preparation and Techniques
Working in Rows
This pattern is worked in rows, switching between the right side and the wrong side periodically. Make sure to follow the row numbers closely to ensure proper construction.
Changing Colors
When changing colors from Color A to Color B, simply complete the last stitch in the row with the new color. This serves to maintain a clean transition between colors.
Complete Pattern Instructions
STOCKING FRONT (Front)
Foot
| Row | Instructions | Stitches |
|---|---|---|
| Foundation | With A, ch 42. | – |
| 1 | Dc in 4th ch from hook, dc in each remaining ch across—40 dc. | 40 |
| 2 | Ch 4, dc in 4th ch from hook, [dc in next 2 sts, Bpdc around each of next 2 sts] 3 times, dc in next 4 sts, [Bpdc around each of next 2 sts, dc in next 2 sts] 3 times, Bpdc around each of next 9 sts, dc in next 2 sts, Bpdc around each of next 2 sts, dc in next st, 2 dc in last dc. Turn—46 sts. | 46 |
| 3 | Ch 4, Fpdc around first st, working in front of Fpdc just made, dc in first ch of beginning ch 4, dc in next 2 sts, 1/1 LC, dc in next 2 sts, Fpdc around each of next 3 sts, 3/3 LC, [dc in next 2 sts, 1/1 LC] twice, dc in next 2 sts, 2/2 LC, 2/2 RC, [dc in next 2 sts, 1/1 LC] 3 times, dc again in last dc. Turn—49 sts. | 49 |
| 4 | Ch 4, dc in 4th ch from hook, dc in next dc, [Bpdc around each of next 2 sts, dc in next 2 sts] 2 times, Bpdc around each of next 2 sts, dc in next 4 sts, Bpdc around each of next 4 sts, dc in next 4 sts, [Bpdc around each of next 2 sts, dc in next 2 sts] twice, Bpdc around each of next 9 sts, [dc in next 2 sts, Bpdc around each of next 2 sts] twice, 2 dc in last dc. Turn—52 sts. | 52 |
| 5 | Ch 3, dc in next dc, [1/1 LC, dc in next 2 sts] twice, 3/3 RC, Fpdc around each of next 3 sts, [dc in next 2 sts, 1/1 LC] twice, dc in next 2 sts, 2/2 RC, 2/2 LC, [dc in next 2 sts, 1/1 LC] 3 times, dc in last 3 sts. Turn. | – |
| 6 | Ch 3, [dc in next 2 sts, Bpdc around each of next 2 sts] 4 times, dc in next 4 sts, [Bpdc around each of next 2 sts, dc in next 2 sts] 3 times, Bpdc around each of next 9 sts, [dc in next 2 sts, Bpdc around each of next 2 sts] twice, dc in last 2 sts. Turn. | – |
| 7 | Ch 3, dc in next dc, [1/1 LC, dc in next 2 sts] twice, Fpdc around each of next 3 dc, 3/3 LC, [dc in next 2 sts, 1/1 LC] twice, dc in next 2 sts, 2/2 LC, 2/2 RC, [dc in next 2 sts, 1/1 LC] 3 times, dc in last 3 sts. Turn. | – |
| 8 | Ch 3, [dc in next 2 dc, Bpdc around each of next 2 sts] 3 times, dc in next 4 sts, Bpdc around each of next 4 sts, dc in next 4 sts, [Bpdc around each of next 2 sts, dc in next 2 sts] twice, Bpdc around each of next 9 sts, [dc in next 2 sts, Bpdc around each of next 2 sts] twice, dc in last 2 sts. Turn. | – |
| 9–11 | Repeat Rows 5–7. | – |
| 12 | Ch 3, dc3tog, dc in next st, [dc in next 2 sts, Bpdc around each of next 2 sts] twice, dc in next 4 sts, Bpdc around each of next 4 sts, dc in next 4 sts, [Bpdc around each of next 2 sts, dc in next 2 sts] twice, Bpdc around each of next 9 sts, [dc in next 2 sts, Bpdc around each of next 2 sts] twice, dc in last 2 sts. Turn—50 sts. | 50 |
| 13 | Ch 3, dc in next dc, [1/1 LC, dc in next 2 sts] twice, 3/3 RC, Fpdc around each of next 3 sts, [dc in next 2 sts, 1/1 LC] twice, dc in next 2 sts, 2/2 RC, 2/2 LC, [dc in next 2 sts, 1/1 LC] twice, dc in next 2 sts, dc3tog. Turn—48 sts. | 48 |
| 14 | Ch 3, dc2tog, Bpdc around each of next 2 sts, [dc in next 2 sts, Bpdc around each of next 2 sts] 2 times, dc in next 4 sts, [Bpdc around each of next 2 sts, dc in next 2 sts] 3 times, Bpdc around each of next 9 sts, [dc in next 2 sts, Bpdc around each of next 2 sts] twice, dc in last 2 sts. Turn—46 sts. | 46 |
| 15 | Ch 3, dc in next dc, [1/1 LC, dc in next 2 sts] twice, Fpdc around each of next 3 sts, 3/3 LC, [dc in next 2 sts, 1/1 LC] twice, dc in next 2 sts, 2/2 LC, 2/2 RC, dc in next 2 sts, 1/1 LC, dc in next 2 sts, dc3tog. Turn—44 sts. | 44 |
| – | Fasten off. | – |
Leg (Front)
| Row | Instructions | Stitches |
|---|---|---|
| 1 | With wrong side facing, skip first 13 sts of last row, draw up a loop of A in next st, ch 3, dc2tog (beginning ch-3 and dc2tog count as one dc3tog), dc in next st, [Bpdc around each of next 2 sts, dc in next 2 sts] twice, Bpdc around each of next 9 sts, [dc in next 2 sts, Bpdc around each of next 2 sts] twice, dc in last 2 sts. Turn—29 sts. | 29 |
| 2 | Ch 3, dc in next dc, [1/1 LC, dc in next 2 sts] twice, 3/3 RC, Fpdc around each of next 3 sts, [dc in next 2 sts, 1/1 LC] twice, dc in last 2 sts. Turn. | – |
| 3 | Ch 3, dc in next st, [Bpdc around each of next 2 sts, dc in next 2 sts] twice, Bpdc around each of next 9 sts, [dc in next 2 sts, Bpdc around each of next 2 sts] twice, dc in last 2 sts. Turn. | – |
| 4 | Ch 3, dc in next dc, [1/1 LC, dc in next 2 sts] twice, Fpdc around each of next 3 sts, 3/3 LC, [dc in next 2 sts, 1/1 LC] twice, dc in last 2 sts. Turn. | – |
| 5 | Repeat Row 3. | – |
| 6–33 | Repeat Rows 2–5 seven times. | – |
| 34 | Repeat Row 2. Fasten off. | – |
STOCKING BACK (Back) (mirror-image of front)
Foot
| Row | Instructions | Stitches |
|---|---|---|
| Foundation | With A, ch 42. | – |
| 1 | Ch 4, dc in 4th ch from hook, dc in next st, [1/1 LC, dc in next 2 sts] twice, 2/2 RC, 2/2 LC, [dc in next 2 sts, 1/1 LC] twice, dc in next 2 sts, 3/3 RC, Fpdc around each of next 3 dc, dc in next 2 sts, 1/1 LC, dc again in last dc (same dc as last leg of last 1/1 LC)—43 sts. | 43 |
| 2 | Ch 4, dc in 4th ch from hook, dc in next st, Bpdc around each of next 2 sts, dc in next 2 sts, Bpdc around each of next 9 sts, [dc in next 2 sts, Bpdc around each of next 2 sts] 3 times, dc in next 4 sts, [Bpdc around each of next 2 sts, dc in next 2 sts] 3 times, 2 dc in last st—46 sts. | 46 |
| 3 | Ch 4, dc in 4th ch from hook, [1/1 LC, dc in next 2 sts] 3 times, 2/2 LC, 2/2 RC, [dc in next 2 sts, 1/1 LC] twice, dc in next 2 sts, Fpdc around each of next 3 sts, 3/3 LC, dc in next 2 sts, 1/1 LC, dc in next 2 sts, 2 dc in last st—49 sts. | 49 |
| 4 | Ch 4, dc in 4th ch from hook, [Bpdc around each of next 2 sts, dc in next 2 sts] twice, Bpdc around each of next 9 sts, [dc in next 2 sts, Bpdc around each of next 2 sts] twice, dc in next 4 sts, Bpdc around each of next 4 sts, dc in next 4 sts, [Bpdc around each of next 2 sts, dc in next 2 sts] 3 times, dc in next st, 2 dc in last dc—52 sts. | 52 |
| 5 | Ch 3, dc in next 2 sts, [1/1 LC, dc in next 2 sts] 3 times, 2/2 RC, 2/2 LC, [dc in next 2 sts, 1/1 LC] twice, dc in next 2 sts, 3/3 RC, Fpdc around each of next 3 dc, [dc in next 2 sts, 1/1 LC] twice, dc in last 2 sts. Turn. | – |
| 6 | Ch 3, dc in next st, [Bpdc around each of next 2 sts, dc in next 2 sts] twice, Bpdc around each of next 9 sts, [dc in next 2 sts, Bpdc around each of next 2 sts] 3 times, dc in next 4 sts, [Bpdc around each of next 2 sts, dc in next 2 sts] 4 times, dc in last dc. Turn. | – |
| 7 | Ch 3, dc in next 2 sts, [1/1 LC, dc in next 2 sts] 3 times, 2/2 LC, 2/2 RC, [dc in next 2 sts, 1/1 LC] twice, dc in next 2 sts, Fpdc around each of next 3 dc, 3/3 LC, [dc in next 2 sts, 1/1 LC] twice, dc in last 2 sts. Turn. | – |
| 8 | Ch 3, dc in next st, [Bpdc around each of next 2 sts, dc in next 2 sts] twice, Bpdc around each of next 9 sts, [dc in next 2 sts, Bpdc around each of next 2 sts] twice, dc in next 4 sts, Bpdc around each of next 4 sts, dc in next 4 sts, [Bpdc around each of next 2 sts, dc in next 2 sts] 3 times, dc in last dc. Turn. | – |
| 9–11 | Repeat Rows 5–7. | – |
| 12 | Ch 3, dc in next st, [Bpdc around each of next 2 sts, dc in next 2 sts] twice, Bpdc around each of next 9 sts, [dc in next 2 sts, Bpdc around each of next 2 sts] twice, dc in next 4 sts, Bpdc around each of next 4 sts, dc in next 4 sts, [Bpdc around each of next 2 sts, dc in next 2 sts] twice, dc in next 2 sts, dc3tog. Turn—50 sts. | 50 |
| 13 | Ch 3, dc2tog, [dc in next 2 sts, 1/1 LC] twice, dc in next 2 sts, 2/2 RC, 2/2 LC, [dc in next 2 sts, 1/1 LC] twice, dc in next 2 sts, 3/3 RC, Fpdc around each of next 3 sts, [dc in next 2 sts, 1/1 LC] twice, dc in last 2 sts. Turn—48 sts. | 48 |
| 14 | Ch 3, dc in next st, [Bpdc around each of next 2 sts, dc in next 2 sts] twice, Bpdc around each of next 9 sts, [dc in next 2 sts, Bpdc around each of next 2 sts] 3 times, dc in next 4 sts, [Bpdc around each of next 2 sts, dc in next 2 sts] twice, Bpdc around each of next 2 sts, dc3tog. Turn—46 sts. | 46 |
| 15 | Ch 3, dc2tog, dc in next 2 sts, 1/1 LC, dc in next 2 sts, 2/2 LC, 2/2 RC, [dc in next 2 sts, 1/1 LC] twice, dc in next 2 sts, Fpdc around each of next 3 sts, 3/3 LC, [dc in next 2 sts, 1/1 LC] twice, dc in last 2 sts. Turn—44 sts. | 44 |
| – | Fasten off. | – |
Leg (Back)
| Row | Instructions | Stitches |
|---|---|---|
| 1 | Ch 3, dc in next st, [Bpdc around each of next 2 sts, dc in next 2 sts] twice, Bpdc around each of next 9 sts, [dc in next 2 sts, Bpdc around each of next 2 sts] twice, dc in next st, dc3tog, turn; leave remaining sts unworked—29 sts. | 29 |
| 2 | Ch 3, dc in next dc, [1/1 LC, dc in next 2 sts] twice, 3/3 RC, Fpdc around each of next 3 sts, [dc in next 2 sts, 1/1 LC] twice, dc in last 2 sts. Turn. | – |
| 3 | Ch 3, dc in next st, [Bpdc around each of next 2 sts, dc in next 2 sts] twice, Bpdc around each of next 9 sts, [dc in next 2 sts, Bpdc around each of next 2 sts] twice, dc in last 2 sts. Turn. | – |
| 4 | Ch 3, dc in next dc, [1/1 LC, dc in next 2 sts] twice, Fpdc around each of next 3 sts, 3/3 LC, [dc in next 2 sts, 1/1 LC] twice, dc in last 2 sts. Turn. | – |
| 5 | Repeat Row 3. | – |
| 6–33 | Repeat Rows 2–5 seven times. | – |
| 34 | Repeat Row 2. Fasten off. | – |
Cuff
| Row | Instructions | Stitches |
|---|---|---|
| 1 | With B, ch 28. Sc in 2nd ch from hook and in each ch across, turn—27 sc. | 27 |
| 2 | Ch 1, working in back loops only, sc in each sc across, turn. | – |
| 3 | Ch 1, working in back loops only, sc in first 23 sts, turn; leave remaining 4 sts unworked—23 sts. | 23 |
| 4 | Ch 1, working in back loops only, sc in each sc across, turn. | – |
| 5 | Ch 1, working in back loops only, sc in first 23 sc, sc in next 4 unworked sc of Row 2, turn—27 sts. | 27 |
| 6–8 | Ch 1, working in back loops only, sc in each sc across. | – |
| 9–74 | Repeat Rows 3–8 eleven more times. | – |
| 75–78 | Repeat Rows 3–6. | – |
Fasten off, leaving a long tail for sewing. Use tail to sew the short edges of the piece together.
Hanging Loop
| Row | Instructions | Stitches |
|---|---|---|
| 1 | With B, ch 31. Slip st in 2nd ch from hook and in each ch across. | – |
Fasten off.
Pompom Tie
| Row | Instructions | Stitches |
|---|---|---|
| 1 | With B, ch 70. Fasten off. | – |
Assembly and Finishing
Joining Components
Weave in ends. To add an edging, with right facing, join A with sc in the edge of the front stocking at the center of the bottom of the foot. Work (ch 1, sc) evenly spaced around the entire outer edge, working (sc, ch 1, sc) in each top corner; join with slip st in the first sc. Fasten off. Repeat edging around the back stocking.
Sewing the Cuff
Hold front and back with wrong sides together and stitches matching. With 2 strands of A held together, join yarn with slip st in ch-1 space of one top corner to work reverse sc down the side edge. Working through both thicknesses, ch 1, reverse sc evenly spaced around, adding extra sts to ease around corners, to the opposite top corner. Fasten off. Place cuff inside the top of the stocking, matching the shorter edge of the cuff with the top edge of the stocking. Sew the cuff to the top of the stocking. Fold the cuff over to the right side of the stocking.
Finishing Touches
Fold the hanging loop in half and sew ends to the top of the stocking at the back seam.
Pompom Attachment
With B, follow package instructions to use the pompom maker to make two pompoms. Sew one pompom to each end of the pompom tie. Sew the center of the pompom tie under the cuff at the back seam.
Practical Tips
- Check for even tension: Maintain consistent tension throughout your stitches to ensure an even appearance.
- Mark your rows: Use stitch markers to keep track of rows, making it easier to spot any mistakes.
- Test stitches: Complete a small swatch to ensure you are comfortable with stitch patterns before starting the full project.
- Use a yarn bowl: If working with multiple colors, consider using a yarn bowl to prevent tangling.
Troubleshooting
- Incorrect stitch count: If your stitch count is off, count your stitches on the last completed row to locate any mistakes. Look for dropped stitches or accidental increases.
- Uneven edges: If the sides of your stocking appear jagged, try to keep a tighter gauge or check your joining method when assembling the front and back.
- Coloring issues: When changing colors, ensure you add the new color at the correct point to avoid breaks in your pattern.
- Pompoms not holding shape: If pompoms are flat, ensure ample yarn was used and fluff them out after stitching into place.
Care and Storage
To keep your crocheted cable stocking looking great, it is recommended to:
- Hand wash in cold water with mild detergent.
- Lay flat to dry to maintain the shape.
- Avoid bleach and do not iron the finished piece.
Frequently Asked Questions
What size is the finished stocking?
The finished crochet cable stocking measures approximately 20 inches (51 cm) tall, making it an ideal size for holiday decoration or gift giving.
What skill level is required for this pattern?
This project is suited for intermediate crocheters, as it involves techniques such as front post and back post double crochet, making it great for those looking to improve their skills.
Can I use a different yarn weight?
Yes, you can use a different yarn weight, but keep in mind it may affect the final size and appearance of the stocking. Ensure to adjust your hook size accordingly.
How can I customize the stocking for different seasons?
Change colors based on seasonal celebrations! For example, red and white for Christmas, or pastel colors for springtime. Additionally, you can add personal embellishments like embroidered names.
How do I ensure my stitches are consistent?
To maintain consistent stitches, practice keeping an even tension throughout your work. Consider using the same hook size for future projects as variations can affect stitch height.
What techniques should I familiarize myself with before starting?
Familiarize yourself with front post and back post double crochet stitches, as well as the left and right cable stitches to successfully complete this pattern.