Get 30+ FREE Crochet Patterns — Join Our Newsletter
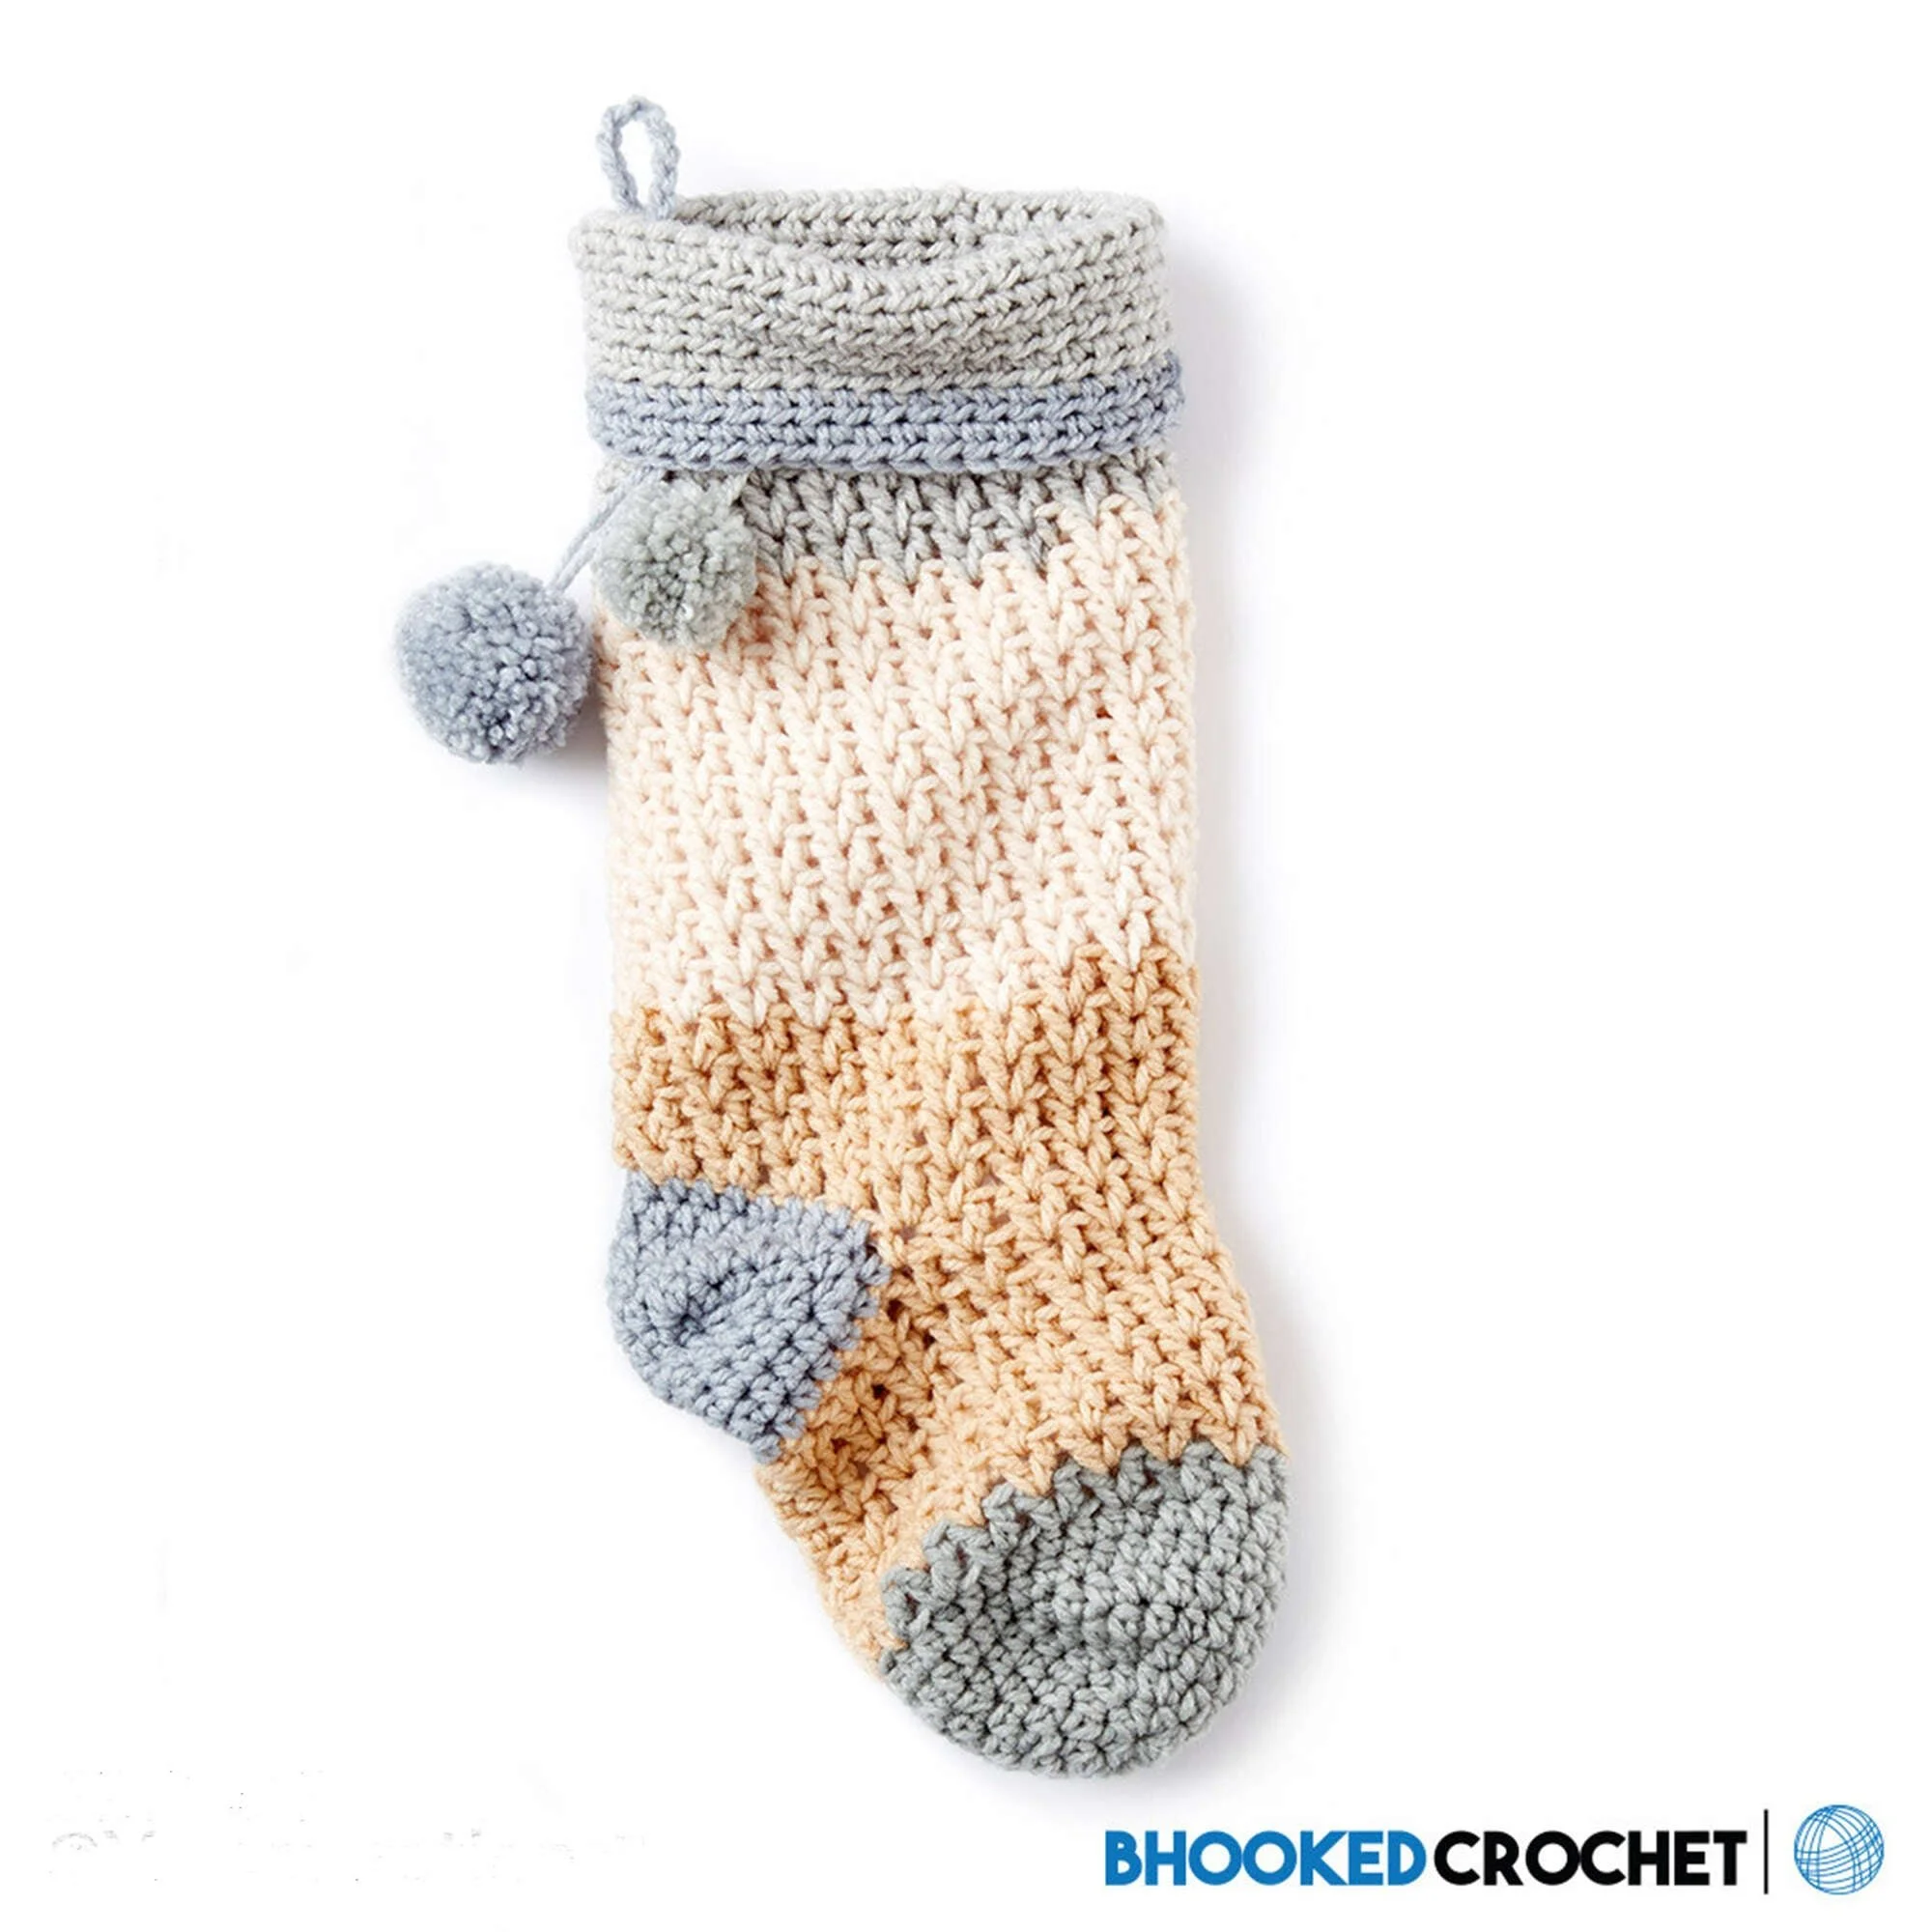
Crochet Christmas Stocking Pattern
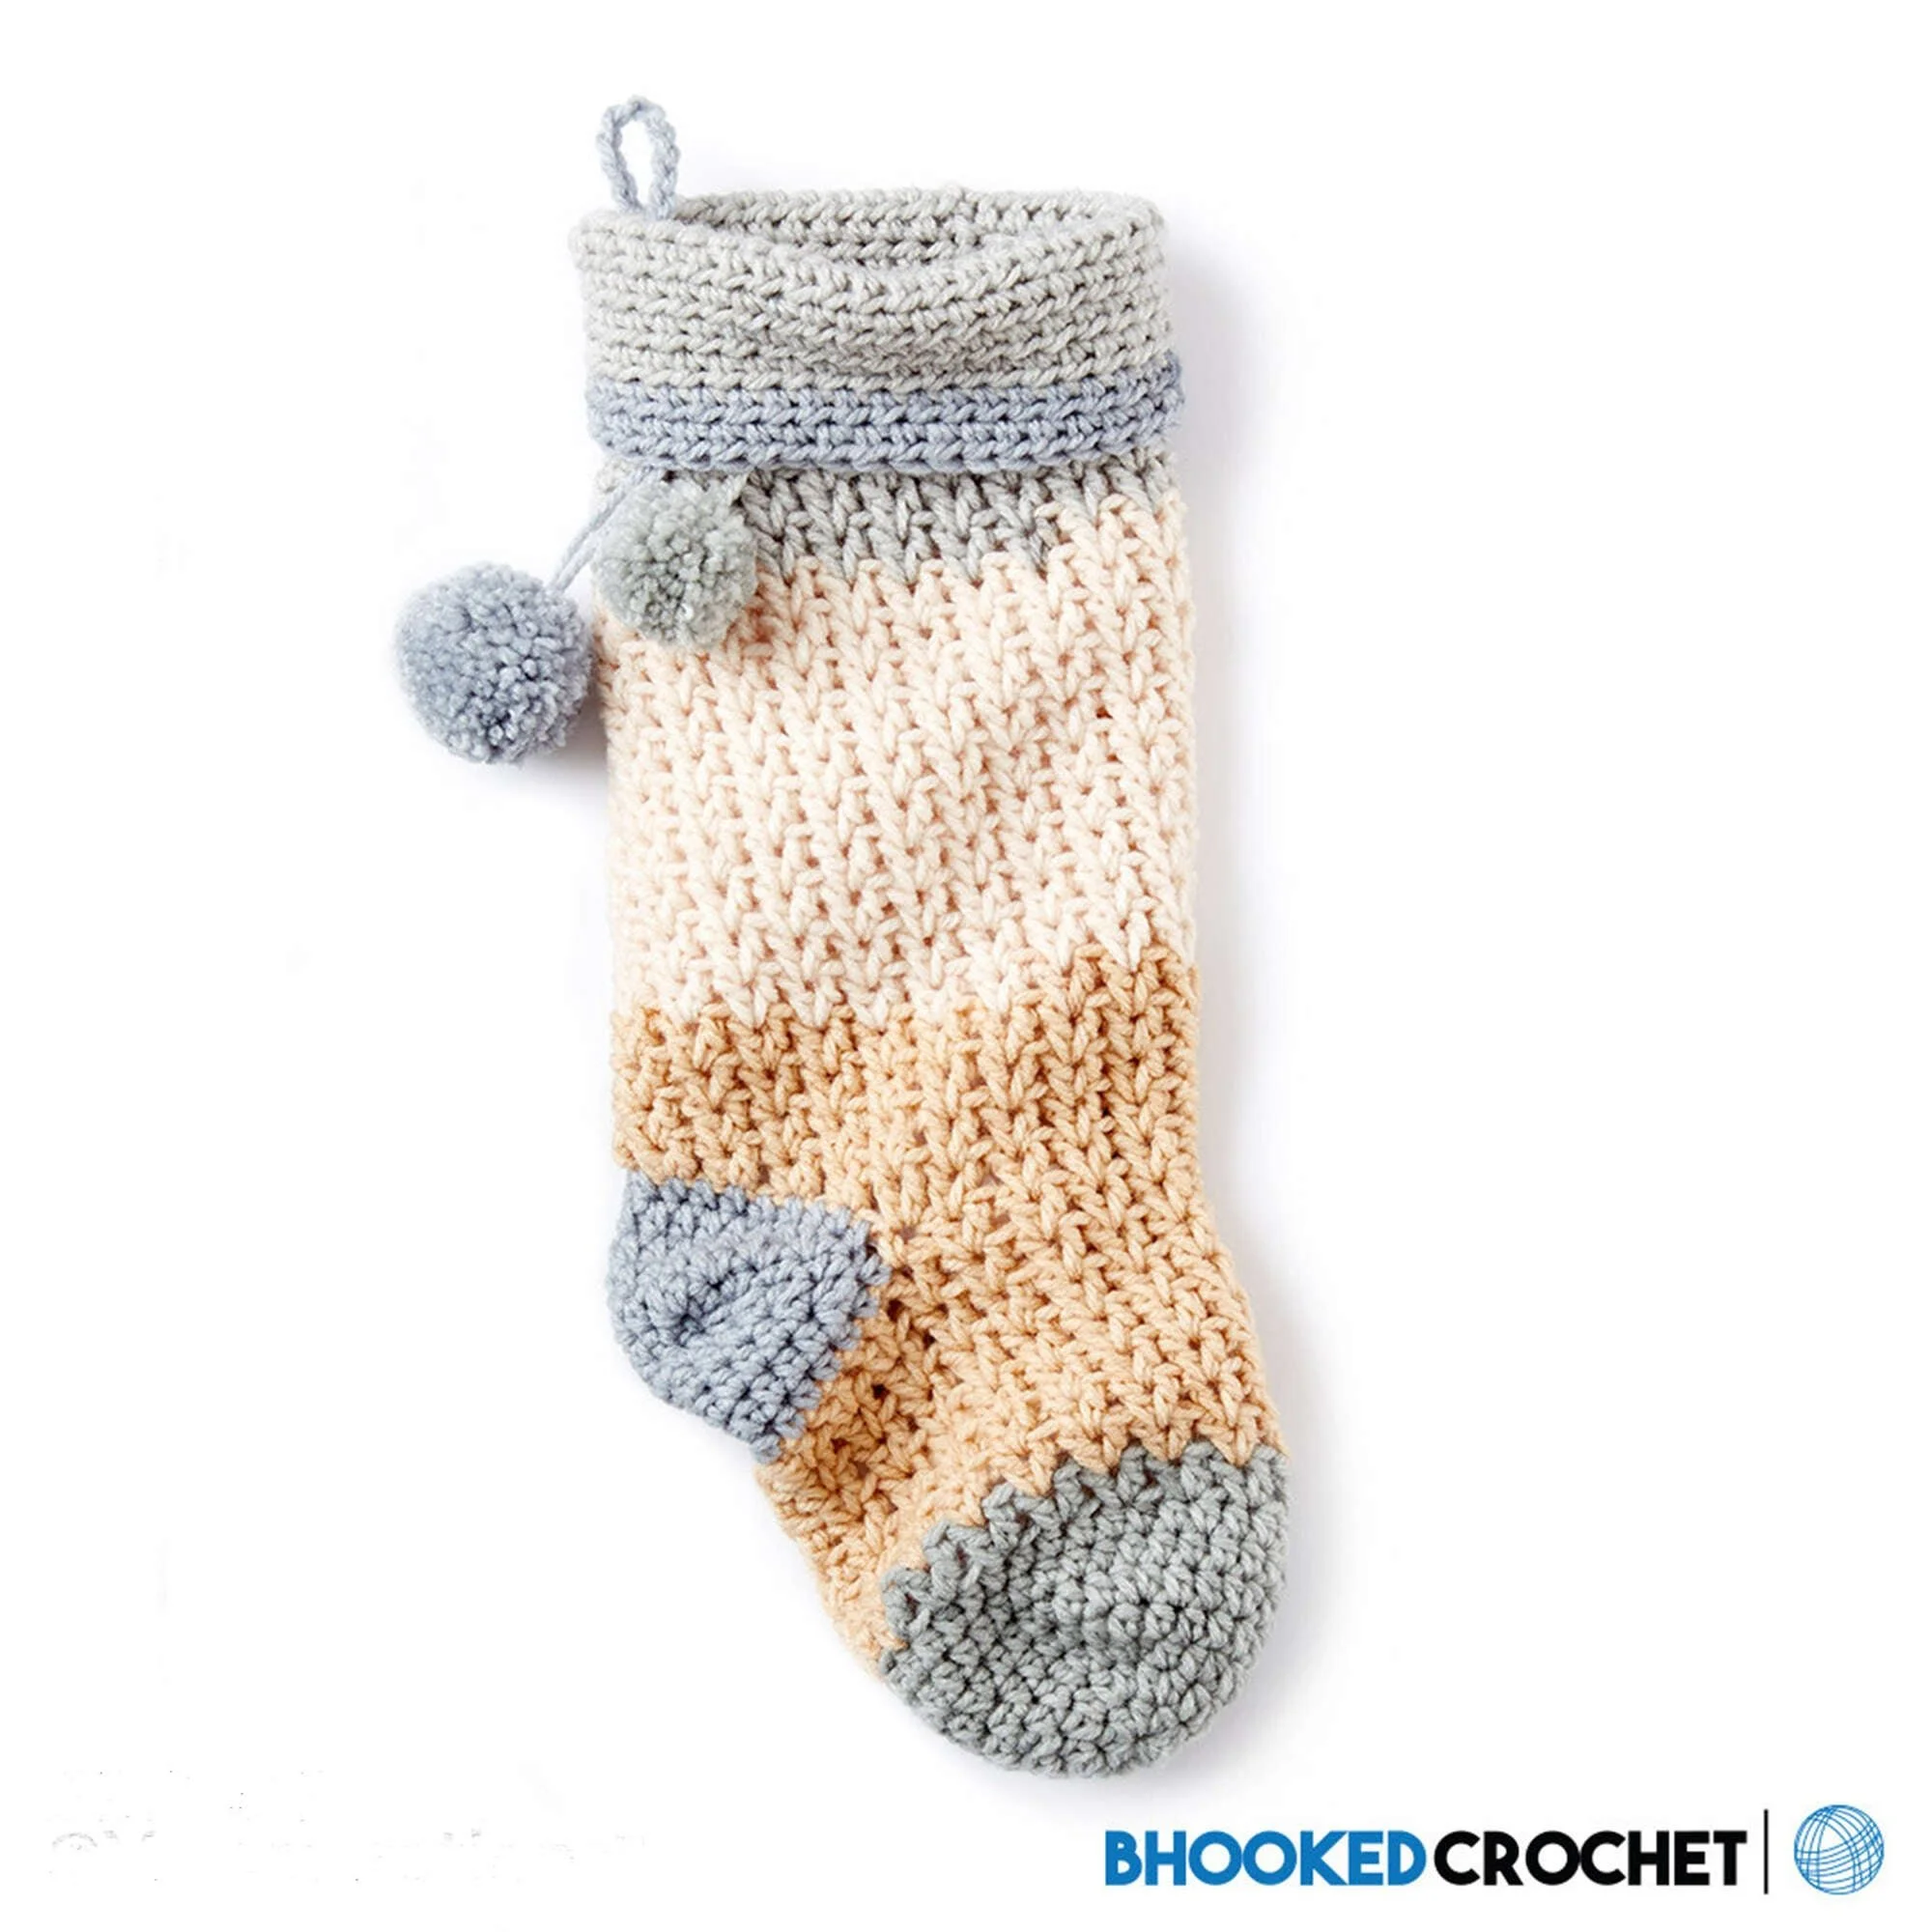
The Pop! Crochet Christmas Stocking is a delightful addition to your holiday decor, featuring a vibrant pop of color and unique texture. This snug stocking, created using Bernat® Pop!™ yarn, is designed to be both functional and stylish, making it perfect for hanging by the fireplace or as a cheerful gift for loved ones. The pattern involves working in rounds, starting from the toe and continuing through the body and heel, resulting in a beautifully shaped stocking.
This project is suitable for crocheters familiar with basic stitches and round construction techniques. As you follow along with the pattern, refer to any provided photos for guidance, ensuring your finished stocking matches your vision.
Project Details
- Crochet terminology: U.S.
- Skill level: Intermediate
- Finished size: Approximately 3″ [7.5 cm] wide at the top and 15″ [38 cm] tall
- Construction method: Worked in rounds
Materials and Tools
| Yarn option | Yarn and specifications | Amount |
|---|---|---|
| Bernat® Pop!™ | (5 oz / 140 g; 280 yds / 256 m) | 1 ball |
| Foggy Notion | (84012) | 1 ball |
- Size U.S. K/10½ (6.5 mm) crochet hook (or size needed to obtain gauge)
- 2 stitch markers
Abbreviations
| Abbreviation | Meaning |
|---|---|
| ch | chain |
| hdc | half double crochet |
| dc | double crochet |
| sc | single crochet |
| sl st | slip stitch |
| st(s) | stitch(es) |
| Rep | repeat |
Preparation and Techniques
Working in Rounds
This pattern primarily uses continuous rounds. To keep track of your progress, consider marking the first stitch of each round with a stitch marker. This will make it easier to identify the beginning of each round as you work.
Complete Pattern Instructions
Toe / Body (worked in rounds)
| Round | Instructions | Stitches |
|---|---|---|
| 1 | Ch 3. Work 8 hdc in 3rd ch from hook. Join with sl st to 2nd chain. | (8 sts) |
| 2 | Ch 2. Make 2 hdc in every stitch. Join with sl st to 2nd chain. | (16 sts) |
| 3 | Ch 2. *2 hdc in next st. 1 hdc in next st. Repeat from * around. Join with sl st to 2nd chain. | (24 sts) |
| 4 | Ch 2. 1 hdc in each st. | (24 sts) |
| 5 | Ch 2. *2 hdc in next st. 1 hdc in each of next 2 sts. Repeat from * around. Join with sl st to 2nd chain. | (32 sts) |
| 6–7 | Ch 2. 1 hdc in each st. | (32 sts each) |
| 8 | Ch 3. 1 dc in same st as ch. *Sk next st. 2 dc in next. Rep from * around. Join with sl st. | (24 sts) |
| 9–14 | Ch 3. 1 dc in same st as ch. *2 dc between next 2 dc group. Rep from * around. Join with sl st. | (24 sts each) |
| 15 | Ch 1. 1 sc in same space as sl st. *2 dc between next 2 dc group. Rep from * 7 times more. 1 sc between next 2 dc group. Ch 18. Join with sl st to first sc. | (24 sts) |
| 16 | Ch 3. 1 dc in same st as ch. *2 dc between next 2 dc group. Rep from * 7 times. 2 dc in sc. Sk first ch. 2 dc in next ch. Sk 1 ch. Rep from ** to end of ch. Join with sl st. | (24 sts) |
| 17–34 | Ch 3. 1 dc in same st as ch. *2 dc between next 2 dc group. Rep from * around. Join with sl st. | (24 sts each) |
| 35–44 | Ch 2. 1 hdc in each st. Join with sl st to 2nd ch. | (?? sts) |
Heel (worked after body of stocking)
| Round | Instructions | Stitches |
|---|---|---|
| 1 | Join yarn with sl st in middle v-stitch of chain with toe facing upward. Ch 2. 1 hdc in each of next 11 ch. 1 hdc in next 15 sts. 1 hdc in each of rem 7 ch. Join with sl st to 2nd ch. | (?? sts) |
| 2 | Ch 2. 1 hdc in each of next 8 sts. Hdc2tog. 1 hdc in next st and place marker. Hdc2tog. Hdc in next 10 sts. Hdc2tog. 1 hdc in next st and place marker. Hdc2tog. 1 hdc in each of last 5 sts. Join with sl st to 2nd ch. | (?? sts) |
| 3 | Ch 2. *1 hdc in each st until 2 sts before marker. Hdc2tog. 1 hdc in marked st. Hdc2tog. Rep from * once more. 1 hdc in each st to end of round. Join with sl st. | (?? sts) |
| 4–5 | Rep round 3. Fasten off. | (?? sts) |
Assembly and Finishing
Sew the Heel
Turn the stocking inside out and seam the heel using a whip stitch. Be sure to weave in all ends securely.
Fold and Secure the Top
Fold the top of the stocking down approximately 3″ [7.5 cm]. Make a chain of 15, fasten off, and secure just inside the top of the stocking for hanging.
Attach Pompoms
Attach pompoms to each end of the chain, securing them with a knot just below the fold for a festive touch.
Pompoms (make 1 each)
- Wind yarn around 3 to 4 fingers approximately 60 times.
- Remove from fingers and tie tightly in the center.
- Cut through each side of the loops to create the shape.
- Trim to achieve a smooth round shape.
Practical Tips
- Gauge Matters: Ensuring you obtain the correct gauge is crucial for achieving the right fit. Measure your work before proceeding.
- Mark Your Rounds: Using stitch markers will help you keep track of your rounds, especially when working with continuous rounds.
- Color Choices: Play with yarn colors to personalize your stocking. Consider using contrasting colors for the cuff and body to make it stand out.
Troubleshooting
- Wrong Size: If your stocking is too small, check your tension. Using a larger hook can help achieve the desired size.
- Uneven Stitches: If stitches look uneven, make sure you’re not pulling your yarn too tightly while working. Looser tension can create a more uniform look.
- Curved Edges: Curved edges may result from increases or decreases done incorrectly. Review your stitch counts ensuring they match the pattern.
Care Instructions
To care for your crocheted stocking:
- Hand Wash: It’s best to hand wash in cold water with gentle detergent.
- Dry Flat: Avoid wringing and lay flat to dry to maintain shape.
- Avoid Ironing: Do not iron directly on the yarn; instead, lightly steam the knitted areas for a fresh look if necessary.
Frequently Asked Questions
What size is the finished stocking?
The finished Pop! Crochet Christmas Stocking measures approximately 3″ [7.5 cm] wide at the top and 15″ [38 cm] tall, making it a perfect size for gifts or decorations.
What skill level is this pattern?
This pattern is classified as intermediate. It requires knowledge of basic crochet stitches and the ability to work in rounds. Familiarity with shaping is also helpful.
Can I substitute yarns?
Yes, you can substitute yarns, but be mindful that changing the weight or fiber content can affect the finished size and drape of the stocking. Ensure your chosen yarn matches the gauge requirements.
How do I hang the stocking?
The stocking includes a chain for hanging. Simply fold the top down, create the chain, and attach it as specified in the finishing instructions.
How can I make this pattern unique?
Add personal touches by incorporating different colors or embellishments, such as embroidery or decorative buttons, to customize your stocking.
Choose Your Next Crochet Project
Explore a range of creative crochet patterns and find your next favorite project. Browse our collection now!