Get 30+ FREE Crochet Patterns — Join Our Newsletter
Crochet Halloween Tree of Spookiness Pattern
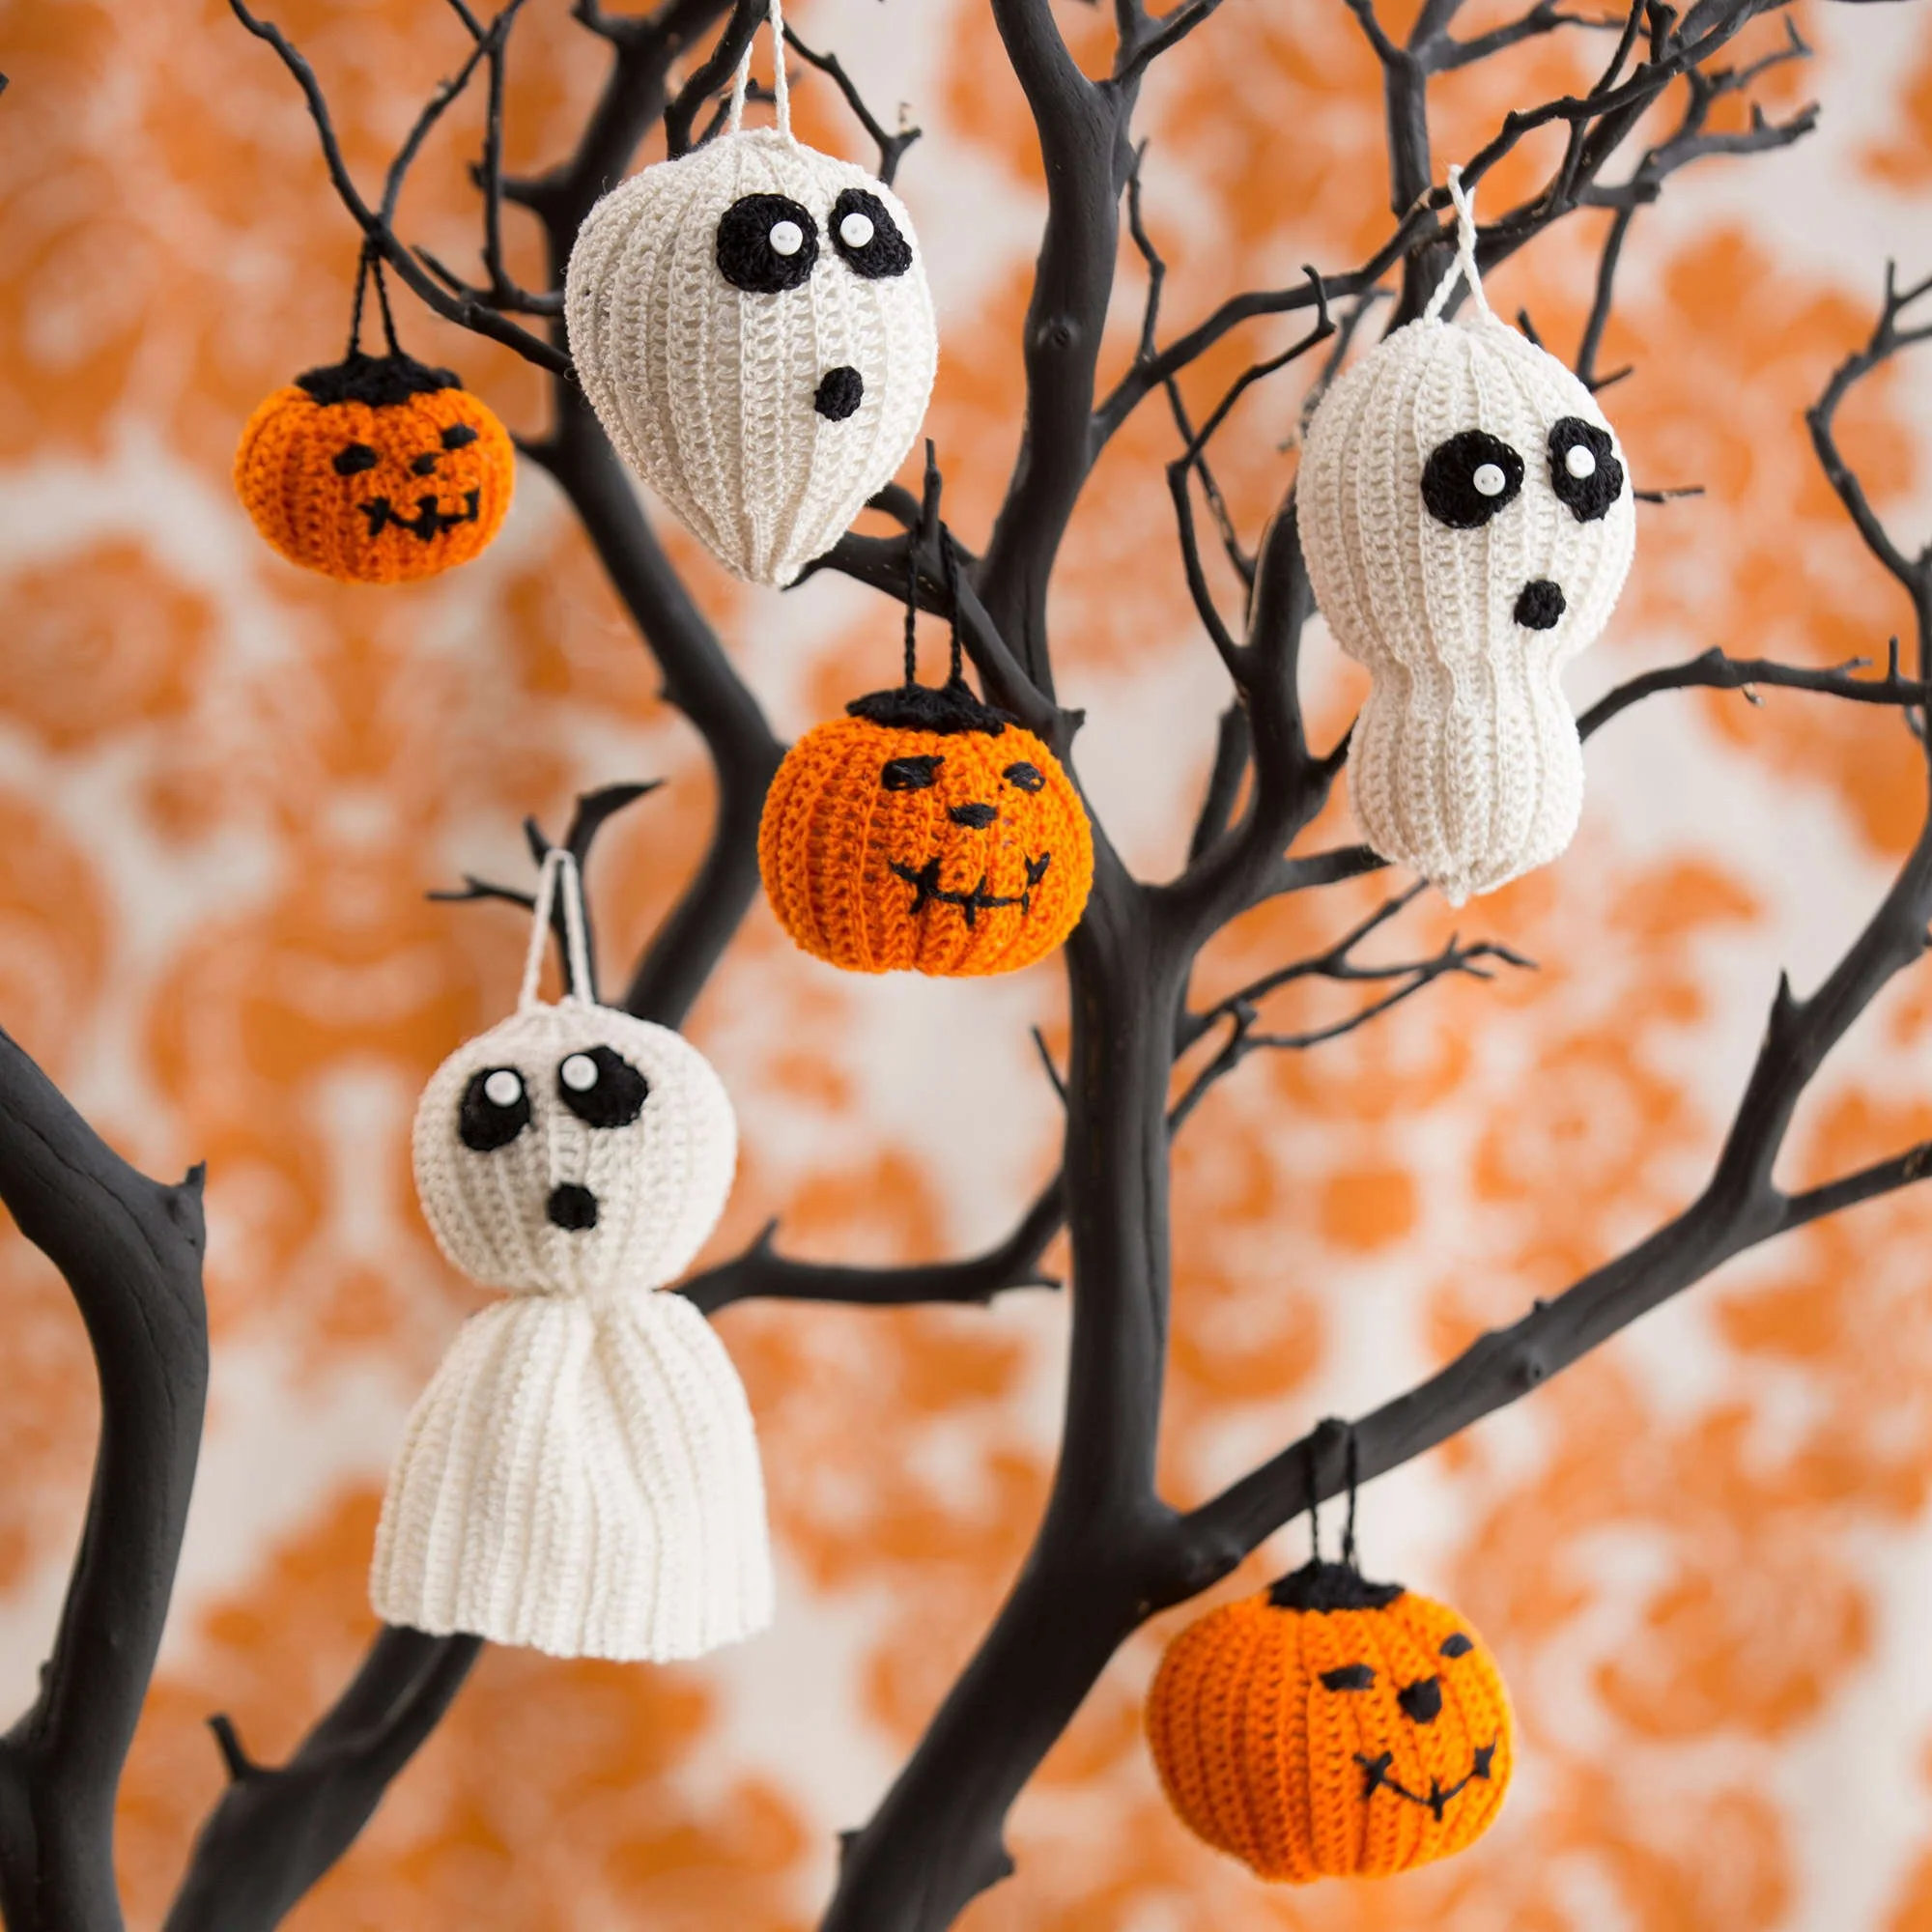
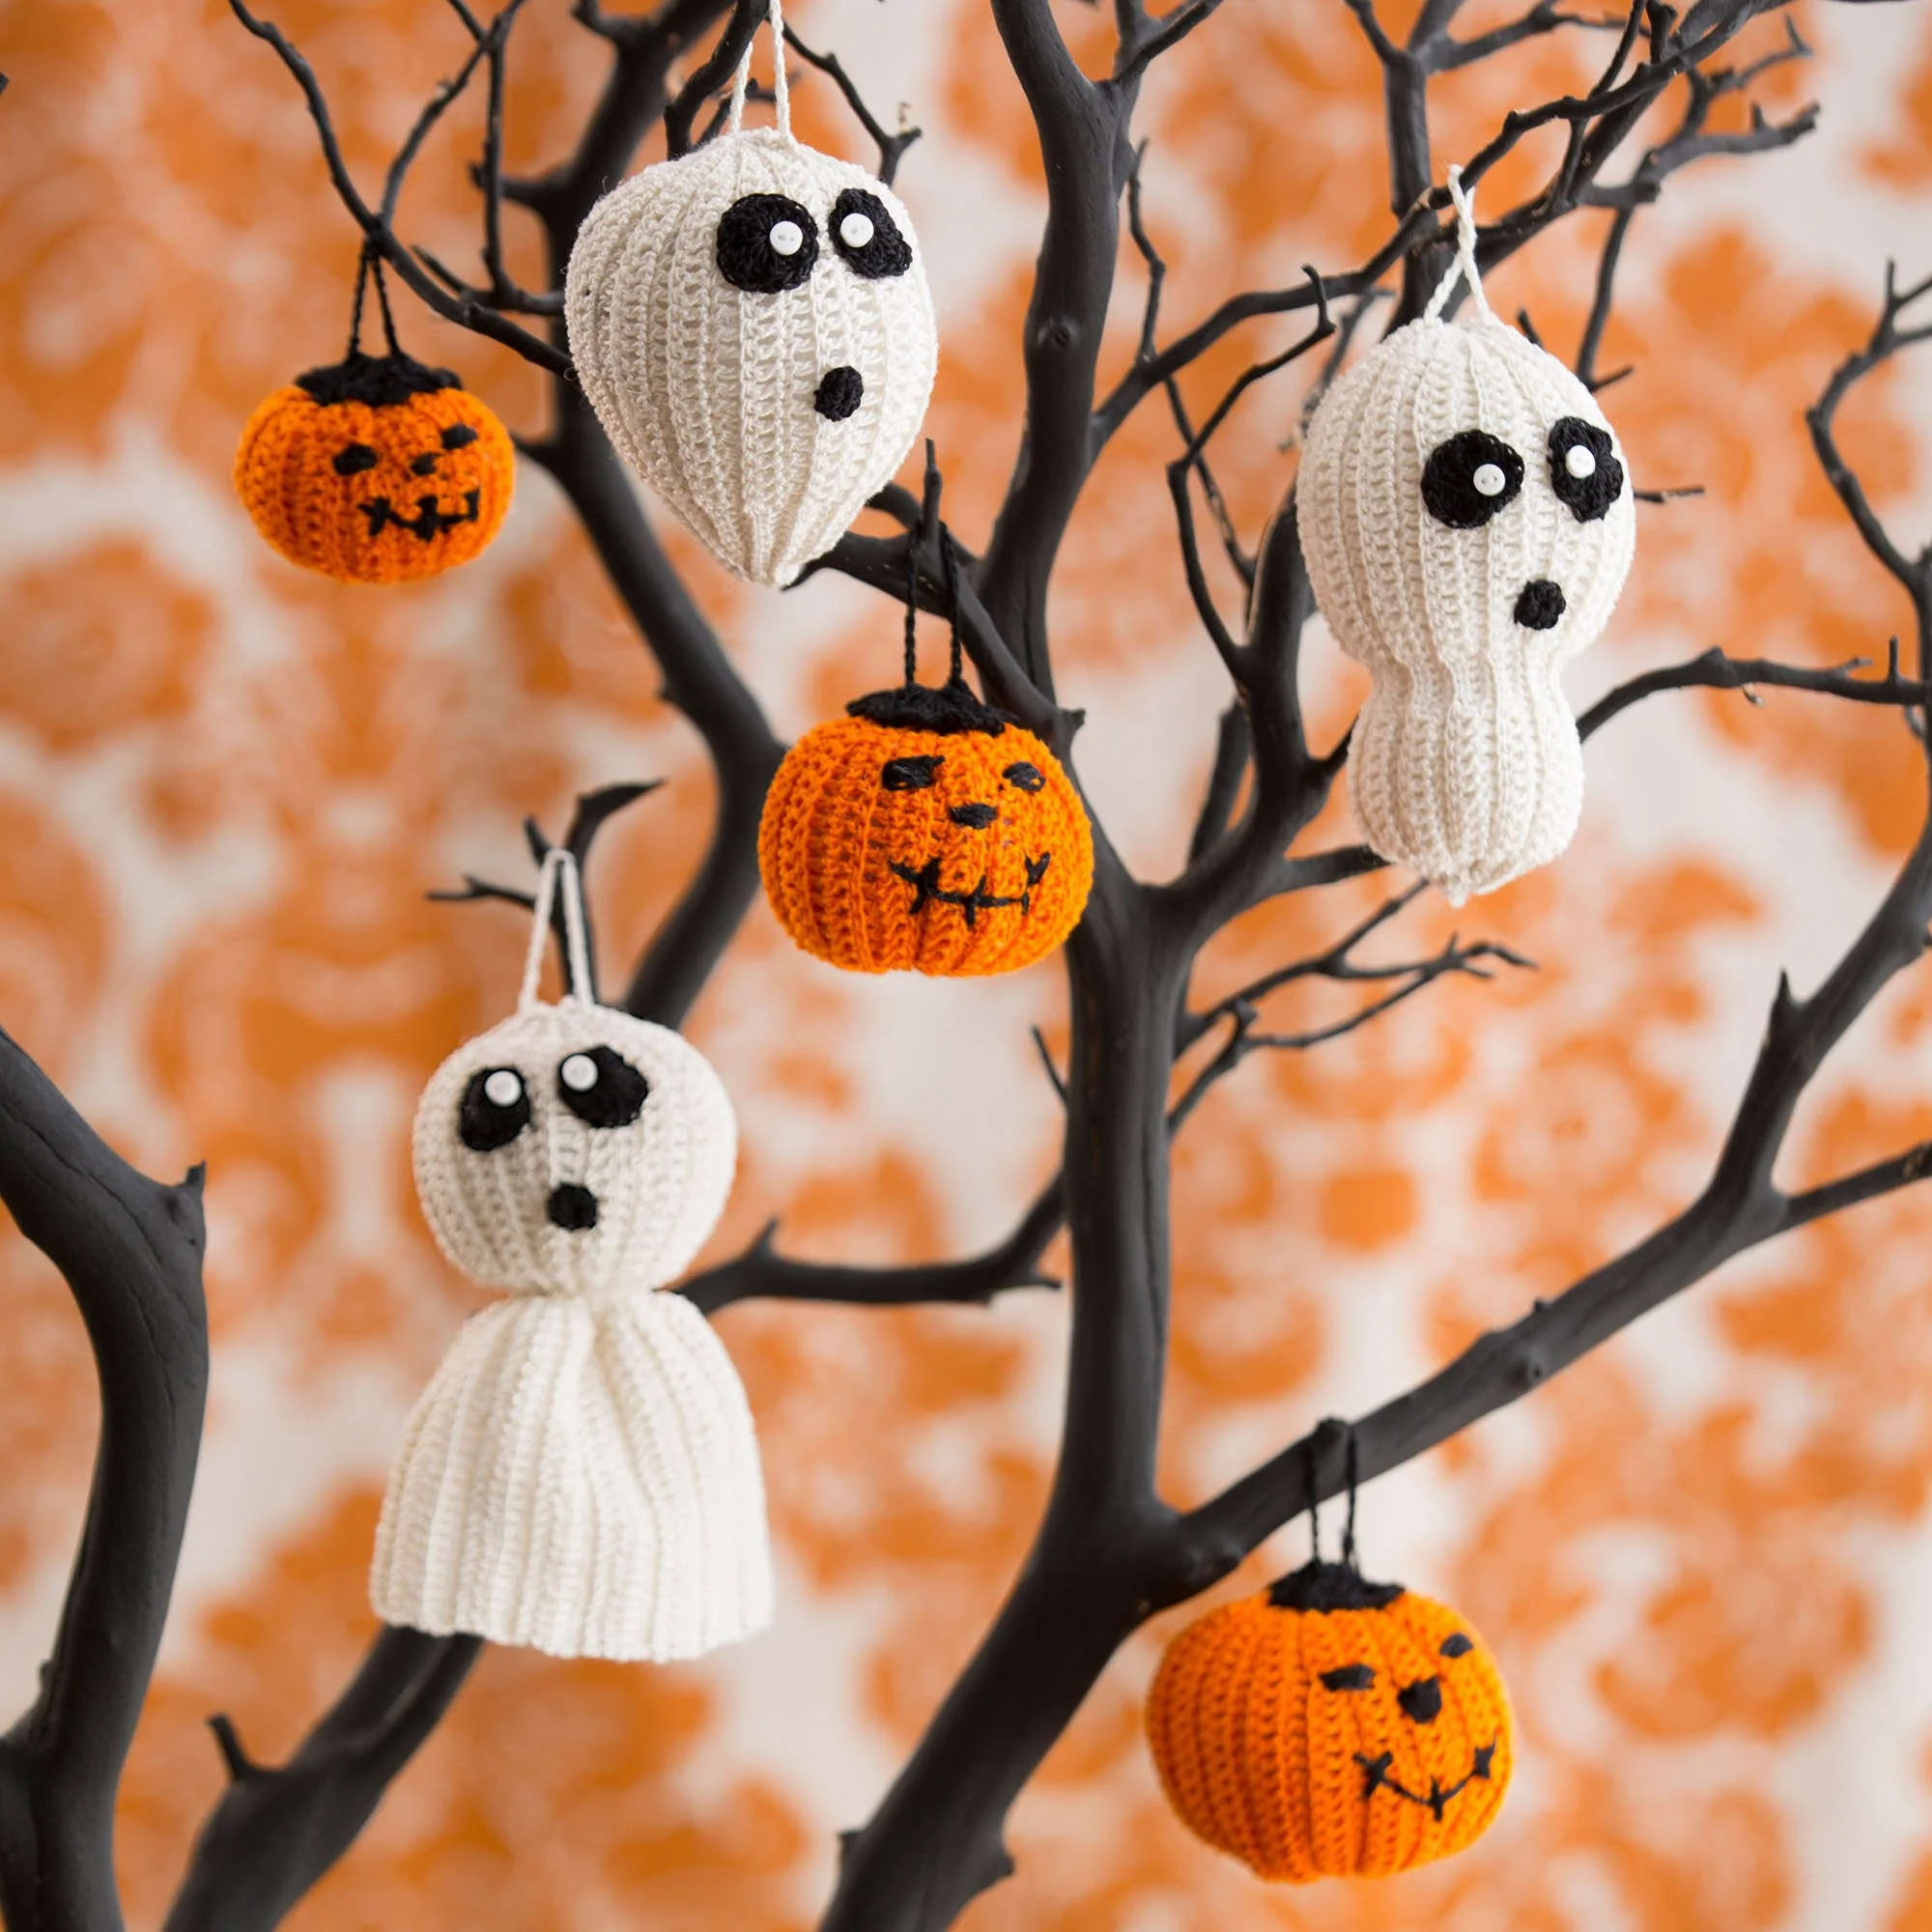
Craft a spine-tingling Crochet Halloween Tree of Spookiness with delightful ghost ornaments and jack-o’-lanterns. Each ornament showcases a unique character, including a ghost ball, floaty ghost, and a charming double ball ghost that are sure to capture the Halloween spirit. You will use basic crochet stitches to assemble these eerie delights, making them perfect for both novice and experienced crocheters. With clear instructions and exciting techniques, this project will bring a festive ambiance to your holiday season. Photos are provided to help guide your crafting journey.
Project Details
- Crochet terminology: US Terms
- Skill level: Intermediate
- Finished size: Varied based on ornament (3″ to 4″ width for ghosts; 2″ to 3″ diameter for pumpkins)
- Construction method: Worked in rows, with some components joined.
- Gauge: Not critical for this project.
Materials and Tools
| Yarn option | Yarn and specifications | Amount |
|---|---|---|
| AUNT LYDIA’S Classic Crochet Thread, Size 10 | Color 210 Antique White (A) | 1 ball |
| AUNT LYDIA’S Classic Crochet Thread, Size 10 | Color 12 Black (B) | 1 ball |
| AUNT LYDIA’S Classic Crochet Thread, Size 10 | Color 431 Pumpkin (C) | 1 ball |
- Susan Bates Steel Crochet Hook: 1.5 mm [US 7]
- Thread needle
- Polyester fiberfill
- Six ¼” (7 mm) white buttons
- White sewing thread
- Ornament hangers
Abbreviations
| Abbreviation | Meaning |
|---|---|
| ch | chain |
| sc | single crochet |
| dc | double crochet |
| sl st | slip stitch |
Preparation and Techniques
Adjustable ring
To master the adjustable ring, follow these steps:
- Wrap yarn into a ring, ensuring that the tail falls behind the working yarn.
- Grip ring and tail firmly between middle finger and thumb.
- Insert hook through the center of the ring, yarn over (with working yarn) and draw up a loop.
- Work stitches of the first round in the ring.
- After the first round of stitches is worked, pull gently, but firmly, on the tail to tighten the ring.
Complete Pattern Instructions
Ghost Ornament: Ghost Ball (3.5” / 9 cm diameter)
Ghost ball body:
| Row | Instructions | Stitches |
|---|---|---|
| 1 | With A, ch 41. Sc in second ch from hook, sc in next 4 ch, dc in next 20 ch, sc in last 15 ch; turn. | 40 sts |
| 2 | (Working in back loops only) ch 1, sc in same beginning sc, sc in next 14 sc, dc in next 20 dc, sc in last 5 sc; turn. | 40 sts |
| 3 | (Working in back loops only) ch 1, sc in same beginning sc, sc in next 4 sc, dc in next 20 dc, sc in last 15 sc; turn. | 40 sts |
| 4–30 | Repeat Rows 2–3 13 times, then Row 2 once. | – |
| 31 | (Work a row of sc joining Row 30 to Row 1) Holding the two rows together with Right Side facing, ch 1, insert hook under the first loop of the opposite side of the foundation ch and under the front loop of the first sc of Row 30, draw up a loop, complete sc; continue in this fashion, working a sc over each set of two stitches across. | 40 sc |
Ghost eyes (Make 2):
- With B, make a Magic Loop.
- Ch 3 (counts as first dc), 16 dc in ring; slip st in top of ch-3 to join; fasten off.
Ghost mouth:
- With B, make a Magic Loop.
- Ch 1, 10 sc in ring; slip st in top of first sc to join; fasten off.
Finishing Ghost Ball:
- Using needle, sew one end of the ornament closed.
- Fill the ornament with polyester fiberfill, then sew the other end closed.
- Join A to the middle of the ornament at the top; ch 20, slip st in first ch to form a loop.
- Referring to photograph for placement, sew the Loop to the top of the Ghost Ball.
- Place the buttons on the Eyes and sew the Eyes to the Ghost Ball.
- Sew the Mouth to the Ghost Ball, not too close to the Eyes.
- Fasten off and weave in all ends.
Ghost Ornament: Floaty Ghost (4” / 10 cm wide × 6” / 15 cm long)
Floaty Ghost body:
| Row | Instructions | Stitches |
|---|---|---|
| 1 | With A, ch 51. Sc in second ch from hook, sc in next 4 ch, dc in next 15 ch, sc in next 5 ch, dc in last 25 ch; turn. | 50 sts |
| 2 | (Working in back loops only) ch 3 (counts as first dc), dc in next 24 dc, sc in next 5 sc, dc in next 15 dc, sc in last 5 sc; turn. | 50 sts |
| 3 | (Working in back loops only) ch 1, sc in same beginning sc, sc in next 4 sc, dc in next 15 dc, sc in next 5 sc, dc in last 25 dc; turn. | 50 sts |
| 4–30 | Repeat Rows 2–3 13 times, then Row 2 once. | – |
| 31 | (Work a row of sc joining Row 30 to Row 1) Holding the two rows together with Right Side facing, ch 1, insert hook under the first loop of the opposite side of the foundation ch and under the front loop of the first sc of Row 30, draw up a loop, complete sc; continue in this fashion, working a sc over each set of two stitches across. | 50 sc |
Ghost eyes and Ghost mouth: Make same as for Ghost Ball.
Finishing Floaty Ghost:
- Using needle, sew one end of the ornament closed.
- Fill the ornament with polyester fiberfill, then sew the other end closed.
- Join A to the middle of the ornament at the top; ch 20, slip st in first ch to form a loop.
- Referring to photograph for placement, sew the Loop to the top of the Floaty Ghost.
- Place the buttons on the Eyes and sew the Eyes to the Floaty Ghost.
- Sew the Mouth to the Floaty Ghost, not too close to the Eyes.
- Fasten off and weave in all ends.
Ghost Ornament: Double Ball Ghost (3” / 7.5 cm wide × 5” / 12.5 cm long)
Double Ball Ghost body:
| Row | Instructions | Stitches |
|---|---|---|
| 1 | With A, ch 46. Sc in second ch from hook, sc in next 4 ch, dc in next 10 ch, sc in next 5 ch, dc in next 20 ch, sc in last 5 ch; turn. | 45 sts |
| 2 | (Working in back loops only) ch 1, sc in same beginning sc, sc in next 4 sc, dc in next 20 dc, sc in next 5 sc, dc in next 10 dc, sc in last 5 sc; turn. | 45 sts |
| 3 | (Working in back loops only) ch 1, sc in same beginning sc, sc in next 4 sc, dc in next 10 dc, sc in next 5 sc, dc in next 20 dc, sc in last sc; turn. | 45 sts |
| 4–28 | Repeat Rows 2–3 12 times, then Row 2 once. | – |
| 29 | (Work a row of sc joining Row 28 to Row 1) Holding the two rows together with Right Side facing, ch 1, insert hook under the first loop of the opposite side of the foundation ch and under the front loop of the first sc of Row 28, draw up a loop, complete sc; continue in this fashion, working a sc over each set of two stitches across. | 45 sc |
Ghost eyes and Ghost mouth: Make same as for Ghost Ball.
Finishing Double Ball Ghost:
- Using needle, sew one end of the ornament closed.
- Fill the ornament with polyester fiberfill, then sew the other end closed.
- Join A to the middle of the ornament at the top; ch 20, slip st in first ch to form a loop.
- Referring to photograph for placement, sew the Loop to the top of the Double Ball Ghost.
- Place the buttons on the Eyes and sew the Eyes to the Double Ball Ghost.
- Sew the Mouth to the Double Ball Ghost, not too close to the Eyes.
- Fasten off and weave in all ends.
Jack-o’-lantern Topper (For All Sizes)
Jack-o’-lantern topper (body):
- With B, ch 6, join with slip st in first ch to form a ring.
- Round 1: Ch 3 (counts as first dc), 11 dc in ring; slip st in top of ch-3 to join.
- Round 2: Ch 1, (sc, ch 3, sc) in same beginning dc, [sc in next dc, (sc, ch 3, sc) in next dc] 5 times, sc in last dc; join with slip st in top of first sc.
Joining topper:
- Join B to the middle of the Topper; ch 20, slip st in first ch to form a loop.
- Sew Topper to the top of the Pumpkin; fasten off.
Finishing (for Jack-o’-lanterns):
- Using needle, sew one end of the ornament closed.
- Fill the ornament with polyester fiberfill, then sew the other end closed.
- Sew the Pumpkin Topper to the ornament and weave in all ends.
- Referring to photograph for placement, embroider the Eyes, Nose, and Mouth to make the Jack O’ Lantern.
Jack-o’-lantern: Big (3” / 7.5 cm diameter)
Big Jack-o’-lantern body:
| Row | Instructions | Stitches |
|---|---|---|
| 1 | With C, ch 31. Sc in second ch from hook, sc in next 4 ch, dc in next 20 ch, sc in last 5 ch; turn. | 30 sts |
| 2 | (Working in back loops only) ch 1, sc in same beginning sc, sc in next 4 sc, dc in next 20 dc, sc in last 5 sc; turn. | 30 sts |
| 3–40 | Repeat Row 2. | – |
| 41 | (Work a row of sc joining Row 40 to Row 1) Holding the two rows together with Right Side facing, ch 1, insert hook under the first loop of the opposite side of the foundation ch and under the front loop of the first sc of Row 40, draw up a loop, complete sc; continue in this fashion, working a sc over each set of two stitches across. | 30 sc |
Finishing: Use FOR ALL SIZES Jack-o’-lantern topper finishing.
Jack-o’-lantern: Medium (2.5” / 6.5 cm diameter)
Medium Jack-o’-lantern body:
| Row | Instructions | Stitches |
|---|---|---|
| 1 | With C, ch 26. Sc in second ch from hook, sc in next 4 ch, dc in next 15 ch, sc in last 5 ch; turn. | 25 sts |
| 2 | (Working in back loops only) ch 1, sc in same beginning sc, sc in next 4 sc, dc in next 15 dc, sc in last 5 sc; turn. | 25 sts |
| 3–36 | Repeat Row 2. | – |
| 37 | (Work a row of sc joining Row 36 to Row 1) Holding the two rows together with Right Side facing, ch 1, insert hook under the first loop of the opposite side of the foundation ch and under the front loop of the first sc of Row 36, draw up a loop, complete sc; continue in this fashion, working a sc over each set of two stitches across. | 25 sc |
Finishing: Use FOR ALL SIZES Jack-o’-lantern topper finishing.
Jack-o’-lantern: Small (2” / 5 cm diameter)
Small Jack-o’-lantern body:
| Row | Instructions | Stitches |
|---|---|---|
| 1 | With C, ch 21. Sc in second ch from hook, sc in next 4 ch, dc in next 10 ch, sc in last 5 ch; turn. | 20 sts |
| 2 | (Working in back loops only) ch 1, sc in same beginning sc, sc in next 4 sc, dc in next 10 dc, sc in last 5 sc; turn. | 20 sts |
| 3–30 | Repeat Row 2. | – |
| 31 | (Work a row of sc joining Row 30 to Row 1) Holding the two rows together with Right Side facing, ch 1, insert hook under the first loop of the opposite side of the foundation ch and under the front loop of the first sc of Row 30, draw up a loop, complete sc; continue in this fashion, working a sc over each set of two stitches across. | 20 sc |
Finishing: Use FOR ALL SIZES Jack-o’-lantern topper finishing.
Practical Tips
- Keep your tension consistent: This ensures even edges and a tidy finish. Check your stitches periodically as you work.
- Use safety eyes for toys: If gifting this to children, opt for safety eyes to avoid choking hazards.
- Experiment with colors: Feel free to choose other thread colors for a unique twist or to match your decorations.
- Stuff lightly: For a more plush feel, use just enough polyester fiberfill to keep the shape but not so much that it loses flexibility.
Troubleshooting
- Problem: Stitches look uneven.
Cause: Inconsistent tension.
Solution: Practice controlling your tension; consider using stitch markers to ensure easier tracking. - Problem: Ornament is too floppy.
Cause: Not enough stuffing.
Solution: Add more fiberfill while ensuring it’s not overstuffed. - Problem: Ghosts don’t hold their shape.
Cause: Lack of support in the stitches.
Solution: Use a smaller hook or adjust your technique to ensure tighter stitches.
Care and Storage
To maintain the quality of your crochet ornaments, follow these easy care tips:
- Hand wash in cold water with mild detergent, if needed.
- Air dry away from direct sunlight to avoid fading or damage.
- Store in a cool, dry place to prevent dust accumulation. Consider using stored boxes or bags to keep them fresh for each season.
Frequently Asked Questions
What size do the finished ornaments measure?
The finished sizes vary: the ghost ball measures 3.5 inches in diameter, while the floaty ghost measures 4 inches wide and 6 inches long, and the double ball ghost measures 3 inches wide and 5 inches long.
Can I use a different yarn for this project?
Yes, while the recommended yarn is AUNT LYDIA’S Classic Crochet Thread Size 10, you can substitute with another thread of the same weight but be aware that colors, texture, and drape may change the final appearance.
How are the ghosts made to float?
The floaty ghost features a construction technique that gives it a more freely formed look. Its design includes longer stitches that resemble floating fabric, enhancing overall character, so be sure to follow those instructions carefully.
How can I ensure my stitches are even?
Consistency is key! Regularly check your tension as you crochet and consider using stitch markers to help you keep track of where you are in your project.
What embellishments can I add?
You can get creative with embellishments by adding sequins, glitter, or additional fabric shapes around the ghosts and pumpkins to enhance their spooky charm.
How can I prevent my ornaments from losing their shape?
Using a smaller hook size can help create tighter stitches that hold their shape better. Additionally, ensure your stuffing is not too loose, which can cause a floppy appearance.
Choose Your Next Crochet Project
Explore more delightful patterns that will inspire your creativity!