
Get 30+ FREE Crochet Patterns — Join Our Newsletter
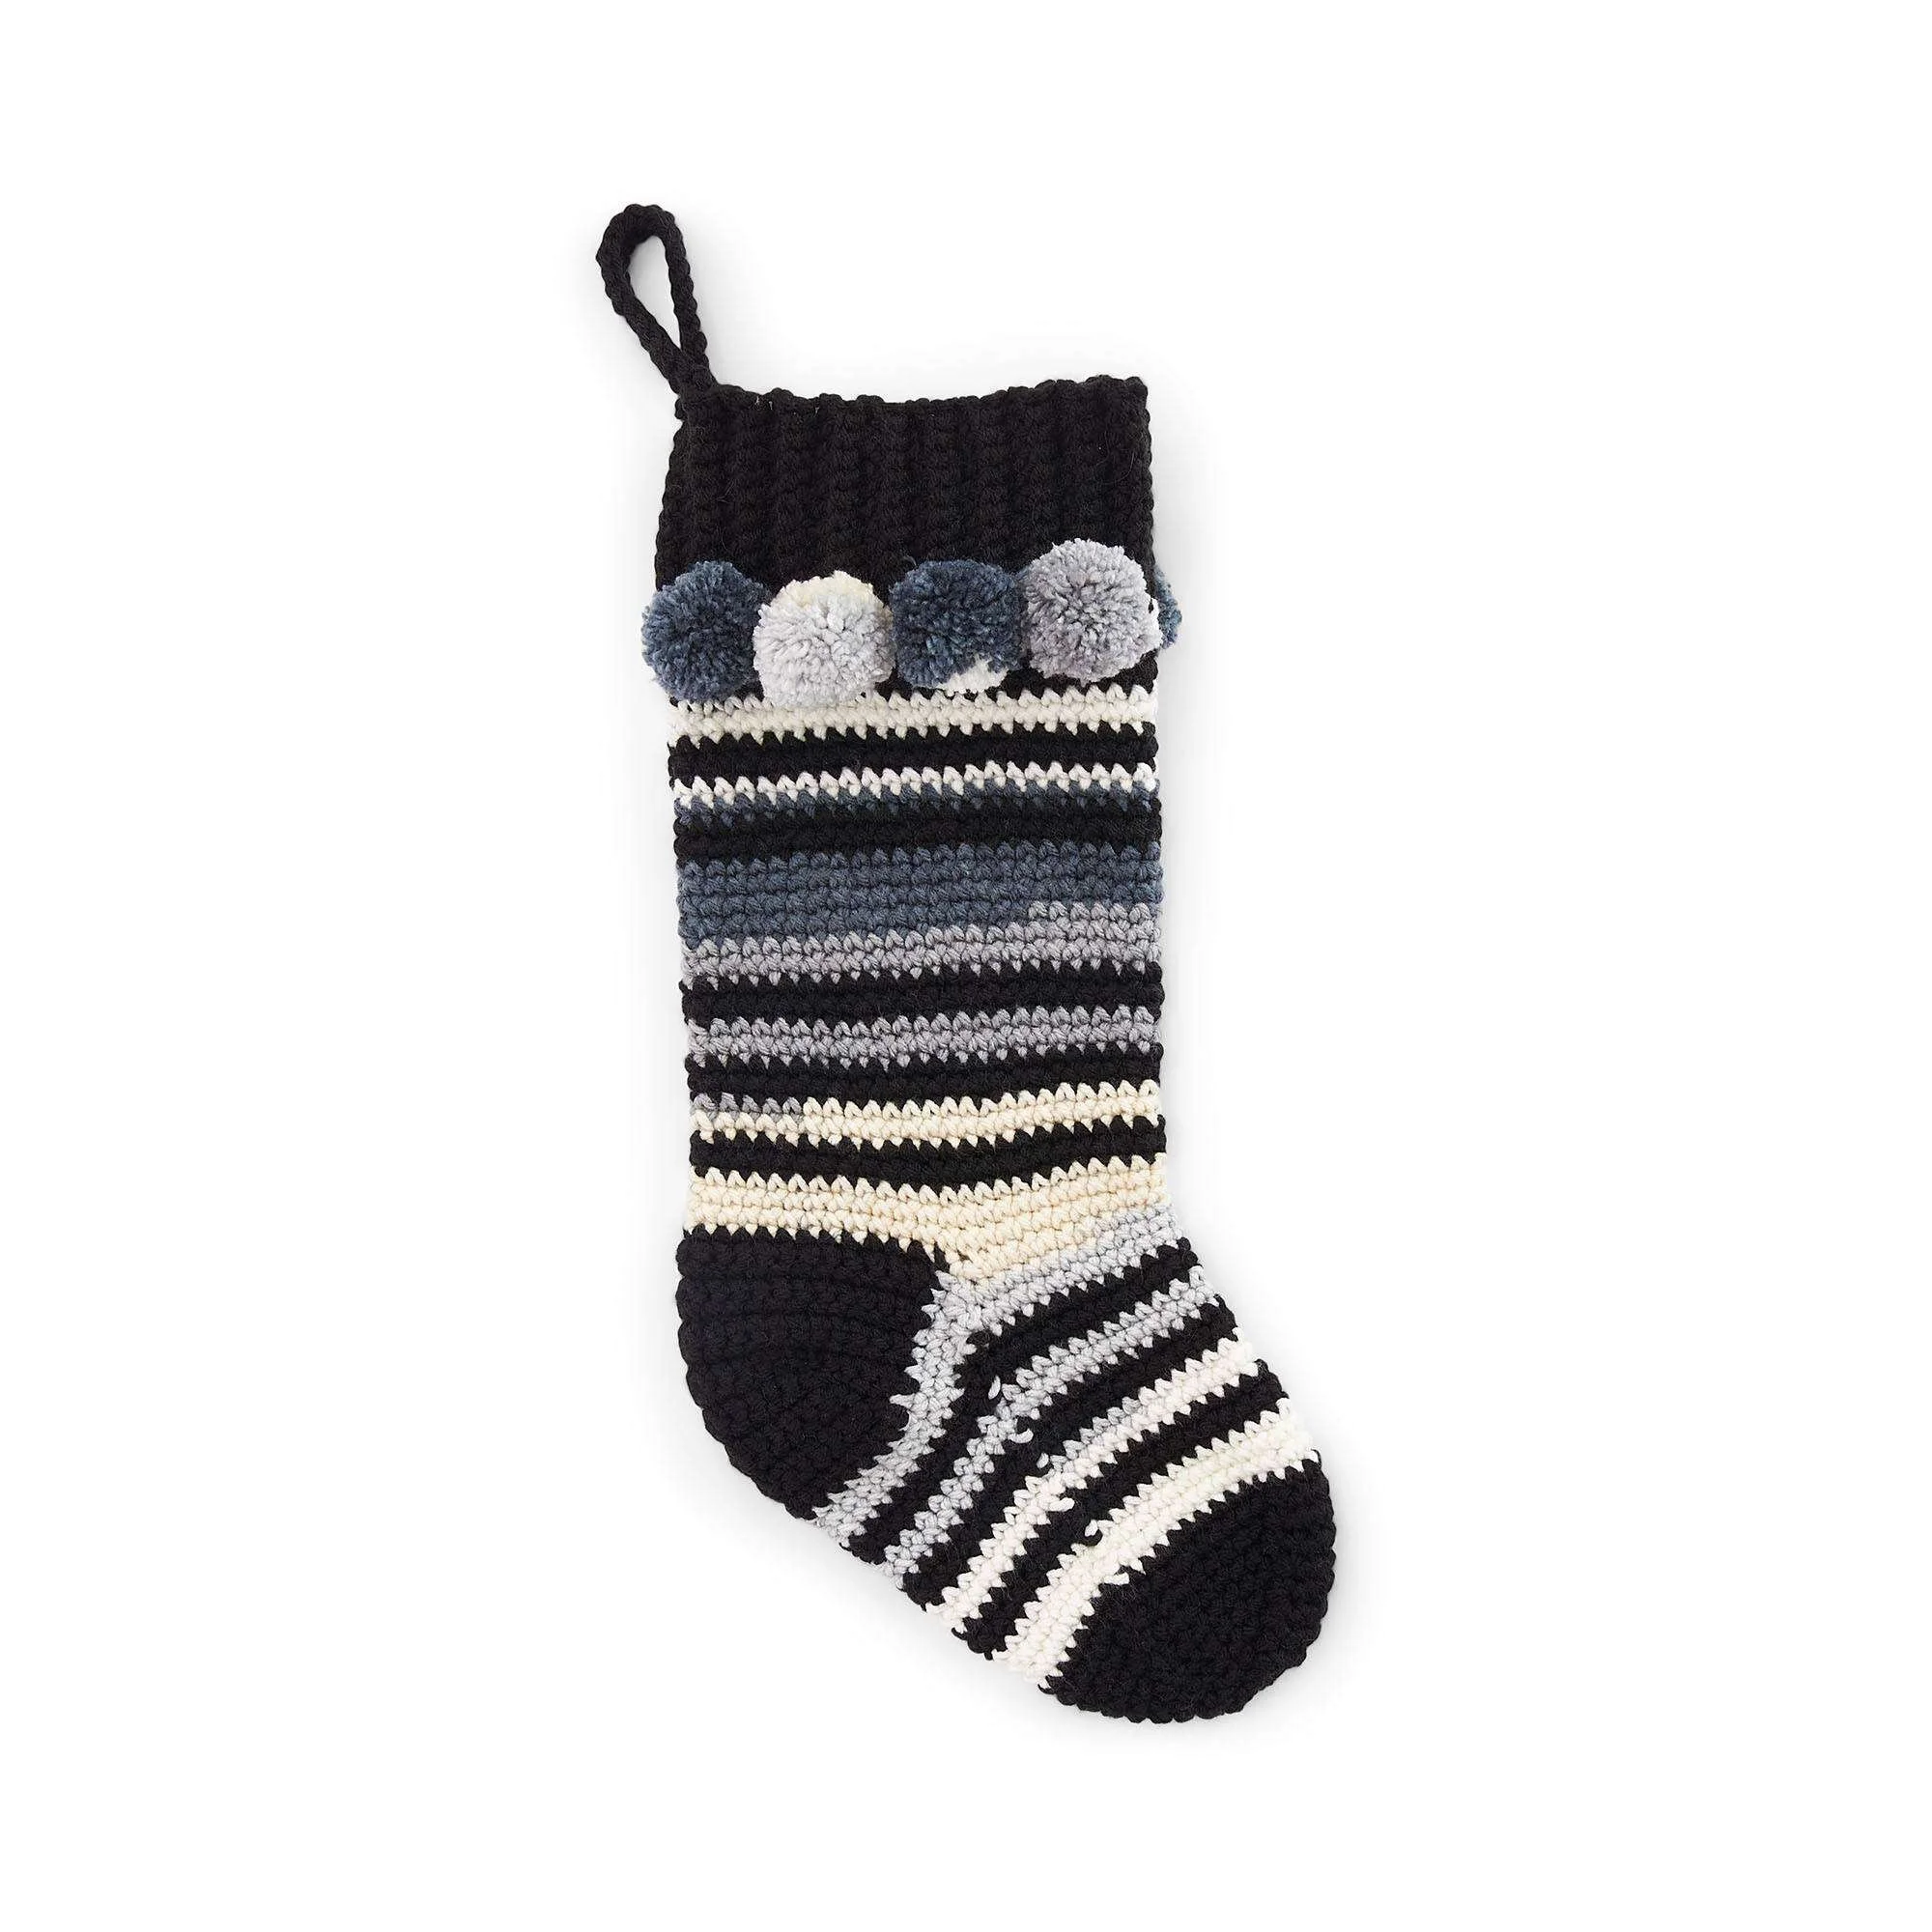
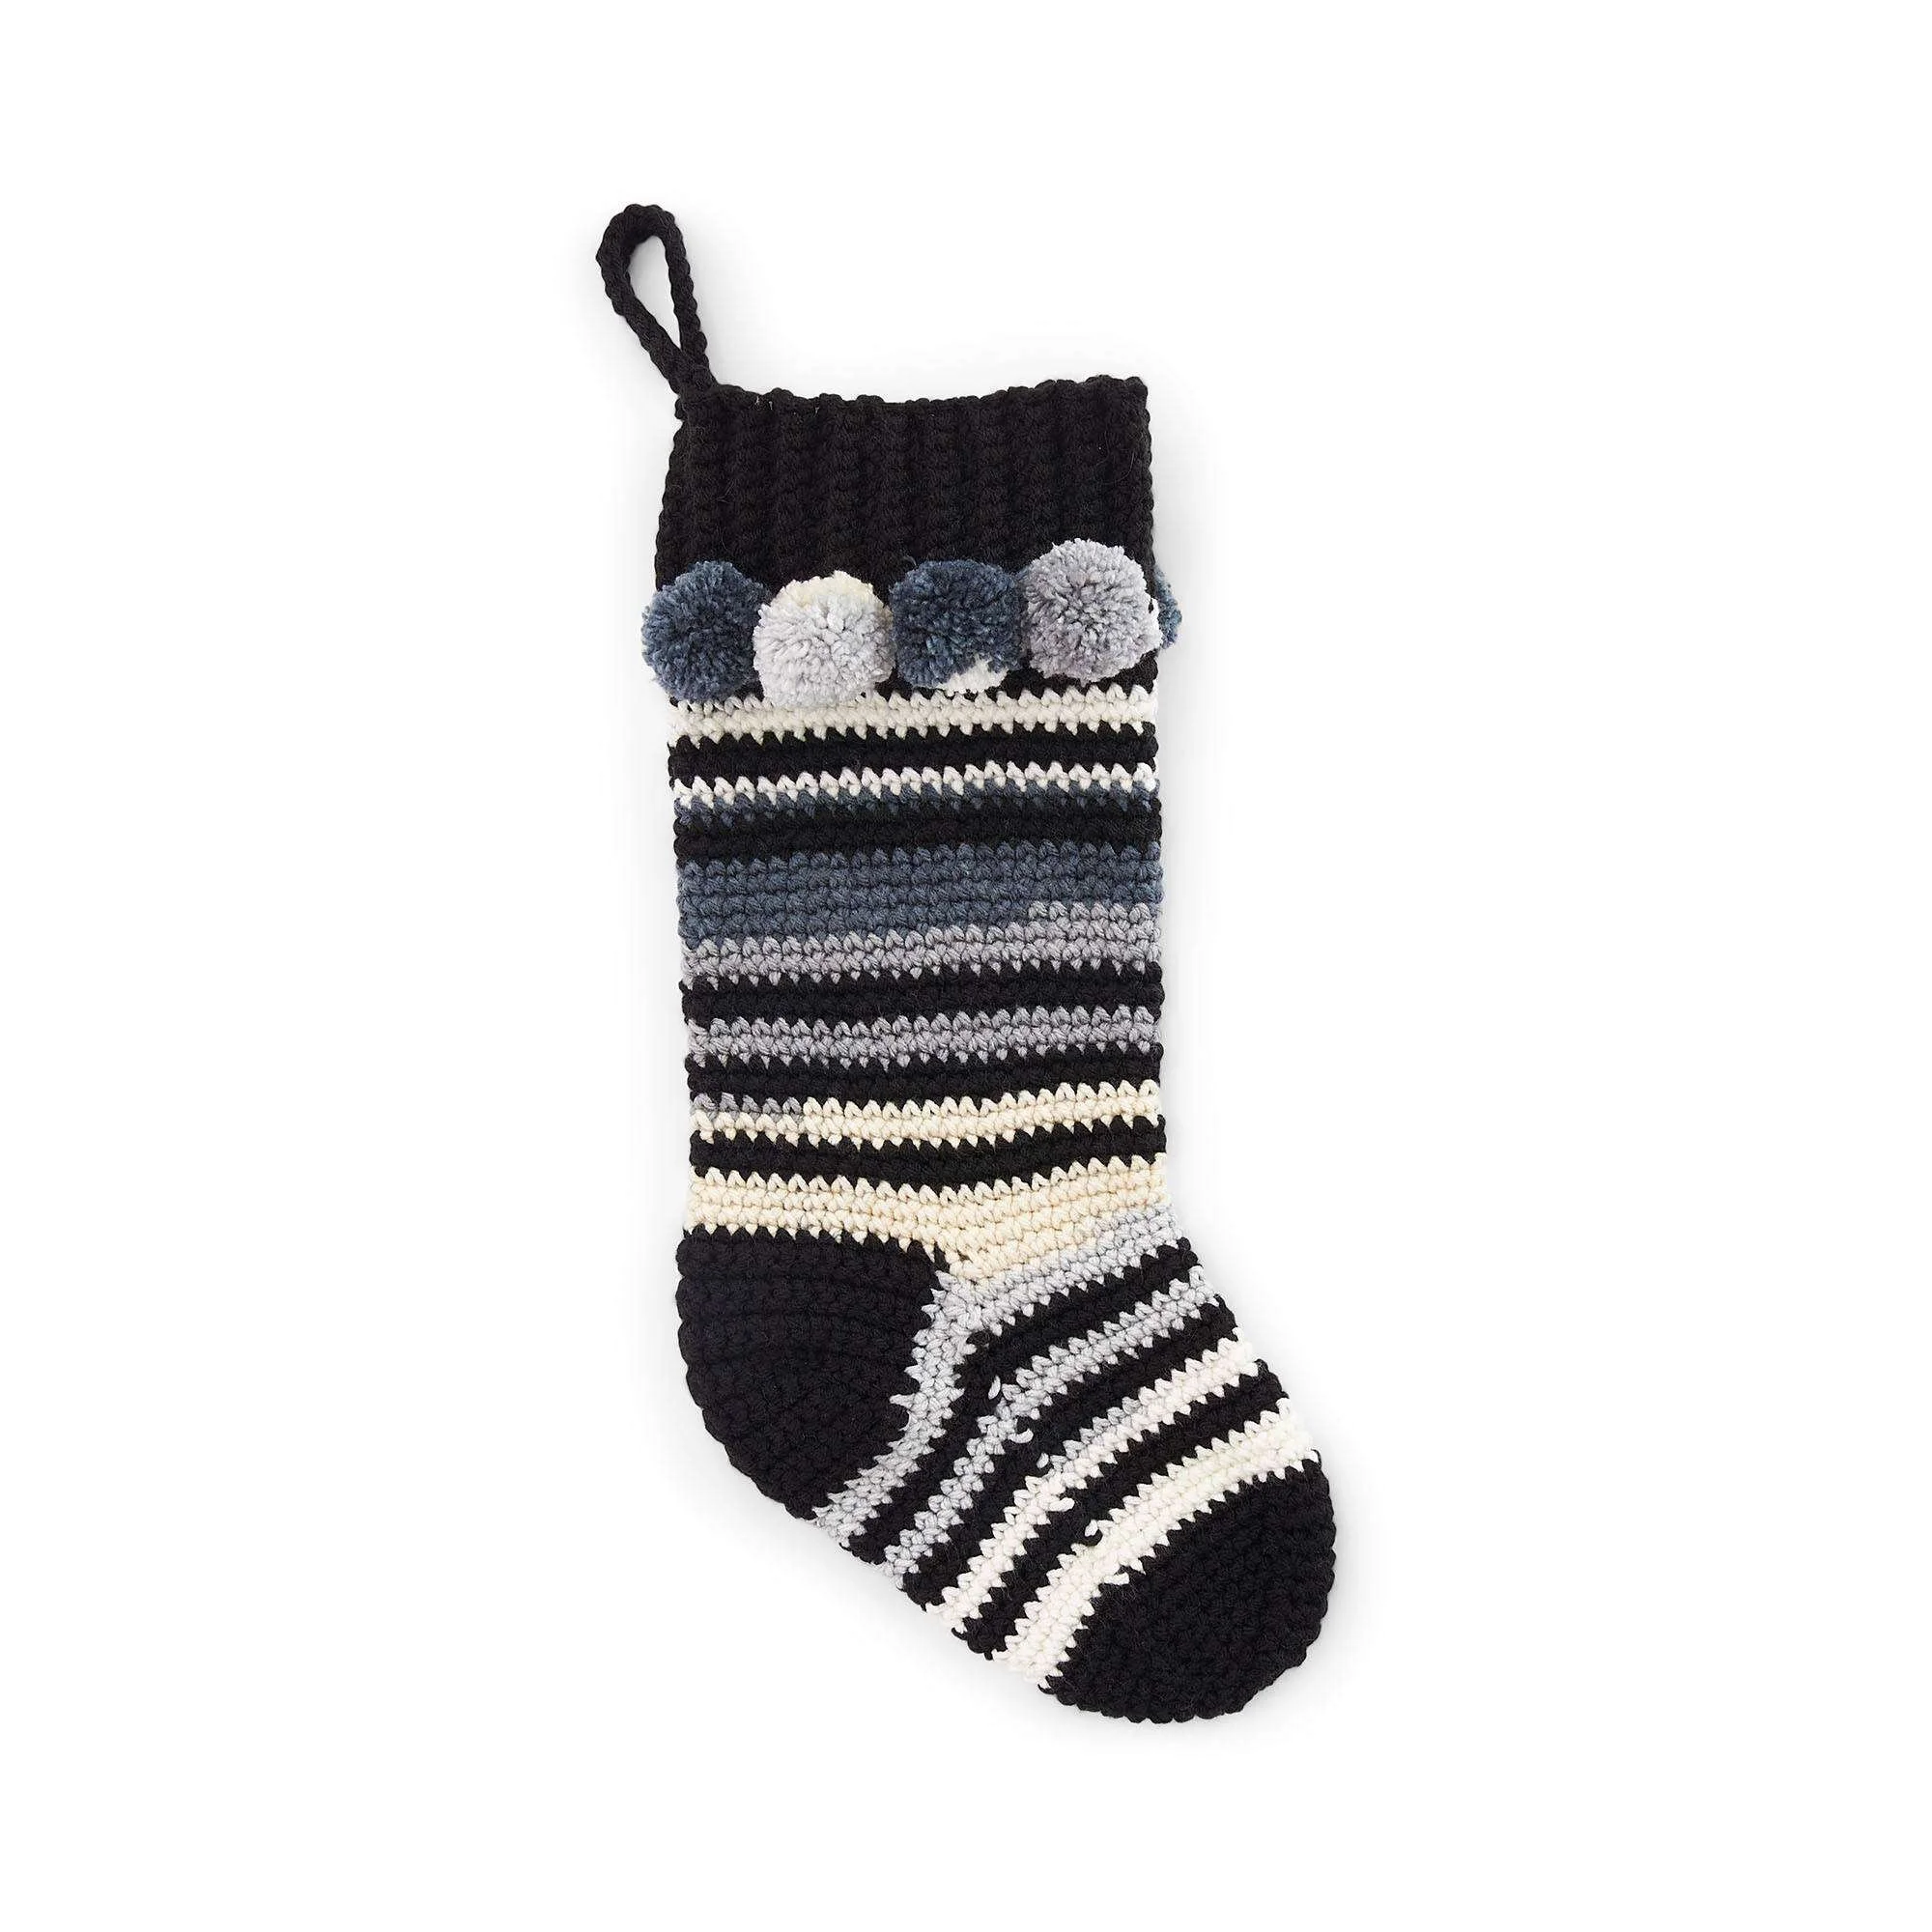
Crochet Striped Stocking Pattern
The Crochet Kitsch Striped Stocking Pattern is a delightful project perfect for the festive season. This charming stocking features a vibrant striped design that showcases the beauty of Red Heart® Super Saver® O’Go™ yarn. The project involves crocheting a striped leg, cozy foot, and fun pom-poms, making it a joy to create and decorate your home for the holidays. With simple construction techniques, including working in rounds and color changes, this pattern suits intermediate crocheters looking to capture the spirit of the season.
Follow the detailed instructions alongside any provided images to successfully craft your own striped stocking!
Project Details
- Crochet terminology: US
- Skill level: Intermediate
- Finished size: Approximately 18″ [46 cm] long
- Construction method: Worked in rounds
Materials and Tools
| Yarn option | Yarn and specifications | Amount |
|---|---|---|
| Version 1 | Red Heart® Super Saver® O’Go™ Contrast A Black (07120), Contrast B Newsprint (07124) | 1 O’Go each |
| Version 2 | Red Heart® Super Saver® O’Go™ Contrast A Cherry (07190), Contrast B Jeweltone (07195) | 1 O’Go each |
| Version 3 | Red Heart® Super Saver® O’Go™ Contrast A White (07100), Contrast B Baby Rainbow (07175) | 1 O’Go each |
| Version 4 | Red Heart® Super Saver® O’Go™ Contrast A Gold (07160), Contrast B Peacock (07155) | 1 O’Go each |
| Version 5 | Red Heart® Super Saver® O’Go™ Contrast A Soft Navy (07180), Contrast B Christmas (07196) | 1 O’Go each |
| Version 6 | Red Heart® Super Saver® O’Go™ Contrast A Dusty Gray (07140), Contrast B Rainbow (07192) | 1 O’Go each |
| Version 7 | Red Heart® Super Saver® O’Go™ Contrast A Café Latte (07130), Contrast B Forest (07136) | 1 O’Go each |
- Stitch marker
- Yarn needle
- 1½” [4 cm] piece of cardboard for pompons
Abbreviations
| Abbreviation | Meaning |
|---|---|
| ch | Chain |
| sc | Single crochet |
| sl st | Slip stitch |
| pm | Place marker |
| Sc2tog | Single crochet two together |
Preparation and Techniques
Working in Rounds
This project is primarily worked in joined rounds. To begin each round, join with a slip stitch to the first stitch of the round. Be sure to mark the first stitch of each round to track your progress.
Changing Yarn Colors
Change colors by completing the last yarn over of the last stitch with the new color. Make sure to carry the unused color up the side of your work to keep it neat.
Reading Repeats
Pay close attention to repeat sections within the pattern to ensure you maintain the correct stitch count and pattern. Use a sticky note to mark where you are if this helps you track your progress.
Complete Pattern Instructions
Cuff
- With A, ch 11.
- 1st row (RS): 1 sc in 2nd ch from hook. 1 sc in each ch to end of chain. Turn. (10 sc)
- 2nd row: Ch 1. Working in back loops only, 1 sc in each sc to end of row. Turn.
- Rep 2nd row until work from beg measures 14″ [35.5 cm], ending on a WS row. Do not fasten off.
- Join Cuff: Working in back loops only, sl st last row and rem loops of foundation ch tog. Do not turn.
Leg (Rotate)
- 1st rnd: Ch 1. Work 46 sc evenly around side edge of Cuff. Join with sl st to first sc. Join B. Turn. Begin working Leg Stripe Pat.
- 2nd rnd: With B, ch 1. 1 sc in each sc around. Join.
- 3rd to 32nd rnds: Keeping cont of Leg Stripe Pat, ch 1. 1 sc in each sc around. Join.
Leg Stripe Pat is complete.
Heel
- 1st row (RS): With A, ch 1. 1 sc in same sp as last sl st. 1 sc in each of next 22 sc. Turn. Leave rem sts unworked. (23 sc)
- 2nd row: Ch 1. 1 sc in each sc to end of row. Turn.
- Rep 2nd row for 2″ [5 cm], ending on a WS row.
Shape Heel
- 1st row (RS): Ch 1. 1 sc in each of next 15 sc. Sc2tog. 1 sc in next sc. Turn. Leave rem sts unworked. (17 sts)
- 2nd row: Ch 1. 1 sc in each of first 9 sts. Sc2tog. 1 sc in next sc. Turn. (11 sts)
- 3rd row: Ch 1. 1 sc in each of first 10 sts. Sc2tog. 1 sc in next sc. Turn. (12 sts)
- 4th row: Ch 1. 1 sc in each of first 11 sts. Sc2tog. 1 sc in next sc. Turn. (13 sts)
- 5th row: Ch 1. 1 sc in each of first 12 sts. Sc2tog. 1 sc in next sc. Turn. (14 sts)
- 6th row: Ch 1. 1 sc in each of first 13 sts. Sc2tog. 1 sc in next sc. Turn. (15 sts)
- 7th and 8th rows: Ch 1. 1 sc in each of first 14 sts. Sc2tog. Turn. (15 sts)
Fasten off.
Foot
- Joining rnd (RS): Join B with sl st at left side of Heel Base. Ch 1. 1 sc in each of next 23 sc of instep. PM. Work 7 sc up right side of Heel, 1 sc in each of next 15 sc across end of Heel, and 7 sc down left side of Heel. Join. (52 sc)
- 2nd rnd: Ch 1. 1 sc in each sc to marker. Sc2tog. 1 sc in each sc to last 2 sc. Sc2tog. Join. (50 sts)
First 2 rnds of Foot Stripe Pat are complete.
Continue Foot Stripe Pat Until Stated
- Keeping cont of Foot Stripe Pat, rep 2nd rnd until 44 sts rem.
- 6th rnd: With B, ch 1. 1 sc in each sc around. Join.
- 7th rnd: Ch 1. 1 sc in each sc around. Join.
- 8th to 20th rnds: Keeping cont of Foot Stripe Pat, rep 7th rnd. Foot Stripe Pat is complete.
Shape Toe
- 1st rnd: With A, ch 1. (1 sc in each of next 9 sc. Sc2tog) 4 times. Join. (40 sts)
- 2nd rnd: Ch 1. (1 sc in each of next 8 sc. Sc2tog) 4 times. Join. (36 sts)
- 3rd to 8th rnds: Continue in same manner, dec 4 sts on every rnd until 12 sts rem.
- Break yarn, leaving a long end. Draw end tightly through rem sts and fasten securely.
Assembly and Finishing
Hanging Loop
- With A, ch 25. Sl st in 2nd ch from hook and each ch to end of chain. Fasten off.
- Fold in half and sew in position at top center back of cuff as shown in photo.
Pompoms (Make 9)
- Wind B around 1½” [4 cm] piece of cardboard 100 times.
- Tie yarn tightly in the middle and leave long ends for attaching to Stocking.
- Cut loops at both ends and trim to smooth round shape.
- Sew Pompoms evenly around the base of Cuff as shown in photo.
Practical Tips
- Maintain consistent tension: Keeping an even tension throughout your work ensures a smooth finish on your stocking.
- Use a stitch marker: Mark the end of each round to avoid losing track, especially with color changes.
- Check your stitch counts: This helps prevent issues later on if you start losing or gaining stitches.
- Consider using a larger hook: For a looser, more flexible fabric, a slightly larger hook can help, especially in the leg section.
Troubleshooting
- Uneven Stripes: If your stripes appear uneven, double-check your color changes and ensure they are placed correctly at the end of each round.
- Stitch Count Errors: If you find you have more or fewer stitches than indicated, recount your work to identify where the mistake occurred.
- Pompoms Falling Off: Make sure to securely sew the pompoms to the stocking, attaching through multiple layers of yarn for durability.
- Foot Too Tight: If the foot feels tight when trying it on, consider increasing the stitch count in the foot section by distributing extra stitches evenly around.
Care
To maintain the beauty of your finished stocking, follow these care guidelines:
- Hand wash gently in cold water.
- Lay flat to dry.
- Avoid bleach to preserve colors and integrity of the yarn.
- Store in a cool, dry place when not in use to prevent moisture buildup.
Frequently Asked Questions
What size will my stocking be?
Your finished stocking will measure approximately 18″ [46 cm] long. This size is perfect for hanging by the fireplace or placing gifts inside.
Can I use a different yarn?
Yes, you can choose a different worsted weight yarn, but keep in mind it may affect the final size and appearance of your stocking. Make sure the yarn is suitable for holiday decor.
How do I make the stripes even?
To ensure even stripes, make sure to work the prescribed number of rounds in each color before changing to the next. Accurately following the stripe pattern is crucial.
What can I do if my stocking doesn’t hold its shape?
If your stocking tends to sag, consider using a smaller hook to create a tighter tension, which will help maintain its shape during use.
Can I sell the stockings I make from this pattern?
Please check the original designer’s usage terms for selling any finished items made from this pattern. Always ensure you comply with copyright regulations.




