Get 30+ FREE Crochet Patterns — Join Our Newsletter

Crochet Tree Pattern for the 2024 Advent Calendar
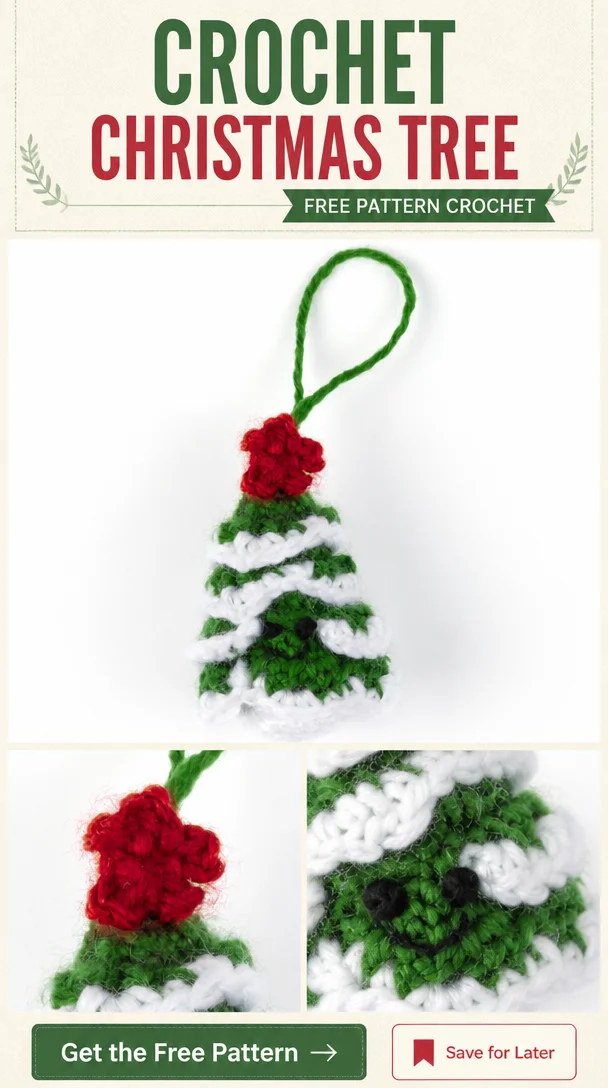
The 2024 Advent Calendar Crochet Tree is a delightful and festive decoration perfect for the holiday season. This charming little tree utilizes a variety of stitches to create an appealing texture and shape. Each round brings together vibrant colors, making it a great addition to your decor or even as a handmade gift. This project is suitable for crocheters with an understanding of basic stitches looking to create a unique, seasonal item. Follow along with the written pattern while using any accompanying photographs for guidance.
Project Details
- Crochet terminology: U.S. Terms.
- Skill level: Intermediate.
- Finished size: Approximately 6-8 inches tall.
- Construction method: Worked in rounds, some components made separately.
- Gauge: Not specified.
Materials and Tools
| Yarn Option | Yarn and Specifications | Amount |
|---|---|---|
| Contrast A | Worsted Gauge Yarn (Green) | 20 yds / 18 m |
| Contrast B | Worsted Gauge Yarn (White) | 15 yds / 14 m |
| Contrast C | Worsted Gauge Yarn (Red) | 2 yds / 1.75 m |
- Crochet hook: Size U.S. G/6 (4 mm) Susan Bates® Silvalume® crochet hook or size needed to obtain gauge
- Susan Bates® yarn needle
- Polyester stuffing
- Small amount of Black yarn
- Alternate: Key chain clasp

Abbreviations
| Abbreviation | Meaning |
|---|---|
| ch | Chain |
| sc | Single Crochet |
| hdc | Half Double Crochet |
| dc | Double Crochet |
| sl st | Slip Stitch |
| Sc2tog | Single Crochet Two Together |
Preparation and Techniques
Working in a Spiral
This pattern utilizes continuous rounds for a seamless look. Be mindful to use a stitch marker to indicate the start of each new round.
Changing Yarn Colors
Consult the starting instructions to appropriately change colors at specified rounds without leaving visible color transitions.
Complete Pattern Instructions
Tree
- With B, make a magic loop.
- 1st rnd: Ch 1. 6 sc in loop. Pull magic loop tight and join.
- 2nd rnd: Ch 1. 2 sc in each sc around. Join. (12 sc)
- 3rd rnd: Ch 1. (1 sc in next sc. 2 sc in next sc) 6 times. Join. (18 sc)
- 4th rnd: Ch 1. (1 sc in each of next 5 sc. 2 sc in next sc) 3 times. Join. Break B. (21 sc)
- 5th rnd: Join A with sl st to back loop of first sc. Ch 1. Working in back loops only, 1 sc in each sc around. Join.
- 6th rnd: Ch 1. 1 sc in each sc around. Join.
- 7th rnd: Working in front loops only, skip first sc. *(1 hdc. 1 dc. Ch 1. 1 dc. 1 hdc) all in next sc. Skip next 2 sc. Rep from * 5 times more, then from * to once. Skip last sc. Join with sl st to back loop of first skipped sc of 6th rnd.
- 8th rnd: Working into remaining loops of 6th rnd, ch 1. 1 sc in each st around. Join.
- 9th rnd: Ch 1. (1 sc in each of next 5 sc. Sc2tog) 3 times. Join. (18 sc)
- 10th rnd: Working in front loops only, skip first sc. *(1 hdc. 1 dc. Ch 1. 1 dc. 1 hdc) all in next sc. Skip next 2 sc. Rep from * 4 times more. Skip next sc. Working into both loops, sl st in each of last 3 sc. Join with sl st to back loop of first skipped sc of 9th rnd.
- 11th rnd: Working into remaining loops of 9th rnd and sl sts of 10th rnd, ch 1. 1 sc in each st around. Join.
- 12th rnd: Ch 1. (1 sc in each of next 4 sc. Sc2tog) 3 times. Join. (15 sc)
- 13th rnd: Working in front loops only, skip first sc. *(1 hdc. 1 dc. Ch 1. 1 dc. 1 hdc) all in next sc. Skip next 2 sc. Rep from * 3 times more, then from * to once. Skip last sc. Join with sl st to back loop of first skipped sc of 12th rnd.
- 14th rnd: Working into remaining loops of 12th rnd, ch 1. 1 sc in each st around. Join.
- 15th rnd: Stuff Tree lightly.
- 16th rnd: Ch 1. (1 sc in each of next 3 sc. Sc2tog) 3 times. Join. (12 sc)
- 17th rnd: Working in front loops only, skip first sc. *(1 hdc. 1 dc. Ch 1. 1 dc. 1 hdc) all in next sc. Skip next 2 sc. Rep from * twice more, then from * to once. Skip last sc. Join with sl st to back loop of first skipped sc of 15th rnd.
- 18th rnd: Working into remaining loops of 15th rnd, ch 1. 1 sc in each st around. Join.
- 19th rnd: Ch 1. (Sc2tog) 6 times. Join. (6 sc)
- 20th rnd: Ch 1. (Sc2tog) 3 times. Join. Ch 1. Working through both thicknesses of 19th rnd, sl st across opening to close. Fasten off.
Flip 7th, 10th, 13th, and 16th rnds down so WS is facing out.
Snow
Work into 7th, 13th, and 16th rnds of Tree:
- (WS) Join B with sl st to any ch-1 sp. Ch 1. 2 sc in same ch-1 sp.
- *1 sc in next st. Sc2tog. 1 sc in next st. 3 sc in next ch-1 sp. Rep from * around to last 4 sts.
- 1 sc in next st. Sc2tog. 1 sc in next st. 1 sc in first ch-1 sp. Join. Fasten off.
Work into 10th rnd of Tree:
- (WS) Join B with sl st to last hdc of 10th rnd. Ch 1. 1 sc in first hdc.
- *1 sc in next st. 3 sc in next ch-1 sp. 1 sc in next st. Sc2tog. Rep from * 3 times more.
- 1 sc in next st. 3 sc in next ch-1 sp. 1 sc in each of next 2 sts. Fasten off.
Hanging Loop
- Cut a strand of A 5″ [12.5 cm] long.
- Fold strand in half and tie ends to form Hanging Loop.
- Pull Hanging Loop halfway through the top of Tree, pull Hanging Loop through itself, and tighten to secure.
Alternate: With A and yarn needle, pass yarn through the top of Tree and base of the provided Keychain Clasp. Whipstitch and tie securely as close to the top of Tree as possible, weaving in ends.
Star
- With C, ch 2.
- 1st rnd: (Sl st. Picot) 5 times in 2nd ch from hook. Join with sl st in same sp as last sl st and fasten off.
- Sew Star to the top of Tree at the base of Hanging Loop on the same side as the space in 10th rnd. Weave in all ends.
Face
Split black yarn into 2 plies and embroider face:
- French knot for eyes
- Straight Stitch for mouth
Place in the space left in 10th rnd, as shown.
Assembly and Finishing
Sew the Pieces Together
Ensure that all embellishments, including the snow accents, star, and face, are securely attached before displaying your finished piece. Make sure to weave in all ends and check for any loose threads.
Practical Tips
- Use a stitch marker to help keep track of your rounds, especially in the early stages of the project.
- Lightly stuff the tree to maintain a soft, flexible shape while avoiding overstuffing, which might distort the design.
- Experiment with different embellishments to give your tree a unique style.
- Consider using a contrasting color for the star to make it pop against the green of the tree.
Troubleshooting
- If your tree shape appears irregular, check your tension and ensure you are working with consistent stitch counts in each round.
- For gaps in your rounds, verify that all stitches are securely worked into both loops as instructed.
- If the stuffing shows through, consider using denser yarn or adjusting your stuffing technique to ensure it remains concealed.
Care
To keep your crochet tree looking its best, gently spot clean using a damp cloth. Avoid machine washing and drying, as this may cause the yarn to stretch or lose its shape. Store in a dry place, and consider using a protective box to prevent dust accumulation.
Frequently Asked Questions
What is the finished size of the tree?
The finished 2024 Advent Calendar Crochet Tree is approximately 6-8 inches tall, making it a charming addition to any holiday display.
What skill level is needed for this pattern?
This pattern is categorized as intermediate. A good understanding of basic crochet stitches and the ability to work in rounds are required.
Can I substitute the yarn?
Yes, you may substitute the yarn, but ensure the substitute is a worsted gauge yarn to maintain the project’s proportions and shape.
How can I personalize my tree?
Consider experimenting with different colors and embellishments for the star and snow accents or adding mini ornaments or lights to make it your own!
Can I sell items made from this pattern?
Please check the original designer’s usage terms to confirm if selling items made from this pattern is permitted. Always respect copyright guidelines for patterns.