
Get 30+ FREE Crochet Patterns — Join Our Newsletter
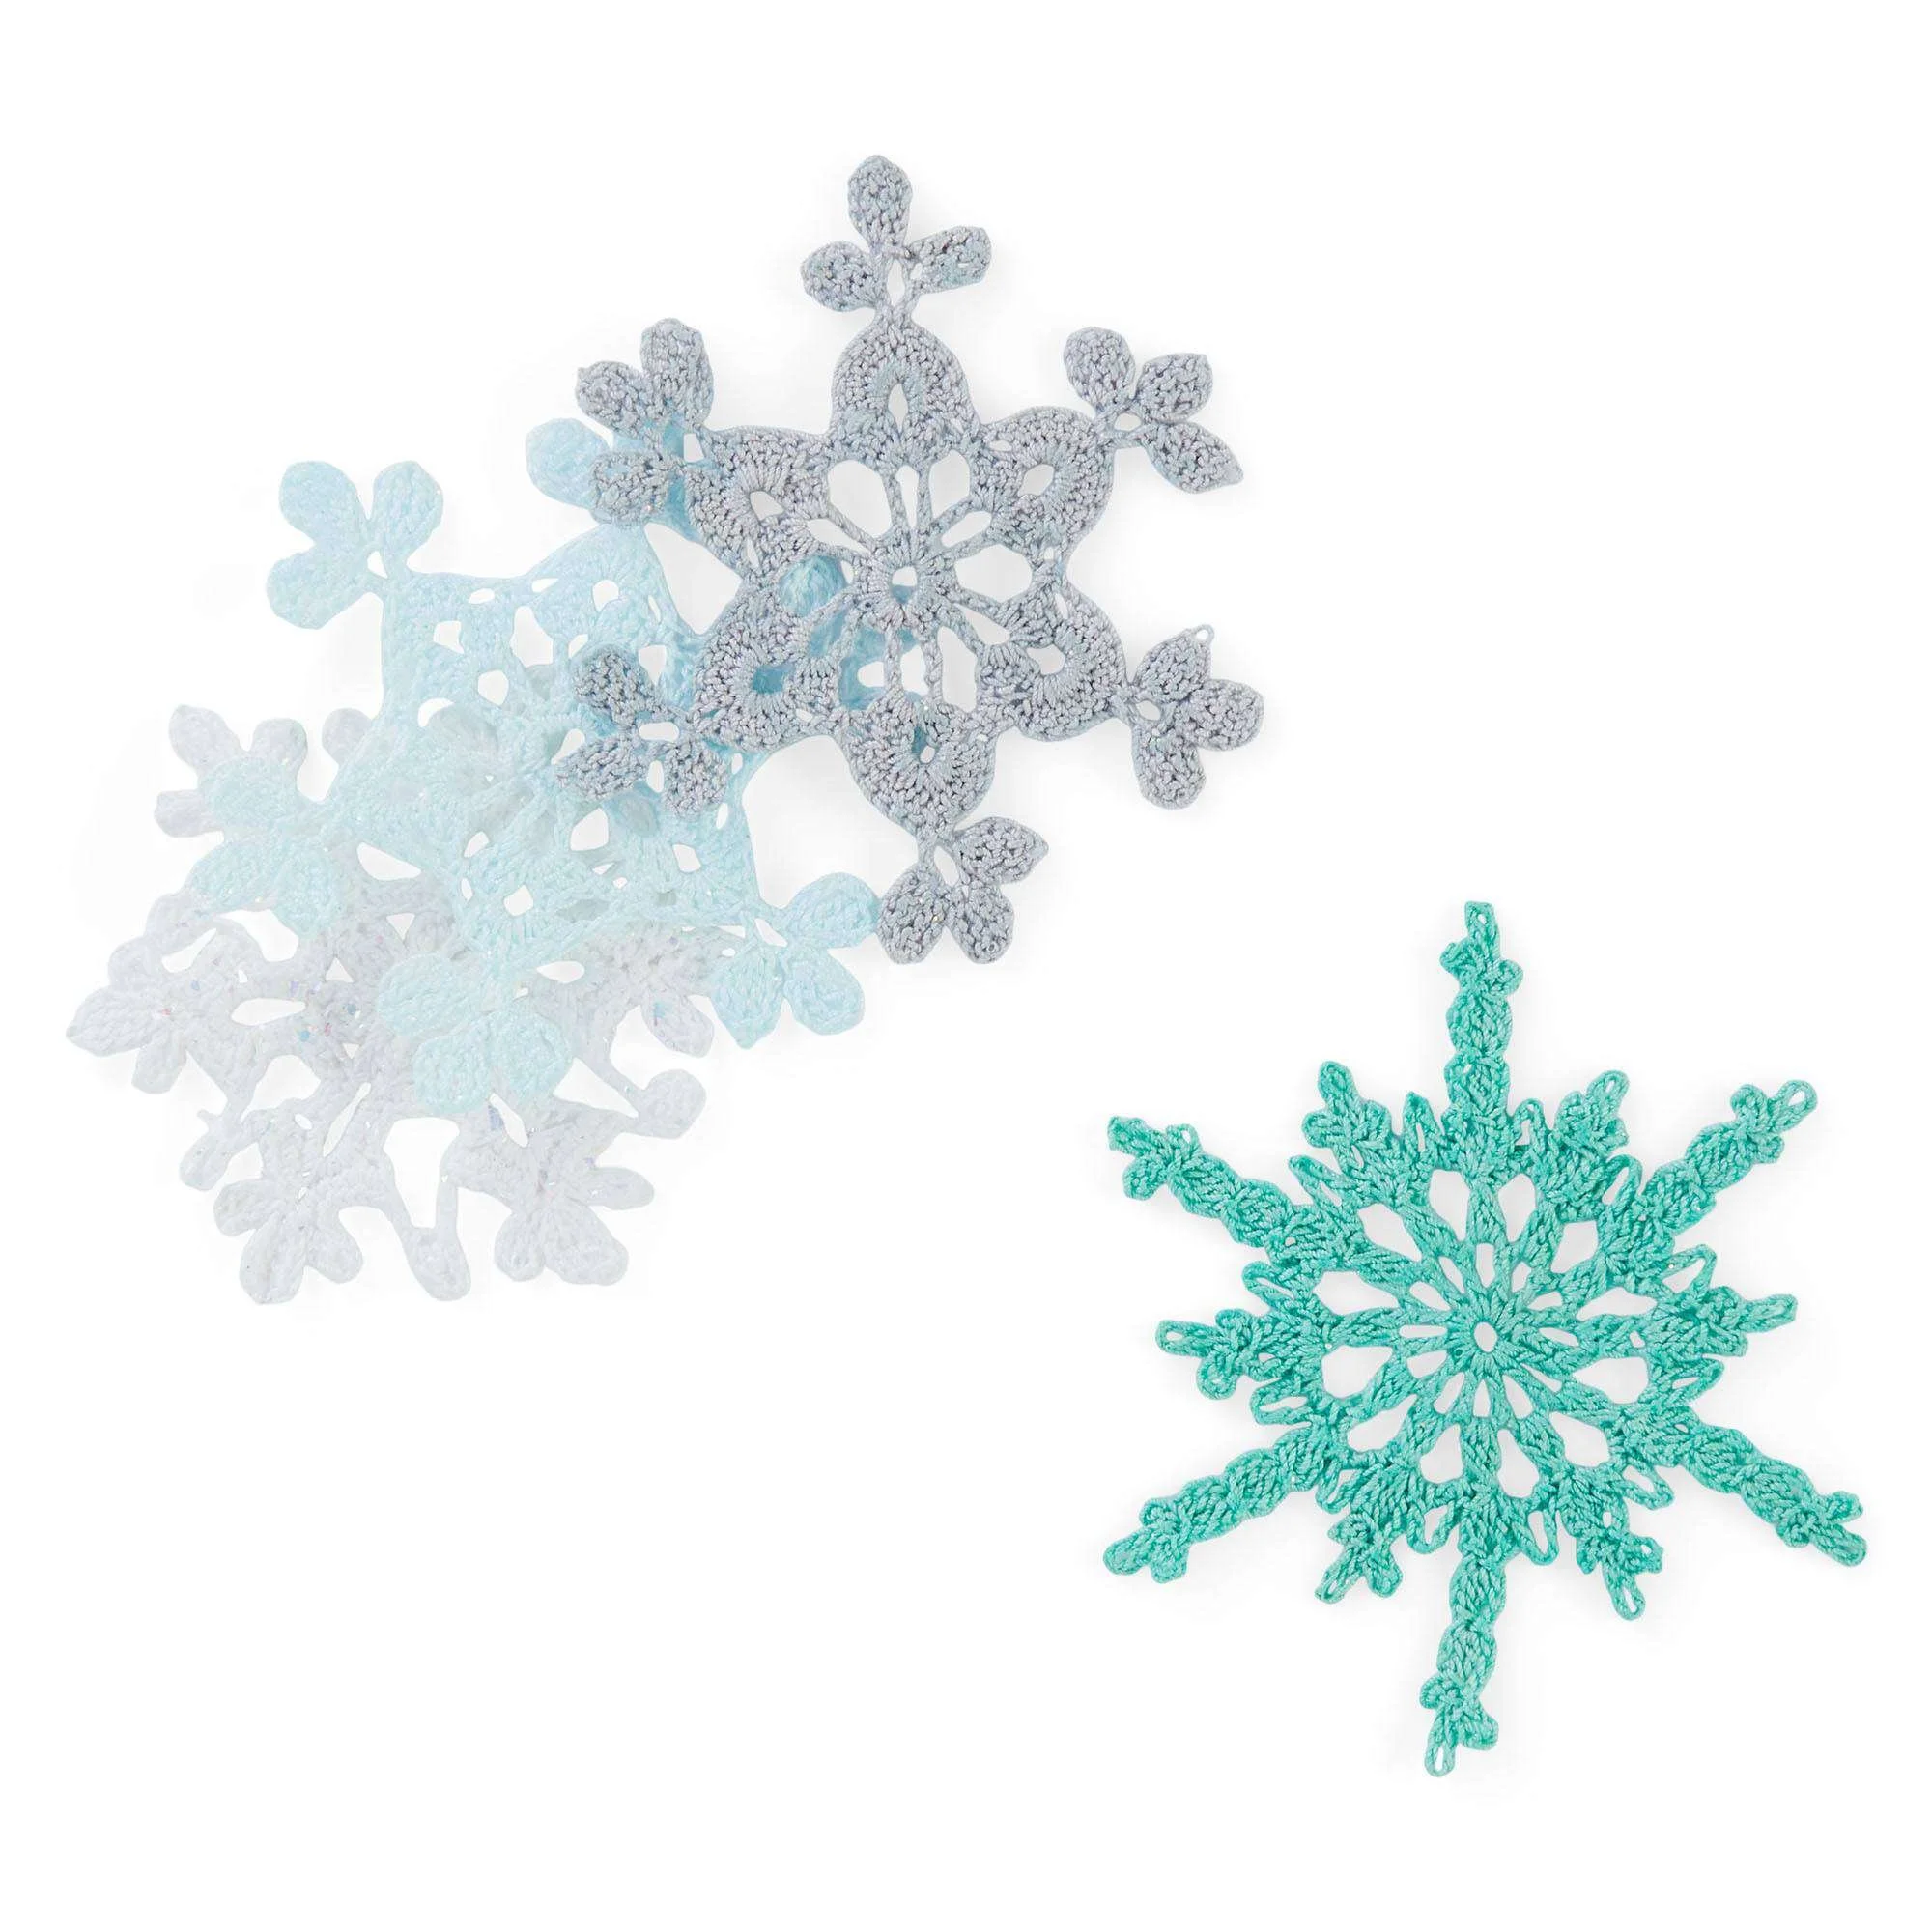
Twinkling Snowflakes Crochet Pattern by Aunt Lydia
A Delightful Crochet Experience
Crocheting snowflakes can bring a sense of joy and accomplishment, especially when transforming simple thread into intricate designs. The Aunt Lydia Twinkling Snowflakes Crochet Pattern is perfect for crafters looking to create beautiful decorations or thoughtful gifts. This pattern blends creativity and relaxation, making it suitable for both novice and experienced crocheters. Whether you’re enhancing your home décor for the holidays or crafting unique ornaments, these snowflakes shine with delight.
Why You’ll Love This Pattern
There are several compelling reasons to take on this project. First, the pattern is beginner-friendly, offering clear instructions that guide you step-by-step. Additionally, creating snowflakes is a quick endeavor, allowing for delightful results in a short amount of time. The handmade appeal of these pieces makes them perfect for gifts or personal decorations. Plus, if you’re a fan of working with yarn scraps, this pattern is ideal for using up leftover threads. Finally, these snowflakes are not only relaxing to create, but also highly portable, making them a great project to take with you on the go.
"I loved making the snowflakes! They were easy to follow and turned out beautifully—perfect for my winter décor!" – Happy Crocheter
How This Crochet Pattern Comes Together
The Aunt Lydia Twinkling Snowflakes project allows you to create three different snowflakes: Snowflake 1, Snowflake 2, and Snowflake 3. Each snowflake builds upon basic techniques and introduces new ones, making this a wonderful opportunity to develop your skills. Expect to work primarily with chaining, single crochet, double crochet, and slip stitch techniques. Completing each snowflake typically takes a couple of hours, depending on your speed and familiarity with crocheting.
Materials You’ll Need
To get started with the Aunt Lydia Twinkling Snowflakes pattern, gather the following materials:
- Aunt Lydia® Classic™ Crochet Thread size 10
- White: 400 yds/367 m (Colors: 350 yds/320 m)
- Snowflake 1: White (0001) – 1 ball
- Snowflake 2: Silver (0435) – 1 ball
- Snowflake 3: Aqua (0450) – 1 ball
- Note: 1 ball will make approximately 12 snowflakes.
- U.S. Size 7 (1.5 mm) Susan Bates® Steelite® crochet hook or size needed to obtain gauge
- Yarn needle
- White glue or spray starch for stiffening
- Optional: Glitter for added sparkle
Ensure you have all materials handy before starting to streamline your crochet process.
Step-by-Step Instructions
Snowflake 1
- Chain 6 and join with a slip stitch to form a ring.
- 1st round: Chain 4. [(Yarn over hook twice and draw up a loop in the ring. Yarn over and draw through 2 loops on the hook) twice]; repeat from * 5 more times. Fasten off.
- 2nd round: Chain 3, join yarn with a slip stitch to the first treble cluster. (Chain 9. Slip stitch in the same space as previous slip stitch. Chain 3. Slip stitch in the next treble cluster) 5 times. Chain 9, slip stitch in the same space as previous slip stitch. Join with a slip stitch to the first chain.
- 3rd round: Chain 1. Single crochet in each of the next 3 chains. [(3 single crochet, chain 3) 3 times. 3 single crochet] in the next chain-9 loop. Repeat from * 5 more times. Join with a slip stitch to the first single crochet. Fasten off.
- 4th round: Join yarn with a slip stitch to the first chain-3 space. Chain 1. 2 single crochet in the same space as slip stitch. *Single crochet in each of the next 3 single crochet. (1 single crochet, chain 3, 1 double crochet, chain 3, slip stitch, chain 4, 2 treble crochet, chain 4, slip stitch, chain 3, 1 double crochet, chain 3, 1 single crochet) all in the next chain-3 space. Single crochet in each of the next 3 single crochet. 2 single crochet in the next chain-3 space. Chain 4. (1 half double crochet, chain 2, slip stitch) in the 2nd chain from the hook. Chain 2, skip the next 9 single crochet. 2 single crochet in the next chain-3 space. Repeat from * 5 more times. Fasten off.
Snowflake 2
- Chain 7 and join with a slip stitch to form a ring.
- 1st round: Chain 1. (3 single crochet, chain 9) 6 times in the ring. Join with a slip stitch to the first single crochet. Fasten off.
- 2nd round: Join yarn with a slip stitch to any chain-9 loop. Chain 3. (2 double crochet, chain 3, 3 double crochet) in the same space as slip stitch. [Chain 1. (3 double crochet, chain 3, 3 double crochet) in the next chain-9 loop] 5 times. Chain 1. Join with a slip stitch to the top of the chain 3.
- 3rd round: Slip stitch back into the last chain-1 space. Chain 1. 1 single crochet in the same space as slip stitch. *Chain 1. 6 double crochet in the next chain-3 space. Chain 6. Slip stitch to the first chain. Turn. (Chain 4, 2 treble crochet, chain 4, slip stitch) 3 times in the last chain-6 space—top cluster made. Turn. 6 double crochet in the same chain-3 space as the last 6 double crochet. Chain 1. 1 single crochet in the next chain-1 space. Repeat from * 4 more times, then from * to ** once. Join with a slip stitch to the first single crochet. Fasten off.
Snowflake 3
- Chain 6 and join with a slip stitch to form a ring.
- 1st round: Chain 6 (counts as a double crochet and chain 3). (1 double crochet, chain 3) 11 times in the ring. Join with a slip stitch to the 3rd chain of the chain 6. (12 chain-3 spaces)
- 2nd round: Slip stitch in the next chain-3 space. Chain 3. (Yarn over and draw up a loop, yarn over and draw through 2 loops on the hook) twice in the same space as last slip stitch. Yarn over and draw through all loops on the hook—a beginning cluster made. [Chain 5. (Yarn over and draw up a loop, yarn over and draw through 2 loops on the hook) 3 times in the next chain-3 space. Yarn over and draw through all loops on the hook—cluster made] 11 times. Chain 5. Join with a slip stitch to the top of the first cluster.
- 3rd round: (Slip stitch, chain 1, 1 single crochet, chain 5, 1 single crochet) in the next chain-5 space. *[Slip stitch, chain 3, cluster] in the next cluster. (Chain 3, cluster in the top of the cluster just made) twice. (Chain 3, slip stitch, chain 6, slip stitch, chain 3, slip stitch) all in the top of the last cluster. Working down towards the 2nd round, (chain 3, slip stitch to the base of the cluster) 3 times. (1 single crochet, chain 5, 1 single crochet) in the next chain-5 space. (Slip stitch, chain 3, cluster) in the next cluster. (Chain 3, slip stitch, chain 6, slip stitch, chain 3, slip stitch) all in the top of the cluster. Working down towards the 2nd round, chain 3, slip stitch to the base of the cluster. **(1 single crochet, chain 5, 1 single crochet) in the next chain-5 space. Repeat from * 4 more times, then from * to ** once. Join with a slip stitch to the first single crochet. Fasten off.
Finishing
- Pin each snowflake according to measurements and ensure they are properly shaped.
- Apply spray starch if desired and steam iron lightly.
- For optional stiffening ornaments: Mix white glue or glitter glue with water (¼ water to ¾ glue).
- Pin snowflakes to measurements on cardboard covered with waxed paper.
- Paint the glue mixture onto the snowflake, saturating well.
- Allow to dry for at least 10 hours before removing pins. Carefully remove the snowflake from the cardboard.
- Note: Colored glitter glue may not dry clear on white and may stain.
Creative Ideas for Your Finished Project
Once you finish crafting your snowflakes, there are endless ways to use them! Here are some creative ideas:
- Use them as chic home décor by hanging them in windows or on walls.
- Gift them to friends for a personalized touch during the holiday season.
- Attach them to gifts as beautiful embellishments.
- Create a stunning winter-themed mobile by stringing them together.
- Incorporate them into seasonal wreaths for a festive vibe.
How to Care for Your Crochet Project
Taking care of your snowflakes is simple, ensuring they remain beautiful. Recommended care guidelines include:
- Hand wash only, avoiding machine washing which may distort fine crochet work.
- Use cold water and a gentle detergent.
- Reshape and lay flat to dry; never wring out.
- For long-term storage, keep them in a cool, dry place, avoiding direct sunlight to prevent discoloration.
Helpful Crochet Tips
To enhance your crochet experience with this pattern, consider the following tips:
- Maintain even tension for uniform stitches throughout.
- Use stitch markers to keep track of your rounds.
- Check your gauge to ensure your snowflakes turn out the correct size.
- Take your time with each stitch; quality is more important than speed.
- When changing yarn colors, tie a secure knot to avoid loose ends.
Fun Pattern Ideas
For those looking to personalize their snowflakes, try implementing some of these creative variations:
- Use different color combinations for a unique look.
- Experiment with textured yarn for added dimension.
- Add contrasting borders or decorative edging to the snowflakes.
- Try creating larger or smaller versions using different hook sizes.
- Embellish with embroidery or add sequins for sparkle.
Keep in mind that any change may affect the final size or drape of your snowflakes.
Your Questions Answered
Here are answers to common questions about the Aunt Lydia Twinkling Snowflakes pattern:
-
Is this crochet pattern beginner-friendly?
Yes, the pattern is designed to be accessible for beginners and includes detailed instructions. -
What yarn works best?
Aunt Lydia® Classic™ Crochet Thread size 10 is recommended for the best results. -
Can I use a different hook size?
You may use a different hook size, but it is recommended to use a U.S. Size 7 (1.5 mm) to maintain the pattern’s gauge. -
How long does the project take?
Each snowflake takes a couple of hours to complete, depending on your crochet speed. -
How can I make it larger or smaller?
Adjust the size by using a larger or smaller hook and modifying the number of rounds or stitches accordingly.
These answers should help guide you through your crocheting journey with the Aunt Lydia Twinkling Snowflakes pattern. Enjoy your crafting!



