Get 30+ FREE Crochet Patterns — Join Our Newsletter
Christmas Crochet Advent Calendar Pattern
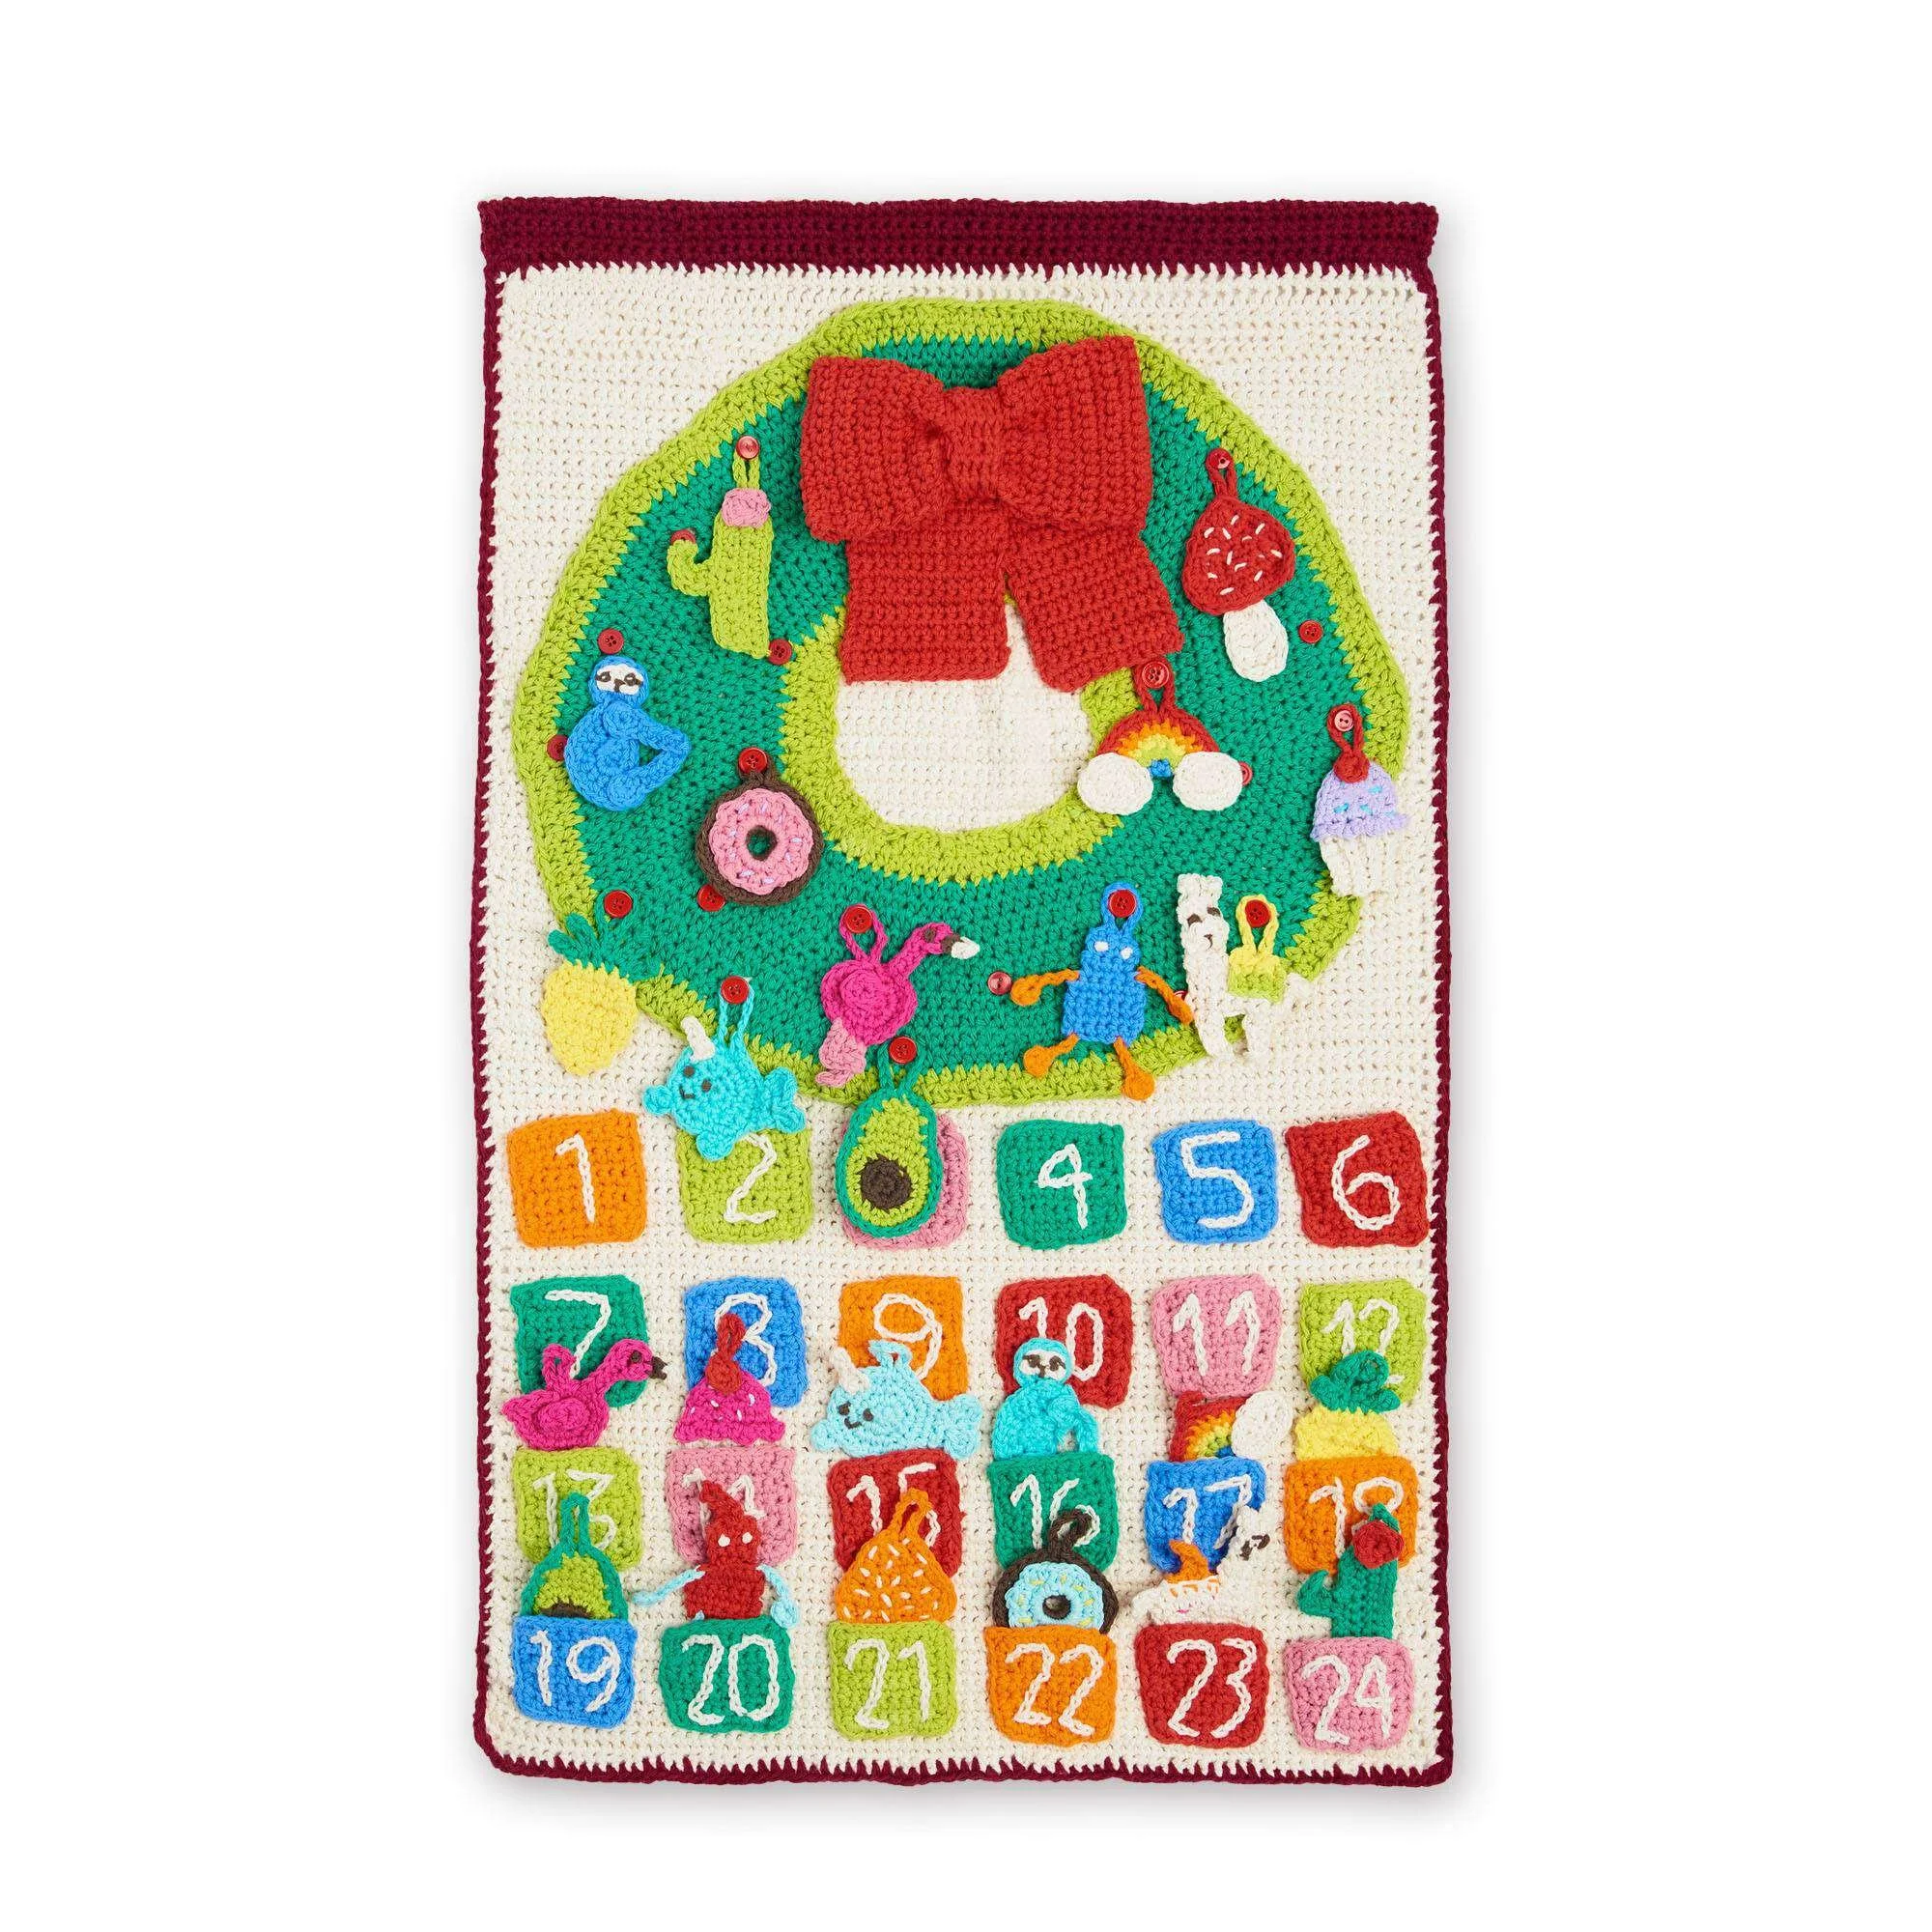
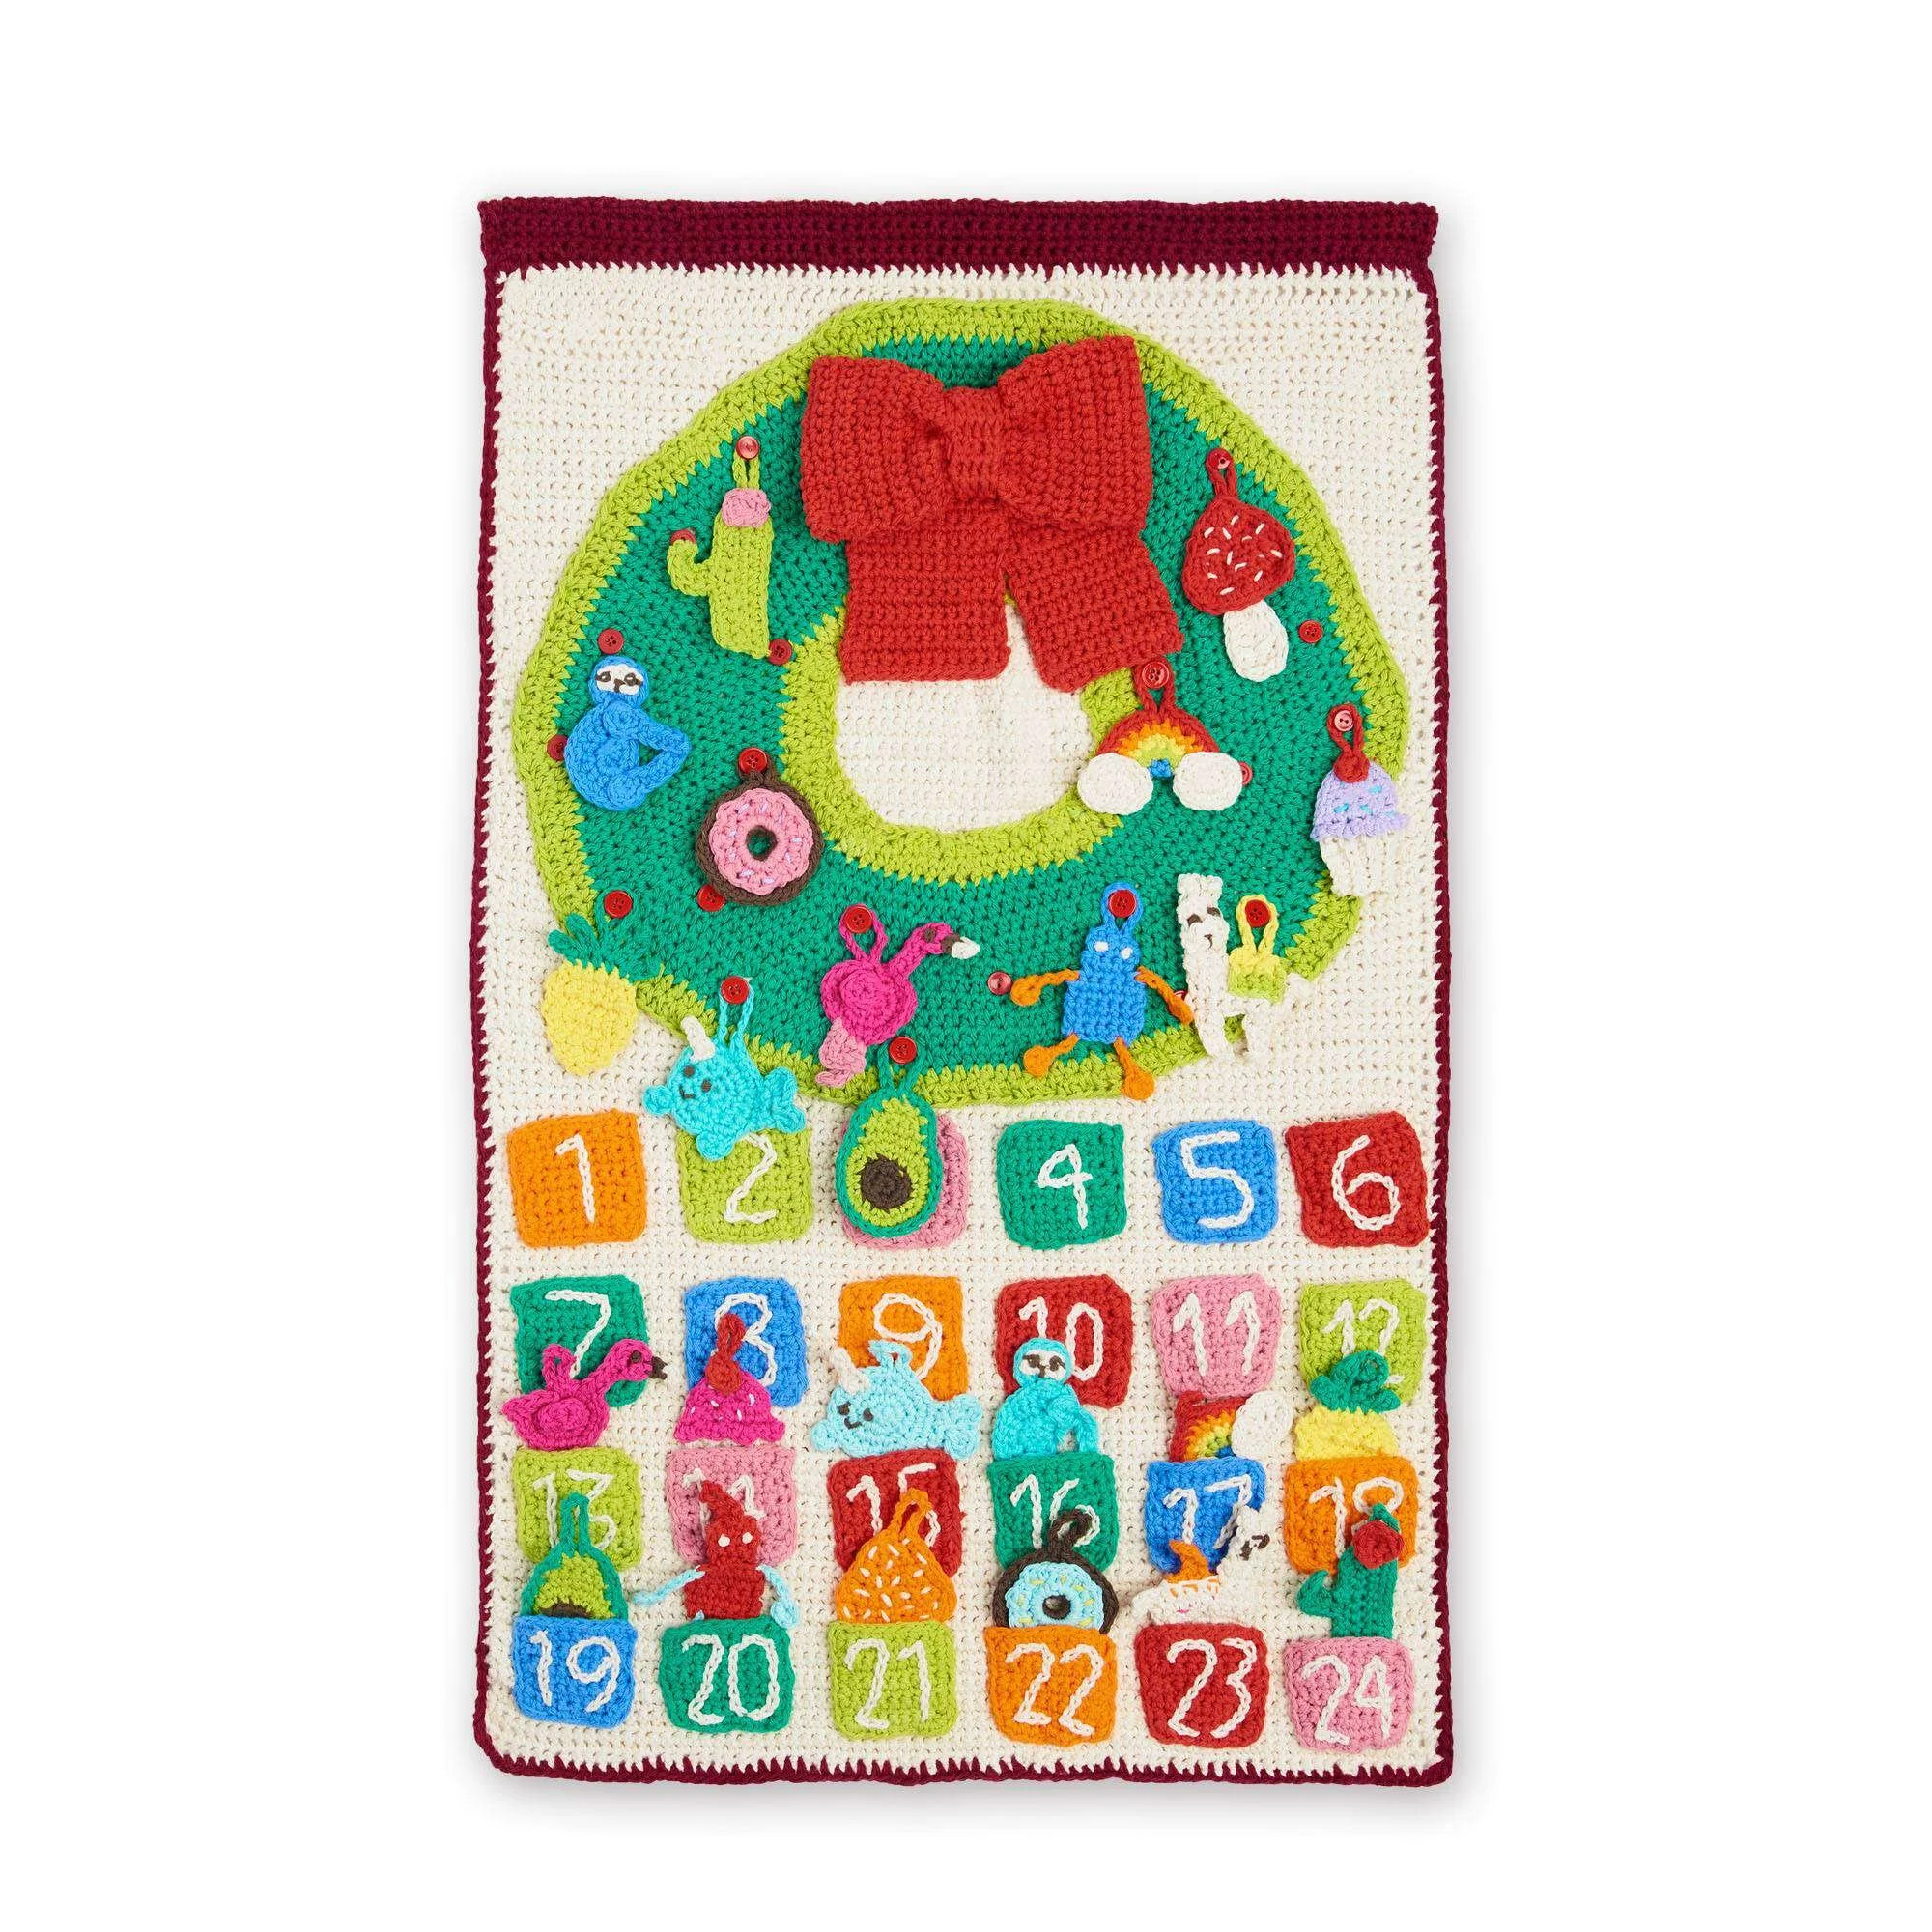
This Modern Christmas Crochet Advent Calendar Pattern is a delightful way to count down the days until Christmas. With a beautiful wreath design adorned with colorful pockets for ornaments, this calendar adds a festive touch to your holiday decor. The project involves crocheting a background, creating a variety of ornaments, and assembling them into a lovely display. Perfect for intermediate crocheters, the pattern features a variety of techniques, including single crochet, half double crochet, and embroidery. Follow along with the instructions and refer to the accompanying photographs for guidance.
Project Details
- Crochet terminology: U.S. terminology
- Skill level: Intermediate – requires basic and some advanced crochet techniques
- Finished size: Approximately 37″ [94 cm] for the background
- Construction method: Worked in rows and rounds, with assembly of elements
Materials and Tools
| Yarn Option | Yarn and Specifications | Amount |
|---|---|---|
| Main | Lily® Sugar’n Cream™ (2.5 oz / 70.9 g; 120 yds / 109 m) | – |
| Contrast A | Ecru (00004) | 7 balls or 723 yds / 661 m |
| Contrast B | Wine (00015) | 1 ball or 68 yds / 62 m |
| Contrast C | Mod Green (01223) | 2 balls or 185 yds / 170 m |
| Contrast D | Hot Green (01712) | 2 balls or 143 yds / 131 m |
| Contrast E | Rose Pink (00046) | 1 ball or 76 yds / 70 m |
| Contrast F | Red (00095) | 2 balls or 169 yds / 154 m |
| Contrast G | Hot Orange (01628) | 1 ball or 68 yds / 62 m |
| Contrast H | Blueberry (01725) | 1 ball or 68 yds / 62 m |
| Contrast I | Hot Pink (01740) | 1 ball or 25 yds / 23 m |
| Contrast J | Sunshine (00073) | 1 ball or 25 yds / 23 m |
| Contrast K | Seabreeze (01201) | 1 ball or 34 yds [31 m] |
| Contrast L | Robin’s Egg (01215) | 1 ball or 25 yds / 23 m |
| Contrast M | Soft Violet (00093) | 1 ball or 25 yds / 23 m |
| Contrast N | Warm Brown (01130) | 1 ball or 30 yds / 28 m |
- Size: U.S. H/8 (5 mm) crochet hook (or size needed to obtain gauge)
- Buttons: 24 – ½” [1 cm] buttons
- Dowel: Wooden dowel approx 28″ [71 cm] long
Abbreviations
| Abbreviation | Meaning |
|---|---|
| ch | chain |
| sc | single crochet |
| hdc | half double crochet |
| sl st | slip stitch |
| st | stitch |
| RS | right side |
| WS | wrong side |
Preparation and Techniques
Working in Rows and Rounds
Crochet Patterns — No Ads. No Clutter.
Browse the Crochet Library →This pattern uses both rows and rounds. The background is worked in rows, while the wreath and ornaments are worked in rounds.
Changing Yarn Colors
When changing yarn colors, complete the last stitch of the previous color to the point of the new yarn color, then drop the old and complete that stitch with the new color. This creates a clean transition.
Checking Gauge
To ensure your tension matches the pattern, make a gauge swatch with the main yarn. Adjust your hook size if necessary.
Main Assembly
Background
With A, ch 83.
- 1st row: (RS). 1 sc in 2nd ch from hook. 1 sc in each ch to end of ch. Turn. (82 sc)
- 2nd row: Ch 1. 1 sc in 1st sc. 1 sc in each sc to end of row. Turn.
- Rep 2nd row until work from beg measures 37″ [94 cm].
- Fasten off.
Edging
- 1st rnd: (RS). Join B with sl st in top left corner. Ch 1. Work 1 rnd sc evenly around Background, working 3 sc in each corner. Join. Do not fasten off. Turn.
Dowel Casing
- 1st row: Ch 1. 1 sc in each sc across top of Background Edging. Turn. (85 sc)
- Rep 1st row until Dowel Casing measures 3″ [7.5 cm].
- Fasten off.
- Fold Dowel Casing in half lengthwise. Sew final row to WS to form casing to insert dowel.
Pockets (make 4 each in C, D, E, F, G, and H)
Ch 9.
- 1st row: 1 sc in 2nd ch from hook. 1 sc in each ch to end of ch. Turn. (8 sc)
- 2nd row: Ch 1. 1 sc in each sc to end of row. Turn.
- Rep 2nd row until work from beg measures 3″ [7.5 cm].
- Fasten off.
With A, using chain st, embroider numbers 1-24 on Pockets according to the provided diagram.
Wreath
With D, ch 70. Join with sl st to 1st ch to form a ring.
- 1st rnd: Ch 2. 1 hdc in each ch around. Join. (70 hdc)
- 2nd rnd: Ch 2. *1 hdc in each of next 6 hdc. 2 hdc in next hdc. Rep from * around. Break D. Join C. (80 hdc)
- 3rd rnd: With C, ch 2. *1 hdc in each of next 7 hdc. 2 hdc in next hdc. Rep from * around. Join. (90 hdc)
- 4th rnd: Ch 2. *1 hdc in each of next 8 hdc. 2 hdc in next hdc. Rep from * around. Join. (100 hdc)
- 5th rnd: Ch 2. *1 hdc in each of next 9 hdc. 2 hdc in next hdc. Rep from * around. Join. (110 hdc)
- 6th rnd: Ch 2. *1 hdc in each of next 10 hdc. 2 hdc in next hdc. Rep from * around. Join. (120 hdc)
- 7th rnd: Ch 2. *1 hdc in each of next 11 hdc. 2 hdc in next hdc. Rep from * around. Join. (130 hdc)
- 8th rnd: Ch 2. *1 hdc in each of next 12 hdc. 2 hdc in next hdc. Rep from * around. Join. (140 hdc)
- 9th rnd: Ch 2. *1 hdc in each of next 13 hdc. 2 hdc in next hdc. Rep from * around. Join. (150 hdc)
- 10th rnd: Ch 2. *1 hdc in each of next 14 hdc. 2 hdc in next hdc. Rep from * around. Join. (160 hdc)
- 11th rnd: Ch 2. *1 hdc in each of next 15 hdc. 2 hdc in next hdc. Rep from * around. Join. (170 hdc)
- 12th rnd: Ch 2. *1 hdc in each of next 16 hdc. 2 hdc in next hdc. Rep from * around. Join. (180 hdc)
- 13th rnd: Ch 2. *1 hdc in each of next 17 hdc. 2 hdc in next hdc. Rep from * around. Break C. Join D. (190 hdc)
- 14th rnd: With D, ch 2. *1 hdc in each of next 18 hdc. 2 hdc in next hdc. Rep from * around. Join. (200 hdc)
- 15th rnd: Skip first 2 hdc. *5 dc in next hdc. Skip next hdc. Sl st in each of next 2 hdc. Skip next hdc. Rep from * to last 3 hdc. 5 dc in next hdc. Skip next hdc. Sl st in last hdc. Join.
- Fasten off.
Sew Wreath to Background as shown in the provided photo.
Bow
With F, ch 14.
- 1st row: 1 sc in 2nd ch from hook. 1 sc in each ch to end of ch. Turn. (13 sc)
- 2nd row: Ch 1. 1 sc in each sc to end of row. Turn.
- Rep 2nd row until work from beg measures 16″ [40.5 cm].
- Fasten off.
- Fold Bow in half widthwise. Sew ends together.
Bow Center
With F, ch 6.
- 1st row: 1 sc in 2nd ch from hook. 1 sc in each ch to end of ch. Turn. (5 sc)
- 2nd row: Ch 1. 1 sc in each sc to end of row. Turn.
- Rep 2nd row until work from beg measures 4″ [10 cm].
- Fasten off.
Center Bow seam in back of work. Wrap Bow Center around middle of Bow, covering Bow seam. Sew ends of Bow Center together.
Bow Ends (make 2 alike)
With F, ch 14.
- 1st row: 1 sc in 2nd ch from hook. 1 sc in each ch to end of ch. Turn. (13 sc)
- 2nd row: Ch 1. 1 sc in each sc to end of row. Turn.
- Rep 2nd row until work from beg measures 6″ [15 cm].
- Fasten off.
Gather tops of Bow Ends with gathering stitch and sew to top of Wreath as shown in the photo. Sew Bow to top of Bow Ends.
Ornaments (General)
Ornaments are each made in the specified color substitutions and assembled by sewing/embroidering as instructed.
Cupcake (make 1 of each version)
Version Color Assignments
- Version 1: Use I as Color 1, A as Color 2, F as Color 3, and L as Color 4.
- Version 2: Use M as Color 1, A as Color 2, F as Color 3, and K as Color 4.
Icing (Color 1)
Ch 2.
- 1st row: (RS). 4 sc in 2nd ch from hook. Turn. (4 sc)
- 2nd row: Ch 1. 2 sc in each sc to end of row. Turn. (8 sc)
- 3rd row: Ch 1. *1 sc in next sc. 2 sc in next sc. Rep from * to end of row. (12 sc)
- Do not fasten off. Do not turn.
- Next row: (RS). Working along straight edge of Icing, ch 1. Work 7 sc evenly across edge. Turn.
- Next row: Ch 1. Working in back loops only, *3 sc in next sc. Sl st in next sc. Rep from * to last sc. (3 sc. Sl st) all in last sc.
- Fasten off.
Cupcake Bottom (Color 2)
Ch 7.
- 1st row: Sl st in 2nd ch from hook. Sl st in each of next 2 ch. 1 sc in each of next 3 ch. Turn. (6 sts)
- 2nd row: Ch 1. Working in back loops only, 1 sc in each of next 3 sc. Sl st in each of next 3 sts. Turn.
- 3rd row: Ch 1. Working in back loops only, sl st in each of next 3 sl st. 1 sc in each of next 3 sc. Turn.
- Rep 2nd and 3rd rows twice more.
- Fasten off.
Sew wider side edge of Cupcake Bottom to front loops of 2nd last row of Icing.
Cherry (Color 3)
Ch 2.
- 1st rnd: 6 sc in 2nd ch from hook. Join. Ch 10 for hanging loop. Join to last sl st worked. Fasten off.
Sew Cherry to top of Icing.
Sprinkles (Color 4)
With Color 4, embroider Sprinkles with straight st as shown in the photo.
Pineapple (make 2)
With J, ch 4.
- 1st row: (WS). 1 sc in 2nd ch from hook. 1 sc in each of next 2 ch. Turn. (3 sc)
- 2nd row: Ch 1. (1 sc. Ch 2. 1 sc) all in 1st sc. Ch 2. 1 sc in next sc. Ch 2. (1 sc. Ch 2. 1 sc) all in last sc. Turn.
- 3rd row: Ch 1. 1 sc in each sc to end of row, pushing each ch-2 to front of work. Turn. (5 sc)
- 4th row: Ch 1. (1 sc. Ch 2. 1 sc) all in 1st sc. *Ch 2. 1 sc in next sc. Rep from * twice more. Ch 2. (1 sc. Ch 2. 1 sc) all in last sc. Turn.
- 5th row: Ch 1. 1 sc in each sc to end of row, pushing each ch-2 to front of work. Turn. (7 sc)
- 6th row: Ch 1. *1 sc in next sc. Ch 2. Rep from * to last sc. 1 sc in last sc. Turn.
- 7th row: As 5th row.
- 8th row: Ch 1. Sc2tog. (Ch 2. 1 sc in next sc) 3 times. Ch 2. Sc2tog. Turn.
- 9th row: Ch 1. 1 sc in each sc to end of row, pushing each ch-2 to front of work. Break J. Join C.
- 10th row: With C, ch 4. 1 sc in 2nd ch from hook. 1 sc in each of next 2 ch. 1 sc in 1st sc of previous row. Ch 5. 1 sc in 2nd ch from hook. 1 sc in each of next 3 ch. 1 sc in next sc of previous row. Ch 12 for hanging loop. 1 sc in 11th ch from hook. 1 sc in next ch. 1 sc in next sc of previous row. Ch 5. 1 sc in 2nd ch from hook. 1 sc in each of next 3 ch. 1 sc in next sc of previous row. Ch 4. 1 sc in 2nd ch from hook. 1 sc in each of next 2 ch. Sl st in 1st sc of previous row.
- Fasten off.
Cactus Plant (make 1 of each version)
Version Color Assignments
- Version 1: Use D as Color 1 and E as Color 2.
- Version 2: Use C as Color 1 and F as Color 2.
Cactus (Color 1)
With Color 1, ch 11.
- 1st row: 1 sc in 2nd ch from hook. 1 sc in each ch to last ch. 4 sc in last ch. Working into opposite side of foundation ch, 1 sc in each ch to end of ch. (22 sc). Turn.
- 2nd row: Ch 1. 1 sc in each of next 9 sc. 2 sc in each of next 2 sc. Ch 10 for hanging loop. Sl st in same st as last 2 sc. 2 sc in each of next 2 sc. 1 sc in each of next 3 sc. Ch 7. 1 hdc in 3rd ch from hook. 1 hdc in next ch. 3 hdc in next ch. 1 hdc in each of next 2 ch. 1 sc in each of last 6 sc.
- Fasten off.
Flower (Color 2)
With Color 2, ch 2.
- 1st rnd: (1 sc. 1 dc) 4 times all in 2nd ch from hook. Join.
- Fasten off.
Sew Flower to top of Cactus under Hanging Loop.
Donut (make 1 of each version)
Version Color Assignments
- Version 1: Use N as Color 1, L as Color 2, J as Color 3.
- Version 2: Use N as Color 1, E as Color 2, M as Color 3.
Donut (Color 1)
With Color 1, ch 6. Join with sl st to 1st ch to form ring.
- 1st rnd: 12 sc in ring. Join.
- 2nd rnd: Ch 1. *1 sc in next sc. 2 sc in next sc. Rep from * around. Join. (18 sc)
- 3rd rnd: Ch 1. *1 sc in each of next 2 sc. 2 sc in next sc. Rep from * around. Join. (24 sc)
- 4th rnd: Ch 1. *1 sc in each of next 3 sc. 2 sc in next sc. Rep from * around. Join. Ch 10 for hanging loop. Sl st in last sl st. (30 sc)
- Fasten off.
Icing (Color 2)
With Color 2, ch 8. Join with sl st to 1st ch to form ring.
- 1st rnd: 16 sc in ring. Join. (16 sc)
- 2nd rnd: Ch 1. *1 sc in next sc. (1 dc. 1 sc) all in next sc. Rep from * around. Join. (24 sts)
- Fasten off.
Sew Icing to Donut.
Sprinkles (Color 3)
With Color 3, embroider Sprinkles with straight st as shown in the photo.
Avocado (make 2)
With N, ch 2.
- 1st rnd: 6 sc in 2nd ch from hook. Join. (6 sc)
- 2nd rnd: Ch 1. 2 sc in each sc around. Break N. Join D. (12 sc)
- 3rd rnd: With D, ch 1. Working in back loops only, *1 sc in next sc. 2 sc in next sc. Rep from * around. Join. (18 sc)
- 4th rnd: Ch 1. *1 sc in each of next 2 sc. 2 sc in next sc. Rep from * around. Join. (24 sc)
- 5th row: Ch 1. 1 sc in each of next 6 sc. Turn. (6 sc)
- 6th row: Ch 1. 1 sc in each sc to end of row. Turn.
- 7th row: Ch 1. Sc2tog. 1 sc in each of next 2 sc. Sc2tog. Turn. (4 sts)
- 8th row: Ch 1. (Sc2tog) twice. Break D. Join C. Turn. Do not fasten off. (2 sc)
- Edging rnd: Ch 1. 1 sc in first sc. Ch 10 for hanging loop. Sl st in same st as last sc. 1 sc in next sc. Work 29 sc evenly around edge of Avocado. Join. Fasten off.
Mushroom (make 1 of each version)
Version Color Assignments
- Version 1: Use G as Color 1 and A as Color 2.
- Version 2: Use F as Color 1 and A as Color 2.
Mushroom Cap (Color 1)
With Color 1, ch 9.
- 1st row: 1 sc in 2nd ch from hook. 1 sc in each sc to end of ch. Turn. (8 sc)
- 2nd row: Ch 1. 2 sc in next sc. 1 sc in each of next 6 sc. 2 sc in last sc. Turn. (10 sc)
- 3rd row: Ch 1. (Sc2tog) twice. 1 sc in each of next 2 sc. (Sc2tog) twice. Turn. (6 sts)
- 4th row: Ch 1. 1 sc in each sc to end of row. Turn.
- 5th row: Ch 1. Sc2tog. 1 sc in each of next 2 sc. Sc2tog. Turn. (4 sts)
- 6th row: Ch 1. 1 sc in each st to end of row. Turn.
- 7th row: Ch 1. (Sc2tog) twice. Do not turn. Do not fasten off. (2 sts)
Edging rnd (cap circumference)
Ch 1. Continuously work around the circumference of the Mushroom Cap, working 22 sc evenly around to last sc of previous row. 1 sc in next sc. Ch 10 for hanging loop. Sl st in same st as last sc. 1 sc in next sc. Join. Fasten off.
Stem (A)
With A, ch 6.
- 1st row: 1 hdc in 3rd ch from hook. 1 hdc in next ch. 1 dc in next ch. 6 dc in last ch. Working into opposite side of foundation ch, 1 dc in next ch. 1 hdc in each of the last 2 ch. Fasten off.
Sew Stem to bottom of Mushroom Cap. Using A, embroider spots with straight st on Mushroom Cap as shown in the photo.
Narwhal (make 1 of each version)
Version Color Assignments
- Version 1: Use L as Color 1, A as Color 2, and N as Color 3.
- Version 2: Use K as Color 1, A as Color 2, and N as Color 3.
Body (Color 1)
With Color 1, ch 2.
- 1st rnd: 6 sc in 2nd ch from hook. Join. (6 sc)
- 2nd rnd: Ch 1. 2 sc in each sc around. Join. (12 sc)
- 3rd rnd: Ch 1. *1 sc in next sc. 2 sc in next sc. Rep from * around. Join. (18 sc)
- 4th rnd: Ch 1. *1 sc in each of next 2 sc. 2 sc in next sc.* Rep from * to * once more. Ch 10 for hanging loop. Sl st in same st as last sc. Rep from * to * around. Join. (24 sc)
Tail
- Next row: Ch 1. 1 sc in each of next 4 sc. Turn.
- Next row: Ch 1. (Sc2tog) twice. Turn. (2 sts)
- Next row: Ch 3. *(2 dc. Ch 2. Sl st) all in next st. Rep from * once more. Fasten off.
Tusk (Color 2)
With Color 2, ch 5.
- 1st row: Sl st in 2nd ch from hook. Sl st in next ch. 1 sc in each of last 2 ch. Fasten off.
Sew Tusk to Narwhal as shown in the photo.
Flippers (make 2)
With Color 1, ch 2.
- 1st row: 3 sc in 2nd ch from hook. Fasten off.
Using Color 3, embroider eyes and mouth with straight st on Narwhal as shown in the photo.
Sloth (make 1 of each version)
Version Color Assignments
- Version 1: Use H as Color 1, A as Color 2, and N as Color 3.
- Version 2: Use K as Color 1, A as Color 2, and N as Color 3.
Body (Color 1)
With Color 1, ch 2.
- 1st row: 4 sc in 2nd ch from hook. Turn. (4 sc)
- 2nd row: Ch 1. 2 sc in each sc to end of row. Turn. (8 sc)
- 3rd row: Ch 1. *1 sc in next sc. 2 sc in next sc. Rep from * to end of row. Turn. (12 sc)
- 4th row: Ch 1. *1 sc in each of next 2 sc. 2 sc in next sc. Rep from * to end of row. Do not turn. (18 sc)
- Ch 1. Work 7 sc evenly across straight edge of body. Fasten off.
Arms (make 2)
With Color 1, ch 2.
- 1st rnd: 6 sc in 2nd ch from hook. Join.
- Next row: Ch 6. 1 sc in 2nd ch from hook. 1 sc in each of the next 4 ch. 1 sc in next sc of last rnd. Fasten off.
Sew Arms to Body as shown in the photo.
Head (Color 1)
With Color 1, ch 2.
- 1st rnd: 6 sc in 2nd ch from hook. Join. (6 sc)
- 2nd rnd: Ch 1. 2 sc in next 5 sc. Do not join. (10 sc)
- Fasten off.
Face (Color 2)
With Color 2, ch 4.
- 1st row: 1 sc in 2nd ch from hook. 1 sc in each ch to end of ch. (3 sc)
- Fasten off.
Sew Face to Head as shown in the photo.
Using Color 3, embroider eyes and nose with straight st as shown in the photo.
Un-ply 6″ [15 cm] of Color 2. Using 1 ply of yarn, embroider glints in eyes with straight st.
Sew ends of Arms together at the top to form a hanging loop.
Rainbow (make 2)
With H, ch 2.
- 1st row: 3 sc in 2nd ch from hook. Break H. Join D. Turn. (3 sc)
- 2nd row: With D, ch 1. 2 sc in each sc to end of row. Break D. Join J. Turn. (6 sc)
- 3rd row: With J, ch 1. *1 sc in next sc. 2 sc in next sc. Rep from * to end of row. Break J. Join G. Turn. (9 sc)
- 4th row: With G, ch 1. *1 sc in each of next 2 sc. 2 sc in next sc. Rep from * to end of row. Break G. Join F. Turn. (12 sc)
- 5th row: With F, ch 1. 1 sc in each of next 3 sc. 2 sc in next sc. 1 sc in each of next 2 sc. Ch 10 for hanging loop. Sl st in same st as last sc. 1 sc in next sc. 2 sc in next sc. 1 sc in each of next 3 sc. 2 sc in last sc. (15 sc)
- Fasten off.
Clouds (make 2 for each Rainbow)
With A, ch 4.
- 1st rnd: 2 sc in 2nd ch from hook. 1 sc in next sc. 3 sc in next sc. Working into opposite side of foundation ch, 1 sc in each of last 2 ch. Join. (8 sc)
- 2nd rnd: Ch 1. 2 sc in each of next 2 sc. 1 sc in next sc. 2 sc in each of next 3 sc. 1 sc in next sc. 2 sc in last sc. Join. Fasten off.
Sew Clouds to bottom of Rainbow as shown in the photo.
Robot (make 1 of each version)
Version Color Assignments
- Version 1: Use F as Color 1, L as Color 2, and A as Color 3.
- Version 2: Use H as Color 1, G as Color 2, and A as Color 3.
Head (Color 1)
With Color 1, ch 5.
- 1st row: 1 sc in 2nd ch from hook. 1 sc in each ch to end of chain. Turn. (4 sc)
- 2nd row: Ch 1. 1 sc in each sc to end of row. Turn.
- 3rd row: Ch 1. 1 sc in each of next 2 sc. Ch 10 for hanging loop. Sl st in same st as last sc. 1 sc in each of last 2 sc. Fasten off.
Body (Color 1)
With Color 1, ch 7.
- 1st row: 1 sc in 2nd ch from hook. 1 sc in each ch to end of chain. Turn. (6 sc)
- 2nd to 5th rows: Ch 1. 1 sc in each sc to end of row. Turn.
- Fasten off.
Sew Head to Body as shown in the photo.
Arms and Legs (make 4 for each Robot)
With Color 2, ch 6.
- 1st row: (3 sc. Sl st) all in 2nd ch from hook. Fasten off.
Sew Arms and Legs to Body as shown in the photo.
Using Color 3, embroider eyes with straight st on Head as shown in the photo.
Flamingo (make 2)
With I, ch 4.
- 1st rnd: 2 sc in 2nd ch from hook. 1 sc in next sc. 3 sc in next sc. Working into opposite side of foundation ch, 1 sc in each of last 2 ch. Join. (8 sc)
- 2nd rnd: Ch 1. 2 sc in each of next 2 sc. 1 sc in next sc. 2 sc in each of next 3 sc. 1 sc in next sc. 2 sc in last sc. Join.
- 3rd rnd: Ch 1. (1 sc in next sc. 2 sc in next sc) twice. 1 sc in next sc. Ch 10 for hanging loop. Sl st in same st as last sc. 1 sc in next sc. 2 hdc in next sc. 1 dc in next sc. Ch 3. 2 sc in next sc. 1 sc in next sc. 2 sc in next sc. 1 sc in each of next 2 sc. 2 sc in last sc. Join.
Neck and Head
Next row: Skip first 2 sc. Sl st in each of next 3 sc. Ch 7. 5 hdc in 3rd ch from hook. 1 sc in each of the next 4 ch. Sl st in next sc of previous rnd. Fasten off.
Beak (With N)
With N, ch 2.
- 1st row: 1 sc in 2nd ch from hook. Break N. Join A. Turn.
- 2nd row: Ch 1. 1 sc in next sc. Turn.
- 3rd row: Ch 2. Sl st in next sc. Fasten off.
Wing (With I)
With I, ch 2.
- 1st rnd: (4 sc. 1 dc. Ch 3. 1 sc) all in 2nd ch from hook. Join. Fasten off.
Sew Wing to Body as shown in the photo.
Legs/Feet (With E)
Front Leg: With E, ch 7.
- 1st row: Sl st in 2nd ch from hook. Sl st in each ch to end of ch. Fasten off.
- Sew Front Leg to Body as shown in the photo.
Back Leg: With E, ch 9.
- 1st row: Sl st in 2nd ch from hook. Sl st in each of next 2 ch. Skip next ch. Sl st in each ch to end of ch. Fasten off.
- Sew Back Leg to Body and Front Leg as shown in the photo.
Using N, embroider eye with straight st on Head.
Llama (make 1 of each version)
Version Color Assignments
- Version 1: Use A as Color 1, E as Color 2, G as Color 3, and N as Color 4.
- Version 2: Use A as Color 1, D as Color 2, J as Color 3, and N as Color 4.
Body (Color 1)
With Color 1, ch 9.
- 1st row: 1 sc in 2nd ch from hook. 1 sc in each ch to end of chain. Turn. (8 sc)
- 2nd and 3rd rows: Ch 1. 1 sc in each sc to end of row. Turn.
- 4th row: Ch 1. Sc2tog. 1 sc in each sc to end of row. Turn. (7 sc)
Neck and Head
- 5th row: Ch 1. 1 sc in each of next 3 sc. Turn. (3 sc)
- 6th to 9th rows: Ch 1. 1 sc in each sc to end of row. Turn.
- 10th row: Ch 3. 1 sc in 2nd ch from hook. 1 sc in the next ch. Sl st in the next sc of previous row. Sl st in next sc. Ch 3. 1 sc in 2nd ch from hook. 1 sc in next ch. Sl st in last sc of previous row. Fasten off.
Legs (make 2) (Color 1)
With Color 1, ch 5.
- 1st row: 1 sc in 2nd ch from hook. 1 sc in each ch to end of ch. (4 sc)
- Fasten off.
Sew Legs to Body as shown in the photo.
Tail (Color 1)
With Color 1, ch 2.
- 1st row: 1 sc in 2nd ch from hook. Turn. (1 sc)
- 2nd row: Ch 1. 1 sc in next sc. Fasten off.
Sew Tail to Body as shown in the photo.
Blanket
With Color 2, ch 5.
- 1st row: 1 sc in 2nd ch from hook. 1 sc in each sc to end of ch. Break Color 2. Join Color 3. Turn. (4 sc)
- 2nd row: With Color 3, ch 1. 1 sc in each sc to end of row. Turn.
- 3rd row: Ch 1. 1 sc in each of next 2 sc. Ch 10 for hanging loop. Sl st in same st as last sc. 1 sc in each of last 2 sc. Fasten off.
Sew Blanket to Llama as shown in the photo.
Assembly and Finishing
- Sew 24 buttons evenly spaced around Wreath.
- Place Ornaments into Pockets on Wreath.
- Hang ornaments from buttons after daily “reveal.”
Practical Tips
- Practice Changing Colors: To ensure smooth transitions, practice changing colors on small swatches before starting. This will enhance your confidence when working on the final project.
- Use a Stitch Marker: When working in rounds, use a stitch marker to indicate the beginning of the round. This will help you keep track and maintain an even stitch count.
- Test Your Gauge: Always check your gauge before starting to ensure that your project’s size matches the pattern. Adjust your hook size if needed to get the desired measurements.
- Keep Ends Tidy: Weave in all ends as you go to keep your workspace clean and avoid confusion during assembly.
Troubleshooting
- Uneven Edges: If your rows or rounds look uneven, you may be pulling your yarn too tightly. Try relaxing your tension as you crochet and practice a consistent stitch.
- Incorrect Stitch Count: If you find your stitch count is lower than expected, double-check your work by counting stitches in each round before joining. It’s easier to adjust before moving onto the next round.
- Color Changes Not Seamless: When changing colors, if you notice a gap, try to let the old color overlap into the new color for one stitch to blend them more seamlessly.
Care
To keep your crochet advent calendar looking fresh and vibrant, consider these care guidelines:
- Spot Clean: If your calendar gets dirty, spot clean with a gentle detergent and a damp cloth.
- Avoid Heat: Keep it away from direct heat and sunlight, as this can cause fading.
- Store Properly: When not in use, store in a dry place and fold gently to preserve shape. Avoid hanging to prevent stretching.
Frequently Asked Questions
What is the finished size of the Advent Calendar?
The background of the Advent Calendar measures approximately 37″ [94 cm], making it a striking focal point for your holiday decor.
What skill level is required for this pattern?
This pattern is suited for intermediate crocheters familiar with various techniques, including single crochet, half double crochet, and basic embroidery.
Can I use a different yarn brand?
Yes, you can use different yarn brands, but be sure to match the weight and fiber content to maintain the same drape and size in the finished project.
How do I keep track of my stitches?
Using a stitch marker can help you keep track of your rows and rounds. Additionally, counting your stitches every few rows can help you catch errors early.
Can I add more pockets to the Advent Calendar?
Yes, you can customize the number of pockets by adjusting the instructions accordingly. Just ensure you have enough space on the background for all additions.
{image_template}